


12–8 • Appendix C. Diagnostics
Synergy 100 Installation Guide (v16.10-S100)
Switcher Calibration
The
Calibration Mode
allows you to calibrate all analog controls on the switcher panel, including the
fader, the positioner and all knobs. In addition, the user is able to set the brightness levels of all panel
button LEDs.
Use the following procedure to calibrate the switcher’s analog controls and adjust the brightness
levels of the LEDs:
1. Enter
Calibration Mode
by holding down the following three buttons at once:
•
ROTATE
•
SEL
in the
Mattes
Group
•
SEL
in the
System Control
Group
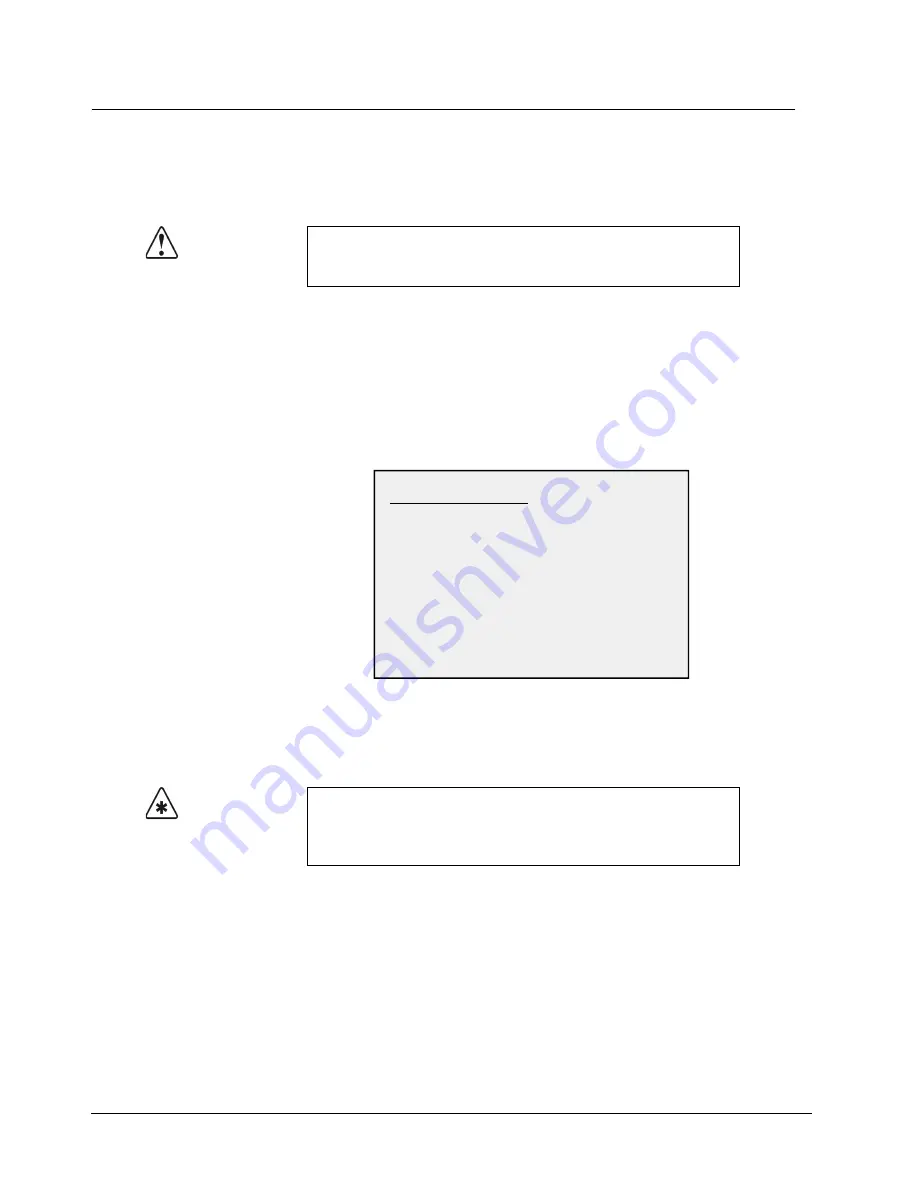
The
Panel Calibration Mode Menu
is displayed on the
Preview
monitor.
Panel Calibration Mode Menu
Using pattern buttons
0
through
8
inclusive in the
Effects Control
Group
, select the
button with the number that coincides with the desired option. The selected button will
light. Button #0, Knob/Fader/Positioner Calibration, is the default option.
2. Calibrate the fader as follows:
•
Press
0. Knob/Fader/Positioner Calibration
.
•
Move the fader
to its full upper and lower limit.
•
Repeat this procedure two or three times.
•
As you move the fader, you will see a series of numbers appear in the four-character
displays in the
Effects Control
and
System Control
groups.
•
Calibration is complete when the limit values in these four-character displays no
longer change.
Caution
Use the
Calibration Mode
with caution. Perform the calibration only
when you suspect that there has been “drift” in the knobs or the
joystick or that there is a “limit” problem with a fader.
Important
If you select option
0. Knob/Fader/Positioner Calibration
, you
must calibrate
all analog controls
on your switcher. Failure to do so
will map a false limit into switcher memory (for the control(s) that you
did not calibrate), thus preventing proper switcher operations.
Panel Calibration Mode
0. Knob/Fader/Positioner Calibration
2. Logo Brightness
3. Red Button LED Brightness
4. Orange Button LED Brightness
5. Green Button LED Brightness
6. Red Non-Button LED Brightness
7. Orange Non-Button LED Brightness
8. Green Non-Button LED Brightness
Press any button on lower panel to exit.
1. Overall LED Brightness Control
Содержание Synergy 100
Страница 1: ...Ross Video Limited Installation Guide Software Issue 16 10 S100...
Страница 10: ......
Страница 16: ...vi Contents Synergy 100 Installation Guide v16 10 S100...
Страница 66: ...2 32 Installation Synergy 100 Installation Guide v16 10 S100...
Страница 88: ...5 6 Using the Menu System Synergy 100 Installation Guide v16 10 S100...
Страница 100: ...6 12 BNC Configuration and Check Synergy 100 Installation Guide v16 10 S100...
Страница 134: ...7 34 Communication Setup Synergy 100 Installation Guide v16 10 S100...
Страница 170: ...8 36 Additional Installation Setups Synergy 100 Installation Guide v16 10 S100...
Страница 186: ...9 16 Completing Setup Synergy 100 Installation Guide v16 10 S100...
Страница 208: ...10 22 Appendix A Specifications Synergy 100 Installation Guide v16 10 S100...
Страница 216: ...11 8 Appendix B Hardware Options Synergy 100 Installation Guide v16 10 S100...
Страница 234: ...GL 4 Glossary of Terms Synergy 100 Installation Guide v16 10 S100...
Страница 246: ...IX 12 Index Synergy 100 Installation Guide v16 10 S100...