All materials can be saved in a Autodesk Navisworks “palette” (.nwp) file, which allows you to set up a palette
of materials once for a project and re-apply them to a model as it evolves, or to another model in the same project
that has been set up with the same layer names, colors, selection sets and/or properties.
See “
” on page 305 for more information.
To apply Presenter rules
1
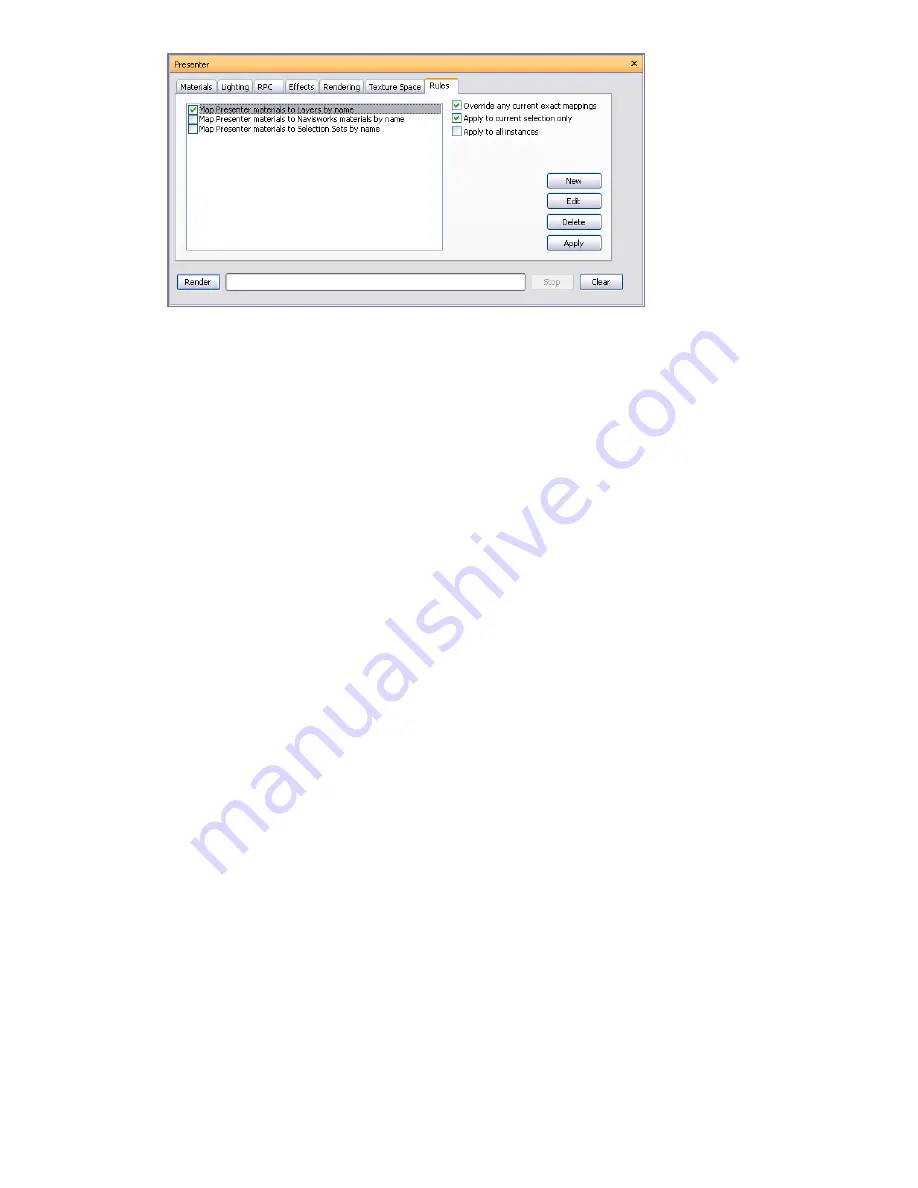
Open the Presenter window, and click the Rules tab.
2
Select the check boxes for all rules you want to apply. You can apply as many rules as you want, as all rules
depend on material names.
3
Use three check boxes on the right-hand side of the Presenter window, Rules tab, to control how the selected
rules applied to the scene:
Select the Override current mappings check box if you want to override any existing mappings from Presenter
materials to items in the selection tree.
Select the Apply to current selection check box if you want to apply this rule only to the currently selected
items in the scene. Be aware that this is the default setting, so if your rule seems not to have worked, check
that you don't have this option checked with nothing selected in the scene.
Select the Apply to all instances check box if you want to apply this rule to all instances of any
multiply-instanced item affected by the rule.
4
Click the Apply button.
Predefined Rules
You can apply as many rules at once, as all rules depend on material names. Rules can be defined using the
Autodesk Navisworks API, but three predefined rules are:
■
Layers by Name rule enables you to apply a material to named layers.
As an example, if a layer is called “Doors” and you rename a material to “Doors” (the spelling and case must
be exactly the same as the layer's name) then all layers named “Doors” will appear with the properties of that
material when you select the rule Layers by Name, and click the Apply button.
You can give multiple materials the name of different layers and apply this rule to all of the layers.
■
Autodesk Navisworks Materials by Name rule enables you to apply a material to named Autodesk Navisworks
materials. Autodesk Navisworks materials are not the same as Autodesk Navisworks Presenter materials -
Autodesk Navisworks materials merely refers to the color and transparency of the item as it comes through
from the original CAD file, whereas Presenter materials are those materials applied using the Presenter tool,
or are more complex materials such as bitmaps converted from the original CAD file.
If a Presenter material has the same name as a Autodesk Navisworks material in the model (for example,
"AutoCAD Color Index 7"), then all items with this original Autodesk Navisworks material name in the scene
receive this Presenter material from the palette when you select the rule Autodesk Navisworks Materials by
Name, and click Apply Rules.
330 | Chapter 14 Create Photorealistic Visualizations
Summary of Contents for 507B1-90A211-1301 - NavisWorks Manage 2010
Page 1: ...Autodesk Navisworks Manage 2010 User Guide March 2009 ...
Page 12: ...xii Contents ...
Page 14: ...2 Part 1 Welcome to Autodesk Navisworks Manage 2010 ...
Page 64: ...52 Chapter 3 Installation ...
Page 97: ...Get a Whole Project View 85 ...
Page 98: ...86 Part 2 Get a Whole Project View ...
Page 136: ...124 Chapter 5 Work with Files ...
Page 178: ...To toggle ViewCube Click View Head Up Display ViewCube 166 Chapter 6 Explore Your Model ...
Page 262: ...250 Chapter 9 Use Viewpoints and Sectioning Modes ...
Page 270: ...258 Chapter 11 Work Within a Team ...
Page 282: ...270 Chapter 12 Share Data ...
Page 346: ...334 Chapter 14 Create Photorealistic Visualizations ...
Page 460: ...448 Chapter 17 Autodesk Navisworks Reference ...
Page 466: ...454 Glossary ...


