


Chapter 4: Connecting External Equipment (Optional)
41
DX Sensor Packages
Most DX sensor packages contain terminals for connecting detectors or
actuators. For information on connecting actuators or detectors to DX
terminals, refer to the Environmental Sensors and Actuators Guide (or
Online Help) on Raritan website's
Support page
(
You can cascade up to 12 DX sensor packages.
When cascading DX, remember that the SRC only supports a maximum
of 32 sensors and/or actuators.
If there are more than 32 sensors and/or actuators connected, every
sensor and/or actuator after the 32nd one is NOT managed by the SRC.
For example, if you cascade 12 DX packages, and each package contains
3 functions (a function is a sensor or actuator), the SRC does NOT
manage the last 4 functions because the total 36 (12*3=36) exceeds 32 by
4.
Tip: To manage the last several sensors/actuators after 32nd function,
you can release some "managed" sensors or actuators, and then
manually bring the last several sensors/actuators into management. See
Peripherals
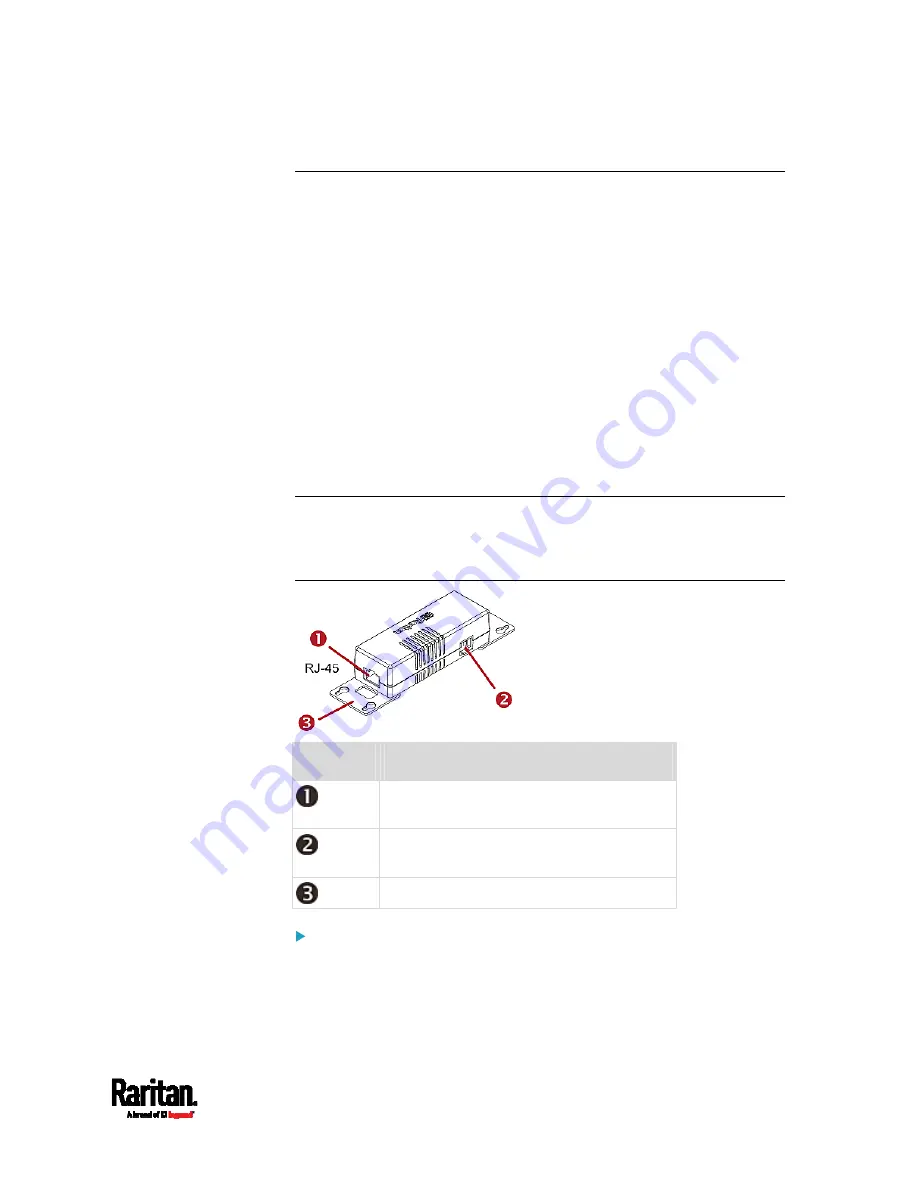
Numbers
Components
RJ-45 ports, each of which is located on
either end of a DX sensor package.
RJ-12 port, which is reserved for future
use and now blocked.
Removable rackmount brackets.
Connect DX to the SRC:
1.
Connect a standard network patch cable (CAT5e or higher) to either
RJ-45 port on a DX sensor package.
2.
If you want to cascade DX packages, get an additional standard
network patch cable (CAT5e or higher) and then:
Содержание Raritan SRC-0100
Страница 42: ...Chapter 3 Initial Installation and Configuration 30 Number Device role Master device Slave 1 Slave 2 Slave 3...
Страница 113: ...Chapter 6 Using the Web Interface 101 4 To return to the main menu and the Dashboard page click on the top left corner...
Страница 114: ...Chapter 6 Using the Web Interface 102...
Страница 128: ...Chapter 6 Using the Web Interface 116 Go to an individual sensor s or actuator s data setup page by clicking its name...
Страница 290: ...Chapter 6 Using the Web Interface 278 If wanted you can customize the subject and content of this email in this action...
Страница 291: ...Chapter 6 Using the Web Interface 279...
Страница 301: ...Chapter 6 Using the Web Interface 289 6 Click Create to finish the creation...
Страница 311: ...Chapter 6 Using the Web Interface 299...
Страница 312: ...Chapter 6 Using the Web Interface 300 Continued...
Страница 625: ...Appendix H RADIUS Configuration Illustration 613 Note If your SRC uses PAP then select PAP...
Страница 626: ...Appendix H RADIUS Configuration Illustration 614 10 Select Standard to the left of the dialog and then click Add...
Страница 627: ...Appendix H RADIUS Configuration Illustration 615 11 Select Filter Id from the list of attributes and click Add...
Страница 630: ...Appendix H RADIUS Configuration Illustration 618 14 The new attribute is added Click OK...
Страница 631: ...Appendix H RADIUS Configuration Illustration 619 15 Click Next to continue...
Страница 661: ...Appendix I Additional SRC Information 649...


