18. MR-J4W2-0303B6 SERVO AMPLIFIER
18 - 41
18.4.1 Startup procedure
When switching power on for the first time, follow this section to make a startup.
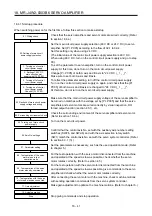
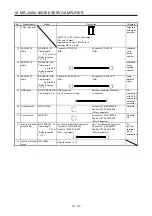
01. Wiring check
04. Surrounding environment check
06. Axis No. settings
07. Parameter setting
08. Test operation of the servo
motor alone in test
operation mode
09. Test operation of the servo
motor alone by commands
10. Test operation with the servo
motor and machine connected
11. Gain adjustment
12. Actual operation
Stop
02. Setting of main circuit
power supply selection
1. Turning on of control
circuit power supply
2. Setting of 24 V DC
main circuit power
supply with [Pr. PC05]
3. Turning off of control
circuit power supply
4. Turning on of control
circuit power supply
Check of [Pr. PC05]
03. Recheck of main circuit power
supply voltage and wiring
05. Turning on of main circuit
power supply
Check that the servo amplifiers and servo motors are wired correctly. (Refer
to section 18.4.4.)
Set the main circuit power supply selection (48 V DC or 24 V DC) to servo
amplifier. Set [Pr. PC05] according to the flow of 02-1 to 02-4.
Set this setting only when using 24 V DC.
(The initial value of the main circuit power supply selection is 48 V DC.
When using 48 V DC, turn on the control circuit power supply and go to step
03.)
To set the parameter to servo amplifier, turn on the control circuit power
supply. At this time, do not turn on the main circuit power supply.
Change [Pr. PC05] of both A axis and B axis to "24 V DC (_ 1 _ _)".
Make sure to set both A axis and B axis.
To reflect the parameter setting, turn off the control circuit power supply.
Turn on the control circuit power supply on again, and check that the [Pr.
PC05] of both A axis and B axis are changed to "24 V DC (_ 1 _ _)".
At this time, do not turn on the main circuit power supply.
Make sure that the main circuit power supply voltage of the servo amplifier to
be turned on matches with the voltage set by [Pr. PC05] and that the servo
amplifiers and servo motors are wired correctly by visual inspection, DO
forced output function (section 4.5.1), etc.
Check the surrounding environment of the servo amplifier and servo motor.
(Refer to section 18.4.4.)
Turn on the main circuit power.
Confirm that the control axis No. set with the auxiliary axis number setting
switches (SW2-5 and SW2-6) and with the axis selection rotary switch
(SW1) match the control axis No. set with the servo system controller. (Refer
to section 4.3.1 (3).)
Set the parameters as necessary, such as the used operation mode. (Refer
to chapter 5.)
For the test operation, with the servo motor disconnected from the machine
and operated at the speed as low as possible, check whether the servo
motor rotates correctly. (Refer to section 4.5.)
For the test operation with the servo motor disconnected from the machine
and operated at the speed as low as possible, give commands to the servo
amplifier and check whether the servo motor rotates correctly.
After connecting the servo motor with the machine, check machine motions
with sending operation commands from the servo system controller.
Make gain adjustment to optimize the machine motions. (Refer to chapter 6.)
Stop giving commands and stop operation.
Summary of Contents for MR-J4W2-0303B6
Page 39: ...2 INSTALLATION 2 8 MEMO ...
Page 97: ...4 STARTUP 4 20 MEMO ...
Page 181: ...6 NORMAL GAIN ADJUSTMENT 6 28 MEMO ...
Page 235: ...9 DIMENSIONS 9 6 MEMO ...
Page 245: ...10 CHARACTERISTICS 10 10 MEMO ...
Page 309: ...13 USING STO FUNCTION 13 14 MEMO ...
Page 365: ...15 USING A DIRECT DRIVE MOTOR 15 24 MEMO ...
Page 389: ...16 FULLY CLOSED LOOP SYSTEM 16 24 MEMO ...
Page 461: ...17 APPLICATION OF FUNCTIONS 17 72 MEMO ...
Page 556: ...APPENDIX App 41 ...
Page 585: ...MEMO ...


