


Specifications
Specifications
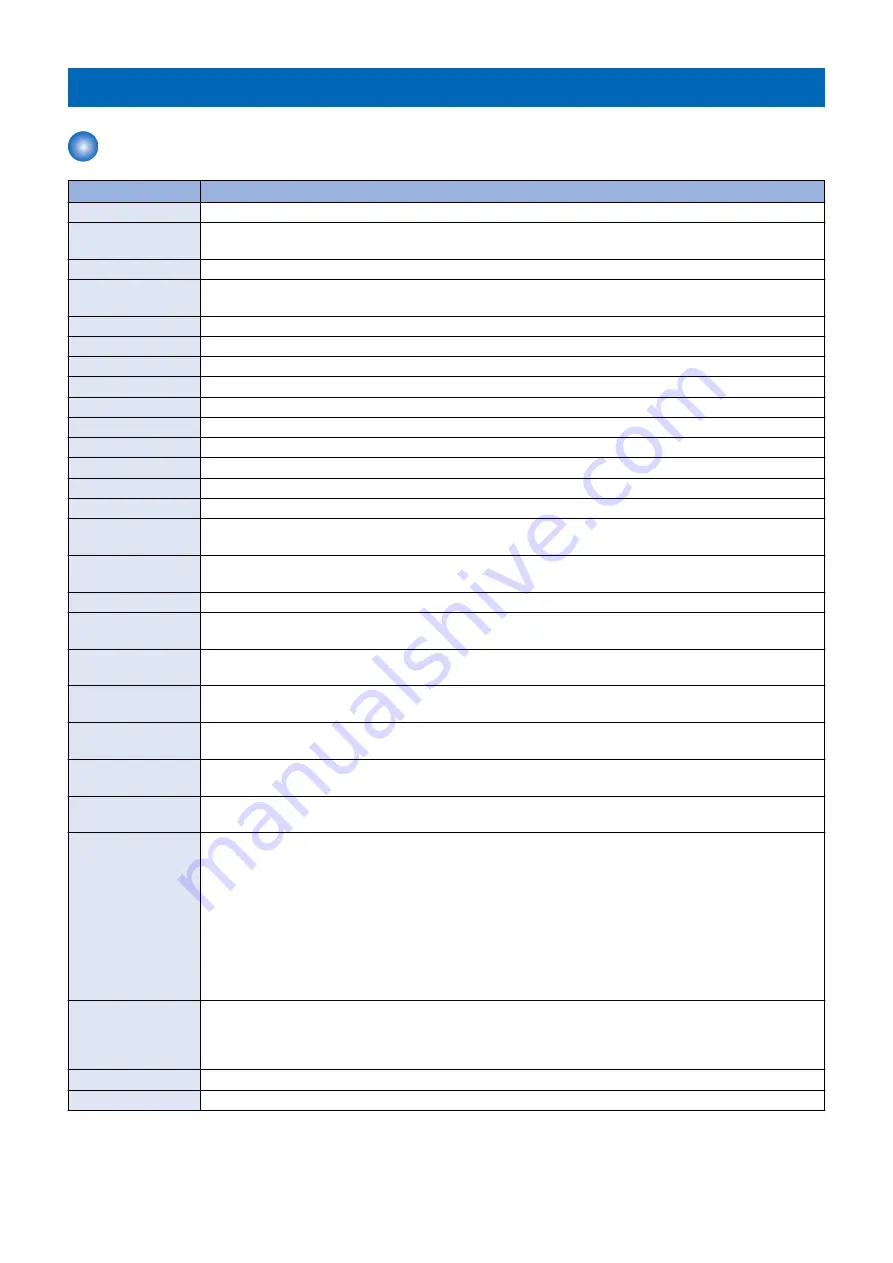
Item
Specification/Function
Copyboard
Original fixed reading
Machine installation
method
Desktop
Light source
White LED
Photosensitive medi-
um
OPC
Image reading sensor CMOS
Exposure method
Laser exposure
Charging method
DC Roller charging
Developing method
Dry, 2-component devel ACR method (ACR: Auto Carrier Refresh)
Transfer method
Intermediate Belt transfer
Separation method
Curvature sepa Static Eliminator
Pickup method
Simple retard roller method
Fixing method
On-demand fixing
Delivery method
Face-down
Magnification ratio
25 to 400% (in 1% increment)
Drum cleaning meth-
od
Cleaning Blade
Transfer cleaning
method
Cleaning Blade
Toner type
Non-magnetic negative toner
Toner supplying meth-
od
Toner Container method
Toner level detection
function
Yes
Leading edge image
margin
4.0 +1.5/-1.0 mm
Left & right edge im-
age margin
2.5 +/- 1.5 mm (2-side : 2.5 +/- 2.0 mm)
Leading edge non-im-
age width
4.0 +1.5/-1.0 mm
Left & right edge non-
image width
2.5 +/- 1.5 mm (2-side : 2.5 +/- 2.0 mm)
Warm-up time
*1
After Powering ON
Quick Startup 'OFF' :
• 34 sec. or less
Quick Startup 'ON' :
• 10 sec. or less
Time until the key operation of the Control Panel becomes possible: 7 seconds or less
* Quick startup may not occur depending on the usage conditions
Returning from the Sleep mode
10 sec. or less
First copy time
Full Color :
8.2 sec.
B/W :
5.9 sec.
Image gradations
256 gradations
Print resolution
1200 × 1200 dpi
1. Product Overview
17
Summary of Contents for imageRUNNER ADVANCE C3330 Series
Page 1: ...Revision 7 0 imageRUNNER ADVANCE C3330 C3325 C3320 Series Service Manual ...
Page 18: ...Product Overview 1 Product Lineup 7 Features 11 Specifications 17 Parts Name 26 ...
Page 518: ...Error Jam Alarm 7 Overview 507 Error Code 511 Jam Code 617 Alarm Code 624 ...
Page 1020: ...9 Installation 1008 ...
Page 1022: ...2 Perform steps 3 to 5 in each cassette 9 Installation 1010 ...
Page 1024: ...5 6 Checking the Contents Cassette Feeding Unit 1x 3x 2x 1x 9 Installation 1012 ...
Page 1027: ...3 4 NOTE The removed cover will be used in step 6 5 2x 2x 9 Installation 1015 ...
Page 1046: ...When the Kit Is Not Used 1 2 Close the Cassette 2 When the Kit Is Used 1 9 Installation 1034 ...
Page 1068: ... Removing the Covers 1 2x 2 1x 9 Installation 1056 ...
Page 1070: ...3 1x 1x 9 Installation 1058 ...
Page 1083: ...6 7 TP M4x8 2x 2x 9 Installation 1071 ...
Page 1084: ...When Installing the USB Keyboard 1 Cap Cover Wire Saddle 9 Installation 1072 ...
Page 1129: ...9 2x 10 2x 11 9 Installation 1117 ...
Page 1135: ...Remove the covers 1 ws 2x 2 1x 9 Installation 1123 ...
Page 1140: ...2 2x 3 Connect the power plug to the outlet 4 Turn ON the power switch 9 Installation 1128 ...
Page 1176: ... A 2x Installing the Covers 1 1x 2 2x 9 Installation 1164 ...
Page 1190: ...14 Install the Cable Guide to the HDD Frame 4 Hooks 1 Boss 9 Installation 1178 ...


