7
INSTALLATION REQUIREMENTS
Improper installation may damage this product. Please note the following during
initial installation and whenever the machine is moved.
1. The machine should be installed
near an accessible power outlet for
easy connection.
2. Be sure to connect the power cord
only to a power outlet that meets
the specified voltage and current
requirements. Also make certain
the outlet is properly grounded.
• For the power supply
requirements, see the name plate
in the lower left corner of the left
side of the machine.
Connect the machine to a power
outlet which is not used for other
electric appliances. If a lighting
fixture is connected to the same
outlet, the light may flicker.
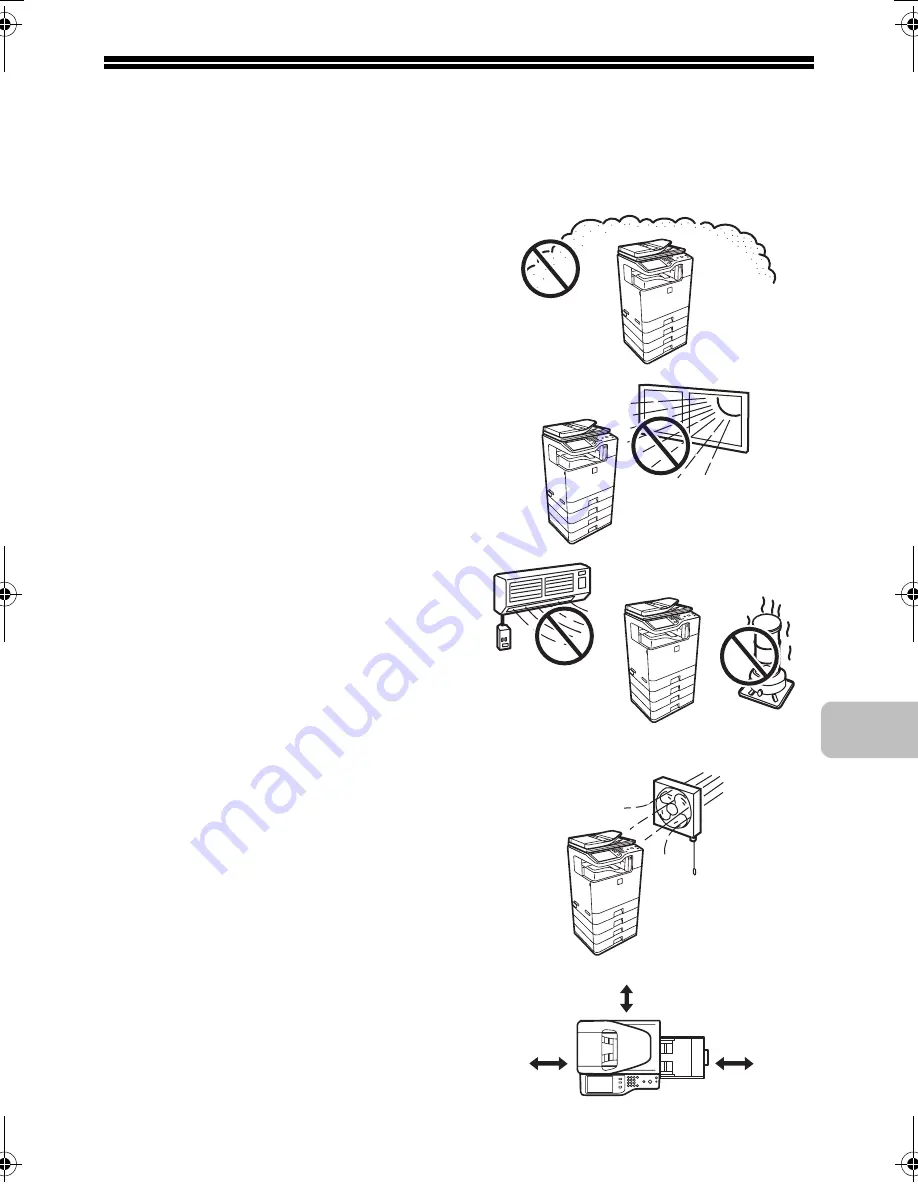
3. Do not install the machine in areas
that are:
• damp, humid, or very dusty
• exposed to direct sunlight
• subject to extreme temperature
or humidity changes, e.g., near
an air conditioner or heater
• poorly ventilated.
4. Be sure to allow the required space
around the machine for servicing
and proper ventilation.
5. The machine includes a built-in
hard drive. Do not subject the
machine to shock or vibration. In
particular, never move the machine
while the power is on.
17-23/32"
(45 cm)
11-13/16"
(30 cm)
11-13/16"
(30 cm)
mxb401_us_saf.book 7 ページ 2009年1月7日 水曜日 午後3時33分
Содержание MX-B401
Страница 4: ...Reduce copy mistakes Print one set of copies for proofing ...
Страница 6: ...Make a copy on this type of paper Envelopes and other special media Transparency film ...
Страница 8: ...Assemble output into a pamphlet Create a pamphlet Staple output Create a blank margin for punching ...
Страница 11: ...Conserve Print on both sides of the paper Print multiple pages on one side of the paper ...
Страница 34: ...Search for a file abc Search for a file using a keyword Search by checking the contents of files ...
Страница 35: ...Organize my files Delete a file Delete all files Periodically delete files Change the folder ...
Страница 203: ...3 18 PRINTER Contents 4 Click the Print button Printing begins ...
Страница 209: ...3 24 PRINTER Contents 1 Select Printer Features 2 Select Advanced 3 Select the Print Mode Macintosh 1 2 3 ...
Страница 770: ...11 REPLACING SUPPLIES AND MAINTENANCE 1 Open the front cover 2 Pull the toner cartridge toward you ...
Страница 772: ...13 REPLACING SUPPLIES AND MAINTENANCE 5 Insert the new toner cartridge horizontally and push it firmly in ...
Страница 835: ......
Страница 836: ......


