5-44
SCANNER/INTERNET FAX
Contents
2
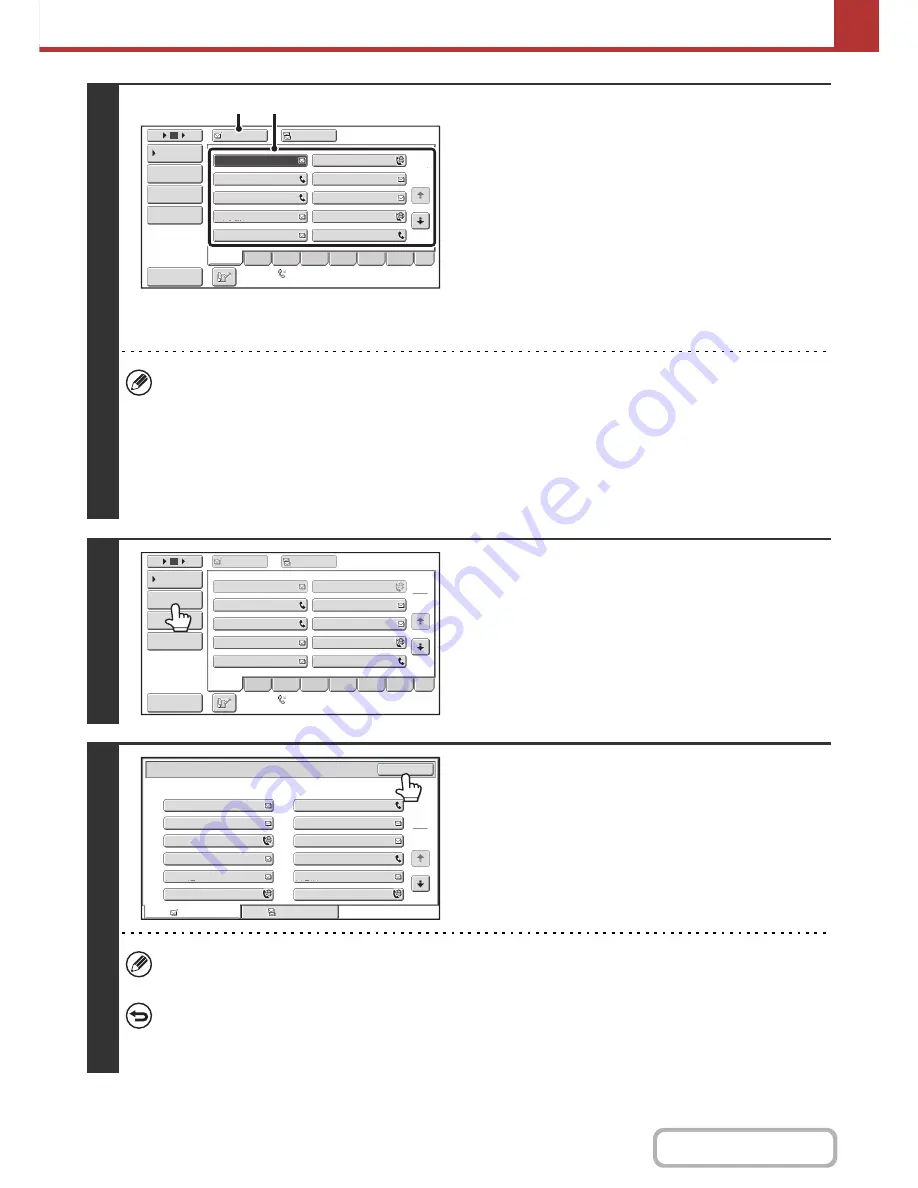
Specify the destination.
(1) Touch the [Address Book] key in the base
screen.
For the [Address Book] key, see "
BASE SCREEN
" (page
5-9).
(2) Touch the one-touch key of the desired
destination.
(3) Touch the [To] key.
The destination is specified.
(4) Repeat steps (2) and (3) until all
destinations are selected.
• To add Cc or Bcc recipients, select a recipient and touch the [Cc] key or the [Bcc] key.
• If "Must Input Next Address Key at Broadcast Setting" is enabled in the system settings (administrator), touch the
[Next Address] key before specifying the next destination.
• One-touch keys that cannot be used for broadcast transmission are grayed out to prevent selection.
• If a Scan to FTP (Hyperlink) address is specified in a broadcast transmission, hyperlink e-mail transmission will not
take place.
• If you frequently use broadcasting to send images to the same group of destinations, it is convenient to store those
destinations in a group key.
3
Touch the [Address Review] key.
4
Check the destinations and then touch
the [OK] key.
If the transmission includes Cc or Bcc destinations, touch the [Cc] tab or the [Bcc] tab to check those destinations.
To cancel a specified destination...
Touch the one-touch key of the destination that you wish to cancel. A message will appear to confirm the deletion.
Touch the [Yes] key.
☞
CHECKING AND DELETING THE SELECTED DESTINATIONS
(page 5-19)
AAA AAA
To
Cc
III III
GGG GGG
EEE EEE
CCC CCC
HHH HHH
FFF FFF
DDD DDD
BBB BBB
1
2
5
15
10
Global
Address Search
Address Entry
Sort Address
Address Re
v
iew
Condition
Settings
JJJ JJJ
ABCD
Fre
q
.
EFGH
IJKL
MNOP
QRSTU
VWXYZ
etc.
Auto Reception
Fax Memory
:
100
%
(3)
(2)
AAA
AAA
BBB
BBB
To
Cc
1
2
5
15
10
Global
Address
Search
Address
Entry
Sort
Address
Address
Re
v
iew
Condition
Settings
III
III
GGG
GGG
EEE
EEE
CCC
CCC
JJJ
JJJ
HHH
HHH
DDD
DDD
FFF
FFF
ABCD
Fre
q
.
EFGH
IJKL
MNOP
QRSTU
VWXYZ
etc.
Auto
Reception
Fax
Memory
:
100
%
To
001
003
005
007
009
011
002
004
006
008
010
012
Cc
1
2
Address Re
v
iew
OK
AAA AAA
KKK KKK
MMM MMM
OOO OOO
QQQ QQQ
SSS SSS
BBB BBB
LLL LLL
NNN NNN
PPP PPP
RRR RRR
TTT TTT
Содержание MX-B401
Страница 4: ...Reduce copy mistakes Print one set of copies for proofing ...
Страница 6: ...Make a copy on this type of paper Envelopes and other special media Transparency film ...
Страница 8: ...Assemble output into a pamphlet Create a pamphlet Staple output Create a blank margin for punching ...
Страница 11: ...Conserve Print on both sides of the paper Print multiple pages on one side of the paper ...
Страница 34: ...Search for a file abc Search for a file using a keyword Search by checking the contents of files ...
Страница 35: ...Organize my files Delete a file Delete all files Periodically delete files Change the folder ...
Страница 203: ...3 18 PRINTER Contents 4 Click the Print button Printing begins ...
Страница 209: ...3 24 PRINTER Contents 1 Select Printer Features 2 Select Advanced 3 Select the Print Mode Macintosh 1 2 3 ...
Страница 770: ...11 REPLACING SUPPLIES AND MAINTENANCE 1 Open the front cover 2 Pull the toner cartridge toward you ...
Страница 772: ...13 REPLACING SUPPLIES AND MAINTENANCE 5 Insert the new toner cartridge horizontally and push it firmly in ...
Страница 835: ......
Страница 836: ......


