5-111
SCANNER/INTERNET FAX
Contents
METADATA FIELDS
The following three types of metadata are included in the XML file that is transmitted.
• Data automatically generated by the machine: This data is always included in the XML file and is automatically stored
on your computer.
• Previously defined fields:
These fields are automatically recognized by the machine and
assigned to appropriate XML tags. These fields are selectable, and
can only be included in the XML file if enabled in the Web pages.
• User defined fields:
Custom fields can be added to the XML file. These fields are selectable
and can be defined in the Web pages.
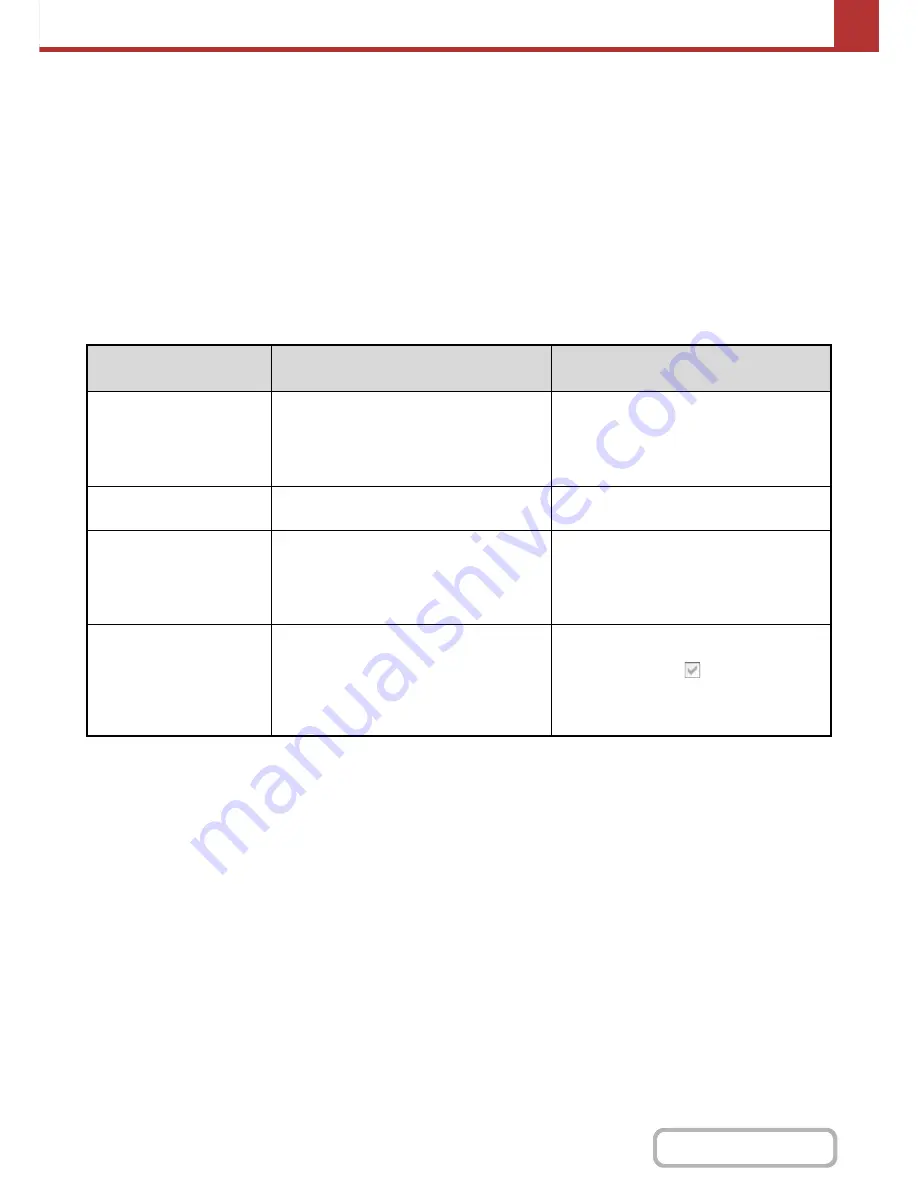
If a defined metadata field is one of the following fields, a message will appear informing you that the field cannot be
entered. Enter appropriate information in the related items of the send settings.
Name entered in
metadata field
Description
Where entered
fromName
Name of the user who sent the job. If the
name is not entered as metadata, the sender
name determined by the usual rules for
determining the sender name will be applied
as metadata.
[Reply-To]
(Sender name of selected sender)
replyTo
E-mail address to which the transmission
result will be sent.
[Reply-To]
(E-mail address of selected sender)
documentSubject
Job name appearing in the e-mail "Subject"
line, or job name on the fax cover sheet.
When the user enters a [Subject] in the send
settings screen in the touch panel, the
entered value is applied as metadata.
[Subject]
(Blank until a value is set in the send settings
screen.)
fileName
Enter the file name of the image to be sent.
[File Name]
(Only when the [Allow Custom Filenames]
checkbox is selected
in the metadata
settings screen in the Web pages.)
(Blank until a value is set in the send settings
screen.)
Содержание MX-B401
Страница 4: ...Reduce copy mistakes Print one set of copies for proofing ...
Страница 6: ...Make a copy on this type of paper Envelopes and other special media Transparency film ...
Страница 8: ...Assemble output into a pamphlet Create a pamphlet Staple output Create a blank margin for punching ...
Страница 11: ...Conserve Print on both sides of the paper Print multiple pages on one side of the paper ...
Страница 34: ...Search for a file abc Search for a file using a keyword Search by checking the contents of files ...
Страница 35: ...Organize my files Delete a file Delete all files Periodically delete files Change the folder ...
Страница 203: ...3 18 PRINTER Contents 4 Click the Print button Printing begins ...
Страница 209: ...3 24 PRINTER Contents 1 Select Printer Features 2 Select Advanced 3 Select the Print Mode Macintosh 1 2 3 ...
Страница 770: ...11 REPLACING SUPPLIES AND MAINTENANCE 1 Open the front cover 2 Pull the toner cartridge toward you ...
Страница 772: ...13 REPLACING SUPPLIES AND MAINTENANCE 5 Insert the new toner cartridge horizontally and push it firmly in ...
Страница 835: ......
Страница 836: ......


