1-12
BEFORE USING THE MACHINE
Contents
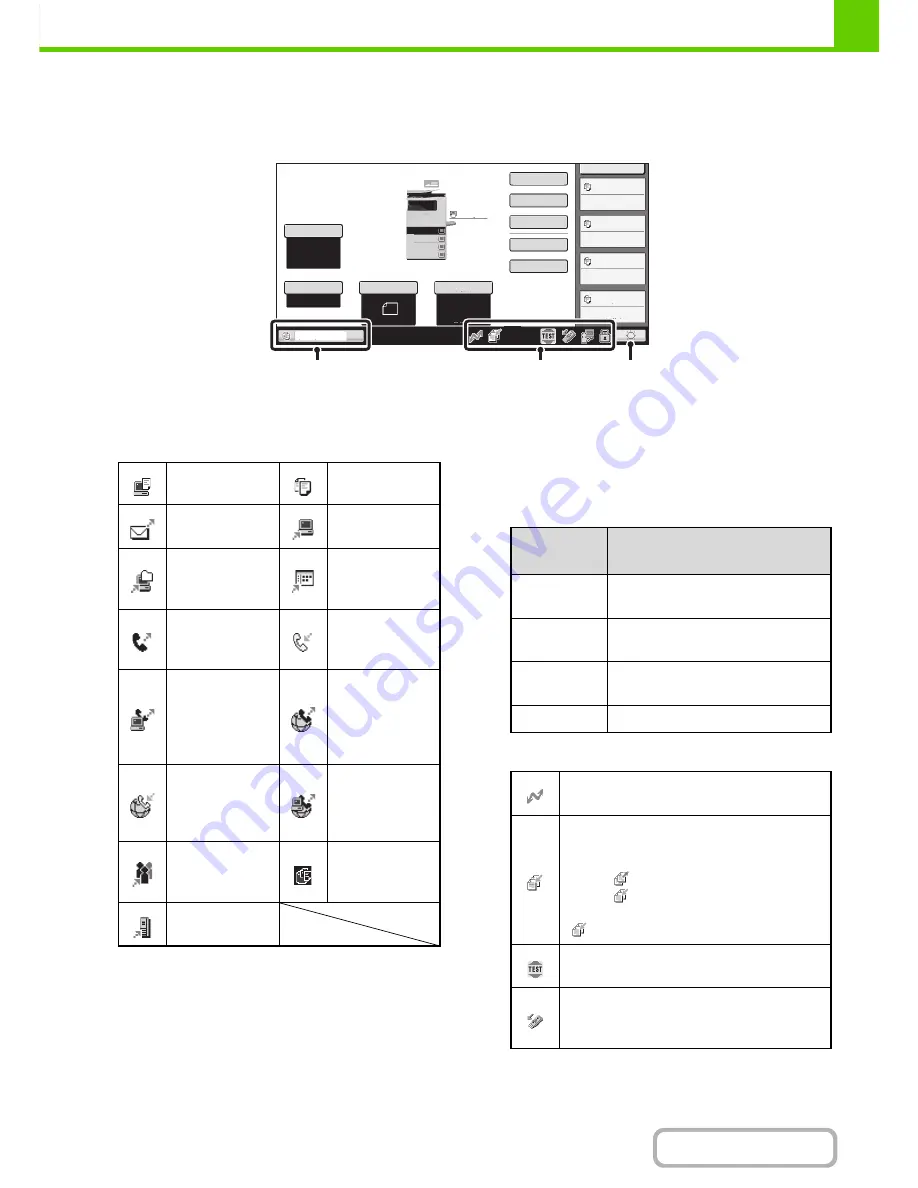
SYSTEM BAR
The system bar appears at the bottom of the touch panel.
The items that appear in the system bar are explained below.
(1)
Job status display
The jobs in progress or reserved are indicated by icons.
The icons are as follows.
* This appears in a multi-mode broadcast job.
When a base screen other than that of image send mode
appears, the number of the tray being used to feed paper
appears during paper feeding. The color appearing in the
job status display depends on the job status as indicated
in the table below.
The job status display can be touched to show the job
status screen.
(2)
Icon display
MFP Status
020/015
Copying
020/015
Waiting
020/015
Waiting
020/015
Waiting
Auto
8
½
x11
Plain
Special Modes
2
-
Sided Copy
Output
File
Quick File
Original
Paper Select
Exposure
Auto
Copy Ratio
Tray1
100
%
2.
3.
4.
1.
5 x8
8 x14
8 x11
8 x11
1
/
2
1
/
2
1
/
2
1
/
2
1
/
2
8 x11
Plain
1
/
2
(1)
(2)
(3)
Print job
Copy job
Scan to E-mail
job
Scan to FTP job
Scan to
Network Folder
job
Scan to
Desktop job
Fax
transmission
job
Fax reception
job
PC-Fax
transmission
job
Internet fax
transmission
job
(Including
Direct SMTP)
Internet Fax
reception job
(Including
Direct SMTP)
PC-I-Fax
transmission
job
Broadcast job*
Inbound routing
job
Scan to HDD
file print job
Metadata send
job
Job status
display
Machine Configuration
Green
A print, scan or other job is being
executed normally.
Yellow
The machine is warming up or on
standby, or a job is being canceled.
Red
A paper misfeed or other error
condition has occurred.
Gray
The machine has no jobs.
This icon appears when data is being sent or
received.
This icon appears when fax, scan, or
Internet fax data is stored in the machine's
memory. When data to be transmitted is
stored,
appears. When received data is
stored,
appears. When both data to be
transmitted and received data are stored,
appears.
This icon appears when a service technician
has activated simulation mode.
This icon appears when a USB memory or
other USB device is connected to the
machine.
Содержание MX-B401
Страница 4: ...Reduce copy mistakes Print one set of copies for proofing ...
Страница 6: ...Make a copy on this type of paper Envelopes and other special media Transparency film ...
Страница 8: ...Assemble output into a pamphlet Create a pamphlet Staple output Create a blank margin for punching ...
Страница 11: ...Conserve Print on both sides of the paper Print multiple pages on one side of the paper ...
Страница 34: ...Search for a file abc Search for a file using a keyword Search by checking the contents of files ...
Страница 35: ...Organize my files Delete a file Delete all files Periodically delete files Change the folder ...
Страница 203: ...3 18 PRINTER Contents 4 Click the Print button Printing begins ...
Страница 209: ...3 24 PRINTER Contents 1 Select Printer Features 2 Select Advanced 3 Select the Print Mode Macintosh 1 2 3 ...
Страница 770: ...11 REPLACING SUPPLIES AND MAINTENANCE 1 Open the front cover 2 Pull the toner cartridge toward you ...
Страница 772: ...13 REPLACING SUPPLIES AND MAINTENANCE 5 Insert the new toner cartridge horizontally and push it firmly in ...
Страница 835: ......
Страница 836: ......


