3-9
PRINTER
Contents
2
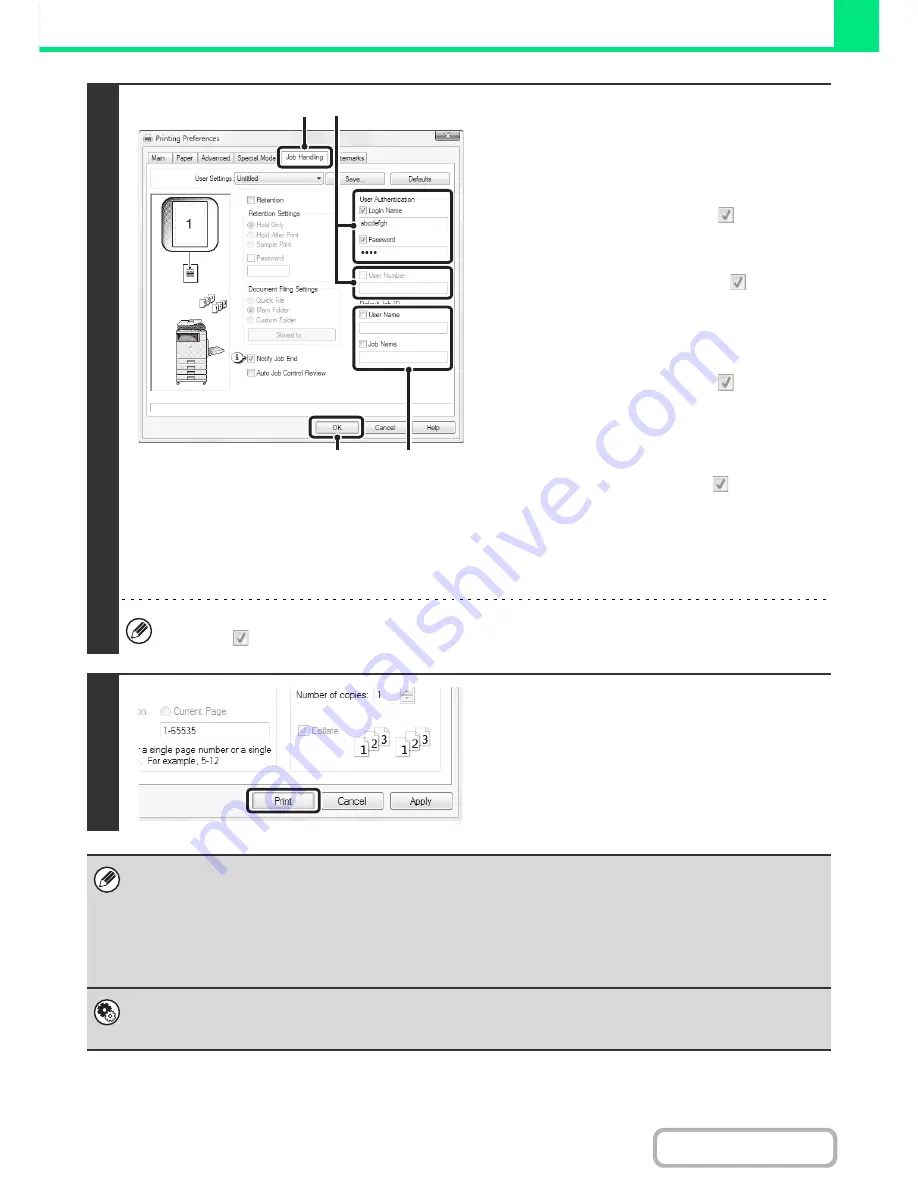
Enter your login name and password.
(1) Click the [Job Handling] tab.
(2) Enter your user information.
•
When authentication is by login name/password
Select the [Login Name] and [Password]
checkboxes so that checkmarks
appear, and
enter your login name and password. Enter 1 to 32
characters for the password.
•
When authentication is by user number
Click the [User Number] checkbox
and enter a
user number (5 to 8 digits).
(3) Enter the user name and job name as
necessary.
•
User Name
Click the [User Name] checkbox
and enter your
user name (maximum of 32 characters). Your
entered user name will appear at the top of the
operation panel. If you do not enter a user name,
your computer login name will appear.
•
Job Name
Click the [Job Name] checkbox
and enter a job
name (maximum of 30 characters). The entered job
name will appear at the top of the operation panel
as a file name. If you do not enter a job name, the
file name set in the software application will appear.
(4) Click the [OK] button.
To have a confirmation window appear before printing starts, select the [Auto Job Control Review] checkbox so that a
checkmark
appears.
3
Start printing.
• Even when user authentication is enabled in the system settings (administrator), normally printing is possible without
entering user information. The number of pages printed is added to the "Other User" count. In this case, other print
functions may be restricted. For more information, ask your administrator.
• The machine's user authentication function cannot be used when the PPD file* is installed and the Windows standard PS
printer driver is used. For this reason, printing will not be possible if printing by invalid users is prohibited in the system
settings (administrator).
* The PPD file enables the machine to print using the standard PS printer driver of the operating system.
System Settings (Administrator): Disabling of Printing by Invalid User
This is used to prohibit printing of print jobs by users whose user information is not stored in the machine. When this function
is enabled, printing is not allowed when user information is not entered or incorrect information is entered.
(4)
(1)
(2)
(3)
Содержание MX-B401
Страница 4: ...Reduce copy mistakes Print one set of copies for proofing ...
Страница 6: ...Make a copy on this type of paper Envelopes and other special media Transparency film ...
Страница 8: ...Assemble output into a pamphlet Create a pamphlet Staple output Create a blank margin for punching ...
Страница 11: ...Conserve Print on both sides of the paper Print multiple pages on one side of the paper ...
Страница 34: ...Search for a file abc Search for a file using a keyword Search by checking the contents of files ...
Страница 35: ...Organize my files Delete a file Delete all files Periodically delete files Change the folder ...
Страница 203: ...3 18 PRINTER Contents 4 Click the Print button Printing begins ...
Страница 209: ...3 24 PRINTER Contents 1 Select Printer Features 2 Select Advanced 3 Select the Print Mode Macintosh 1 2 3 ...
Страница 770: ...11 REPLACING SUPPLIES AND MAINTENANCE 1 Open the front cover 2 Pull the toner cartridge toward you ...
Страница 772: ...13 REPLACING SUPPLIES AND MAINTENANCE 5 Insert the new toner cartridge horizontally and push it firmly in ...
Страница 835: ......
Страница 836: ......


