


14 - 60
Chapter 14 Common Functions
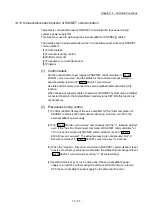
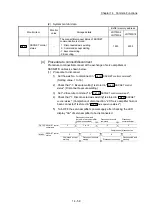
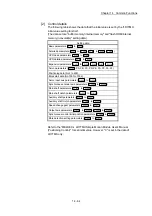
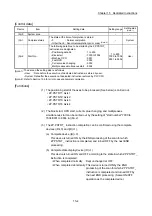
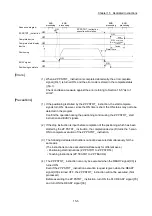
(2) Procedure to connect
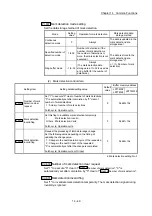
1) Turn ON the servo amplifier's power supply.
2) Set "-10: Connect command of SSCNET communication" in "
Cd.102
SSCNET control command
".
3) Check that "-1: Execute waiting" is set in "
Md.53
SSCNET control status
".
(Connect execute waiting)
4) Set "-2: Execute command" in "
Cd.102
SSCNET control command
".
5) Check that "0: Command accept waiting" is set in "
Md.53
SSCNET
control status
". (Completion of connection)
6) Resume operation of servo amplifier after checking "0: Standby" in
"
Md.26
Axis operation status
" of the connected axis.
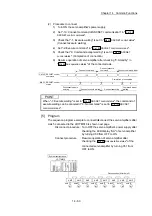
1
-1
-2
0
-10
-2
0
0
Connect command
Connect execute waiting
Connect execute
command
Connect executing
Connect command clear
Completion of connection
Command accept
waiting
Disconnected axis
existing
SSCNET control
command
Cd.102
SSCNET control
status
Md.53
POINT
When "-1: Execute waiting" is set in "
Md.53
SSCNET control status
", the command of
execute waiting can be canceled if "0: No command" is set in "
Cd.102
SSCNET
control command
".
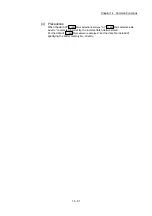
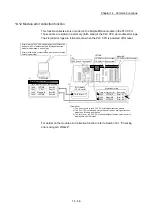
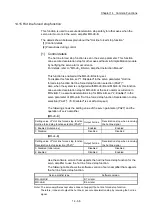
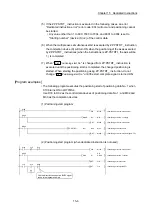
[5] Program
The sequence program example to connect/disconnect the servo amplifiers after
Axis 5 connected to the LD77MS16 is shown next page.
Disconnect procedure : Turn OFF the servo amplifier's power supply after
checking the LED display "AA" of servo amplifier
by turning X50 from OFF to ON.
Connect procedure
: Resume operation of servo amplifier after
checking the "
Md.26
Axis operation status
" of the
connected servo amplifier by turning X51 from
OFF to ON.
System configuration
LD77MS16
M
AMP
M
AMP
M
AMP
M
AMP
Disconnection (After Axis 5)
M
AMP
M
AMP
M
AMP
M
Axis 1
Axis 2
Axis 3
Axis 4
Axis 5
Axis 6
Axis 7
Axis 8
AMP
Содержание MELSEC-L Series
Страница 1: ...MELSEC L LD77MS Simple Motion Module User s Manual Positioning Control LD77MS2 LD77MS4 LD77MS16 ...
Страница 2: ......
Страница 30: ...MEMO ...
Страница 70: ...2 10 Chapter 2 System Configuration MEMO ...
Страница 83: ...3 13 Chapter 3 Specifications and Functions MEMO ...
Страница 103: ...3 33 Chapter 3 Specifications and Functions MEMO ...
Страница 107: ...3 37 Chapter 3 Specifications and Functions MEMO ...
Страница 111: ...3 41 Chapter 3 Specifications and Functions MEMO ...
Страница 115: ...3 45 Chapter 3 Specifications and Functions MEMO ...
Страница 140: ...4 22 Chapter 4 Installation Wiring and Maintenance of the Product MEMO ...
Страница 253: ...5 113 Chapter 5 Data Used for Positioning Control MEMO ...
Страница 342: ...5 202 Chapter 5 Data Used for Positioning Control MEMO ...
Страница 438: ...7 20 Chapter 7 Memory Configuration and Data Process MEMO ...
Страница 440: ...MEMO ...
Страница 485: ...9 25 Chapter 9 Major Positioning Control MEMO ...
Страница 594: ...9 134 Chapter 9 Major Positioning Control MEMO ...
Страница 624: ...10 30 Chapter 10 High Level Positioning Control MEMO ...
Страница 656: ...11 32 Chapter 11 Manual Control MEMO ...
Страница 690: ...12 34 Chapter 12 Expansion Control MEMO ...
Страница 798: ...13 108 Chapter 13 Control Sub Functions MEMO ...
Страница 866: ...14 68 Chapter 14 Common Functions MEMO ...
Страница 884: ...15 18 Chapter 15 Dedicated Instructions MEMO ...
Страница 899: ...16 15 Chapter 16 Troubleshooting MEMO ...
Страница 1036: ...Appendix 88 Appendices MEMO ...
Страница 1039: ......


