DREAMWEAVER CS3
User Guide
318
See also
“Verify tags and braces are balanced” on page 327
“Coding toolbar overview” on page 20
“Display toolbars” on page 27
Insert code with the Insert bar
1
Position the insertion point in the code.
2
Select an appropriate category in the Insert bar.
3
Click a button in the Insert bar or select an item from a pop-up menu in the Insert bar.
When you click an icon, the code may appear in your page immediately, or a dialog box may appear requesting more
information to complete the code.
To find out what each button does, position the pointer over it until a tooltip appears. The number and type of
buttons available in the Insert bar varies depending on the current document type. It also depends on whether you’re
using Code view or Design view.
Although the Insert bar provides a collection of frequently used tags, it is not comprehensive. To choose from a more
comprehensive selection of tags, use the Tag Chooser.
See also
“Insert bar overview” on page 19
Insert tags with the Tag Chooser
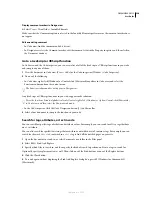
Use the Tag Chooser to insert in your page any tag in the Dreamweaver tag libraries (which include ColdFusion and
ASP.NET tag libraries).
1
Position the insertion point in the code, right-click (Windows) or Control-click (Macintosh), and select Insert Tag.
The Tag Chooser appears. The left pane contains a list of supported tag libraries, and the right pane shows the
individual tags in the selected tag library folder.
2
Select a category of tags from the tag library, or expand the category and select a subcategory.
3
Select a tag from the right pane.
4
To view syntax and usage information for the tag in the Tag Chooser, click the Tag Info button. If available, infor-
mation about the tag appears.
5
To view the same information about the tag in the Reference panel, click the <?> icon. If available, information
about the tag appears.
6
To insert the selected tag into your code, click Insert.
If the tag appears in the right pane with angle brackets (for example,
<title></title>
), it doesn’t require additional
information, and it’s immediately inserted into the document at the insertion point.
If the tag does require additional information, a tag editor appears.
7
If a tag editor opens, enter the additional information, and click OK.
8
Click the Close button.
September 4, 2007

