Chapter 33: Time, Tempo, Meter, Key, and Chords
701
Changing Key Signatures
You can add, edit, or delete key signatures.
To add a key signature:
1
Place the cursor in the Timeline where you
want to add a key signature.
2
Do one of the following:
•
Choose Event > Add Key Change
.
– or –
• Click the Plus (+) button in the Key Signa-
ture ruler.
3
In the Key Change dialog, select the mode
(major or minor), the key, its location and range,
and how you want it to affect pitched tracks.
4
Click
OK
.
To edit a key signature:
1
Double-click the Key Signature marker in the
Key Signature ruler.
2
Make changes in the Key Change dialog.
3
Click
OK
.
To delete a key signature, do one of the following:
Alt-click (Windows) or Option-click (Mac) the
Key Signature marker in the Key Signature ruler.
– or –
Make a selection in the Key Signature ruler
that includes the key signature you want to de-
lete and choose
Edit > Clear
or press Delete.
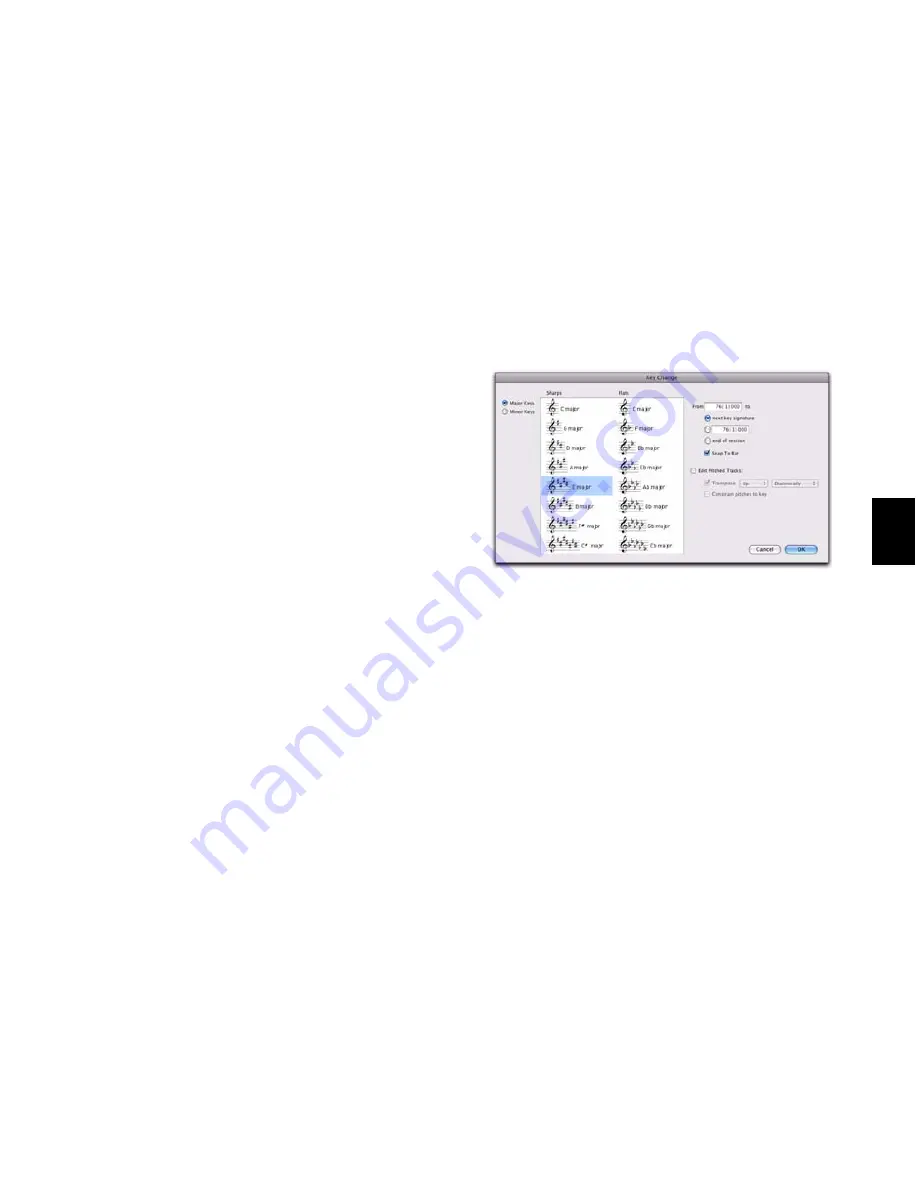
Key Change Dialog
The Key Change dialog lets you specify the
mode (major or minor), the key (from seven
flats to seven sharps), the range affected (for ex-
ample, from Bar 1 to the next key change), and
whether or not MIDI notes on pitched tracks are
transposed or constrained to key (see “Pitched
Tracks” on page 702). The Key Change dialog
opens whenever you add or edit a Key Signature
marker.
Major Keys
Displays the major keys from seven
flats to seven sharps.
Minor Keys
Displays the minor keys from seven
flats to seven sharps. Pro Tools only applies the
natural minor mode.
Sharps
Lets you select any of the sharp keys to
seven sharps and C major (or A minor).
Flats
Lets you select any of the flat keys to seven
flats and C major (or A minor).
From
Lets you specify where to place the Key Sig-
nature marker in Bars|Beats.
To
Lets you specify to where you want the key
change to take effect: to the next Key Signature
marker, to a selection, or to the end of the ses-
sion.
Snap to Bar
Snaps the Key Signature marker to
the barline.
Key Change dialog
Summary of Contents for Digidesign Pro Tools 8.0
Page 1: ...Reference Guide Pro Tools 8 0 ...
Page 18: ...Pro Tools Reference Guide xviii ...
Page 19: ...1 Part I Introduction ...
Page 20: ...2 ...
Page 24: ...Pro Tools Reference Guide 6 ...
Page 40: ...Pro Tools Reference Guide 22 ...
Page 45: ...27 Part II System Configuration ...
Page 46: ...28 ...
Page 58: ...Pro Tools Reference Guide 40 ...
Page 76: ...Pro Tools Reference Guide 58 ...
Page 118: ...Pro Tools Reference Guide 100 ...
Page 127: ...109 Part III Sessions Tracks ...
Page 128: ...110 ...
Page 144: ...Pro Tools Reference Guide 126 ...
Page 170: ...Pro Tools Reference Guide 152 ...
Page 228: ...Pro Tools Reference Guide 210 ...
Page 292: ...Pro Tools Reference Guide 274 ...
Page 343: ...325 Part IV Playback and Recording ...
Page 344: ...326 ...
Page 386: ...Pro Tools Reference Guide 368 ...
Page 442: ...Pro Tools Reference Guide 424 ...
Page 443: ...425 Part V Editing ...
Page 444: ...426 ...
Page 490: ...Pro Tools Reference Guide 472 ...
Page 528: ...Pro Tools Reference Guide 510 ...
Page 566: ...Pro Tools Reference Guide 548 ...
Page 590: ...Pro Tools Reference Guide 572 ...
Page 591: ...573 Part VI MIDI ...
Page 592: ...574 ...
Page 648: ...Pro Tools Reference Guide 630 ...
Page 670: ...Pro Tools Reference Guide 652 ...
Page 679: ...661 Part VII Arranging ...
Page 680: ...662 ...
Page 756: ...Pro Tools Reference Guide 738 ...
Page 769: ...751 Part VIII Processing ...
Page 770: ...752 ...
Page 780: ...Pro Tools Reference Guide 762 ...
Page 786: ...Pro Tools Reference Guide 768 Figure 3 Quantized audio events Warp markers in Warp view ...
Page 814: ...Pro Tools Reference Guide 796 ...
Page 842: ...Pro Tools Reference Guide 824 ...
Page 843: ...825 Part IX Mixing ...
Page 844: ...826 ...
Page 976: ...Pro Tools Reference Guide 958 ...
Page 991: ...973 Part X Surround ...
Page 992: ...974 ...
Page 1000: ...Pro Tools Reference Guide 982 ...
Page 1025: ...1007 Part XI Sync and Video ...
Page 1026: ...1008 ...
Page 1080: ...Pro Tools Reference Guide 1062 ...
Page 1111: ......


