2
1
Bef
or
e U
se
Installation environment
WARNING
Do not use the equipment near a place where water is used such as a bath tub,
washing stand, sink, washing machine, or swimming pool; in a humid basement, or
in a dusty place. Such conditions can lower electric insulation, which can cause an
electric shock or fire.
CAUTION
Do not place the equipment in an unstable place such as an inclined ground and
narrow place. The equipment can fall and cause injury.
The following table lists the installation environment requirements for the system
equipment.
Item
Tolerance
Temperature
5 to 35
C [In non-operating status: 10 to 43
C]
Relative humidity
20 to 80% [In non-operating status: 8 to 90%] (no dew
condensation)
Vibration
Max. 2.50 m/s
2
[In non-operating status: 9.80 m/s
2
]
Dust
Same level as business offices in general
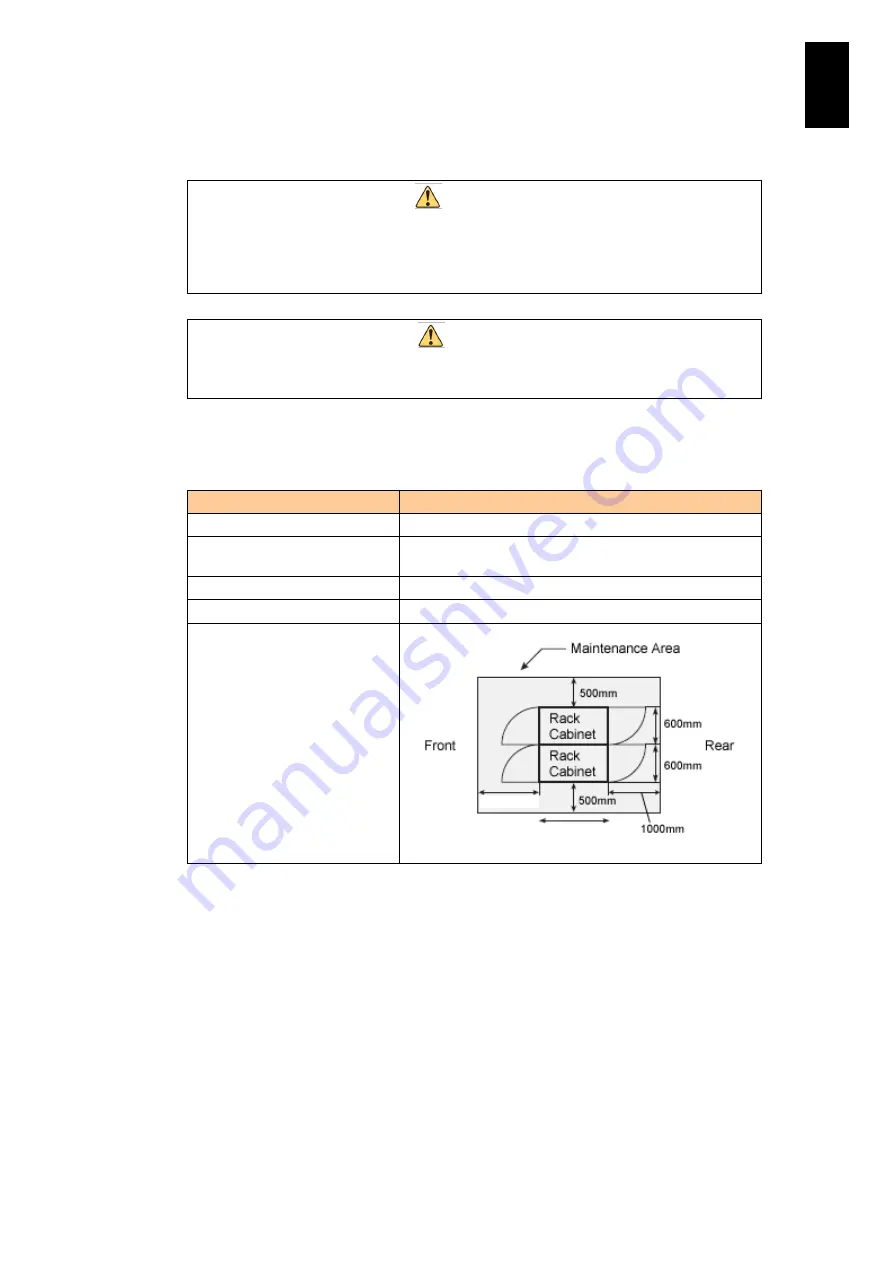
Installation space
Do not install the system equipment in the following environment:
Indirect sunlight
In a location subject to excessive or abrupt temperature or humidity change
Near any equipment generating electrical noise, such as a motor
Near any equipment generating a ferromagnetic field
In a dirty and dusty location
On an inclined surface
In a location subject to heavy vibration
Where the air contains a large amount of corrosive gases (sulfur dioxide,
hydrogen sulfide, chlorine gas, ammonia, and so on.) or salt content
Where ventilation is blocked, such as on a shelf or in a box in a hermetically-
sealed environment
1500mm
1050mm
Содержание Compute Blade 2000
Страница 1: ...MK 99BDS2K001 16 Hitachi Compute Blade 2000 User s Guide ...
Страница 42: ...xlii Precautions for Safe Use Rear View of A1 A2 Chassis ...
Страница 43: ...xliii Precautions for Safe Use Rear View of A2 Chassis ...
Страница 44: ...xliv Precautions for Safe Use Server Blade ...
Страница 45: ...xlv Precautions for Safe Use I O Slot Expansion Unit ...
Страница 46: ...xlvi Precautions for Safe Use I O Module ...
Страница 47: ...xlvii Precautions for Safe Use AC Power Input Module ...
Страница 51: ...li How to Use the Manuals This page is intentionally left blank ...
Страница 61: ...10 1 Before Use ...
Страница 64: ...13 2 How to Use the System Equipment Rear view of A1 chassis Rear view of A2 chassis ...
Страница 93: ...42 2 How to Use the System Equipment ...
Страница 123: ...72 3 Connecting the System Equipment and Powering On ...
Страница 252: ...201 5 Server Blade Setup 7 Click Next The following screen appears 8 Click Add to SPAN The following screen appears ...
Страница 266: ...215 5 Server Blade Setup 12 Click Yes The following screen appears 13 Click Next The following screen appears ...
Страница 272: ...221 5 Server Blade Setup 3 Check Del and click Go The following screen appears 4 Click Yes ...
Страница 277: ...226 5 Server Blade Setup 3 Check Make Global HSP 4 Click Go Hotspare is set to the specified hard disk ...
Страница 332: ...281 5 Server Blade Setup 7 Click Next The following screen appears 8 Click Add to SPAN The following screen appears ...
Страница 345: ...294 5 Server Blade Setup 12 Click Next The following screen appears ...
Страница 351: ...300 5 Server Blade Setup 3 Check Delete and click Go The following screen appears 4 Click Yes ...
Страница 368: ...317 5 Server Blade Setup 5 Confirm that Controller BIOS is set to that value 6 Click Home to return to the main menu ...
Страница 426: ...375 5 Server Blade Setup 3 Check Delete and click Go The following screen appears 4 Click Yes ...
Страница 430: ...379 5 Server Blade Setup 3 Click Go Hotspare is set to the specified hard disk ...
Страница 473: ...422 5 Server Blade Setup iSCSI menu On the iSCSI menu you can check iSCSI settings Figure 5 42 iSCSI selection menu ...
Страница 479: ...428 5 Server Blade Setup ...
Страница 717: ...666 6 Management Module Settings Details of a physical partition ...
Страница 722: ...671 6 Management Module Settings Server blade details view ...
Страница 723: ...672 6 Management Module Settings ...
Страница 732: ...681 6 Management Module Settings Management module details view ...
Страница 745: ...694 6 Management Module Settings Optional Physical WWN list view ...
Страница 748: ...697 6 Management Module Settings Optional Physical WWN initialization view ...
Страница 750: ...699 6 Management Module Settings FRU list view Displays FRU information for all installed modules ...
Страница 751: ...700 6 Management Module Settings ...
Страница 752: ...701 6 Management Module Settings Sensor list view Displays sensor information for all installed modules ...
Страница 754: ...703 6 Management Module Settings Power status details view ...
Страница 767: ...716 6 Management Module Settings ...
Страница 768: ...717 6 Management Module Settings ...
Страница 769: ...718 6 Management Module Settings ...
Страница 814: ...763 6 Management Module Settings Power status trend view partition ...
Страница 817: ...766 6 Management Module Settings Access log display view ...
Страница 819: ...768 6 Management Module Settings WWN change log display view ...
Страница 879: ...828 7 Configuring the LAN Switch Module Link aggregation adding editing screen ...
Страница 899: ...848 8 Configuring the 10 Gb DCB Switch Module ...
Страница 919: ...868 10 Configuring the Fibre Channel Switch Module ...
Страница 931: ...880 11 I O Slot Expansion Unit Account setting You can use the console to set accounts For procedures see SO command ...
Страница 1097: ...1046 12 Logical partitioning manager Click Confirm and the OS setting is updated as shown in the following screen ...
Страница 1535: ...1484 12 Logical partitioning manager ...
Страница 1877: ...1826 14 14 When You Need Help ...
Страница 1925: ...16 Glossary ...
Страница 1926: ...Hitachi Compute Blade 2000 User s Guide ...


