276
▪
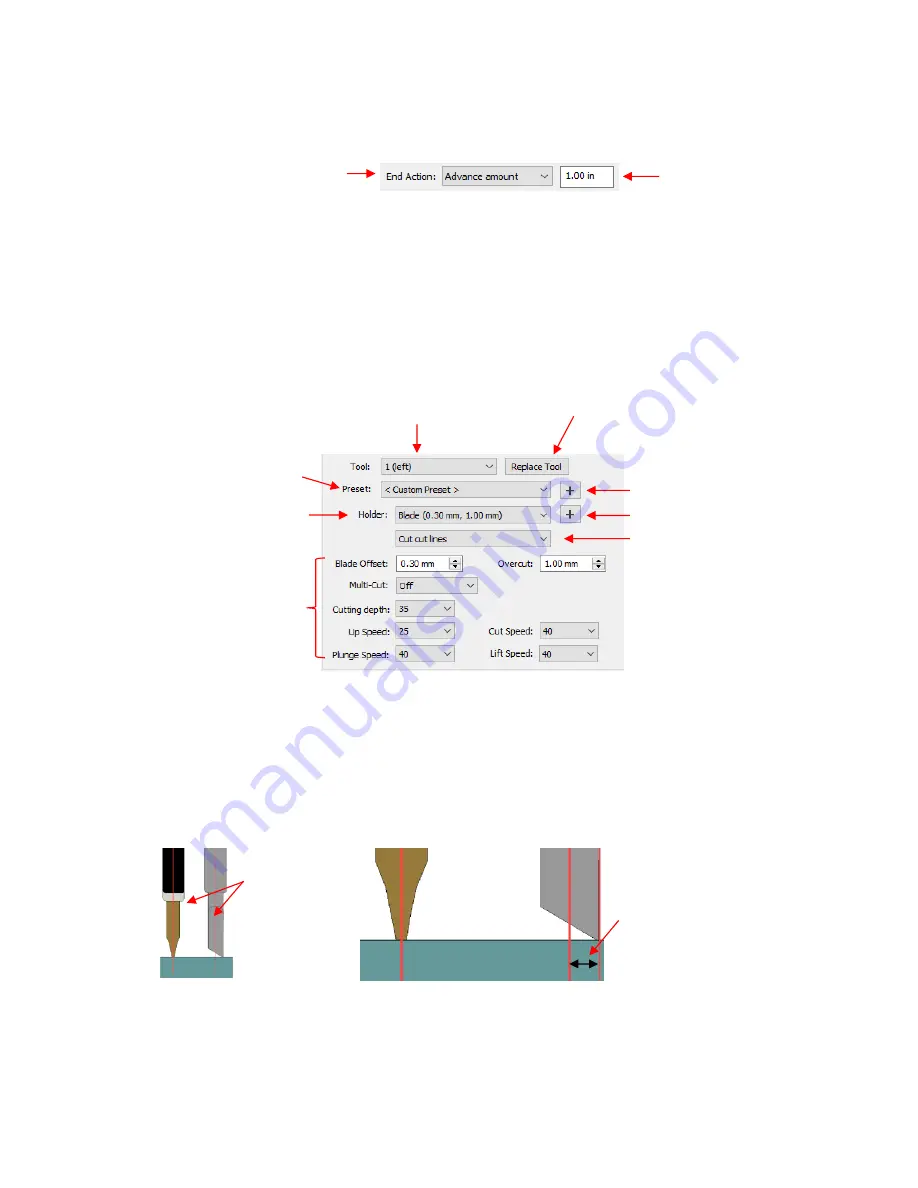
Advance Amount:
when this option is selected, the head moves to the end of the cut, over to
the right side, and then advances the mat or rolled material forward based on a value you enter
into a new window:
▪
Do Nothing:
the head stops at the location where it finished cutting
o
Cut selection only
: If you only want the shapes you have selected on the cutting mat to cut, then
mark this box.
o
Mirror H
and
Mirror V
: Use one or the other options to if you want the shapes mirrored for cutting.
This is very handy when cutting HTV or embossing. In both cases, you will be flipping over the
material once the cutting or embossing is complete.
Cutting/Drawing Settings:
As mentioned earlier, this section will vary considerably from one
brand/model of cutter to the next:
o
Preset
is a customizable menu where you can store settings for a particular material or application.
Refer to
Section 10.06.2
for directions.
o
Holder
has choices for
Blade
or
Pen
. Like
Preset
, you can enter your own menu choices, such as
other blades. Again, refer to
Section 10.06.2
.
o
Blade Offset
is the horizontal distance from the center of the blade shaft to the tip of the blade. A
pen or engraving tool has an offset of 0 because the tip is centered with the center of the
pen/engraving tool shaft. But a blade is different:
▪
If you set the
Blade Offset
to 0 when cutting with a blade, corners will be rounded. On the other
hand, if it is set too high, bubbles will be cut on sharp corners:
Enter distance to advance
Select
Advance Amount
and a new input pops up
Imagine a line
passing through
the center of the
test pen or
blade
The
Offset
is the distance
between the center of the
blade holder and the tip of the
blade.
There is no
Offset
on a
pen.
Click here to change out a
tool on the KNK Force
Select
Tool
(1 or 2)
Select a
Preset
of
suggested settings
Add a new
Preset
Select type of tool
Change settings,
as needed
Add a new tool
Select type of action
Summary of Contents for KNK Force
Page 306: ...306...


