


639
Sizing a job by length
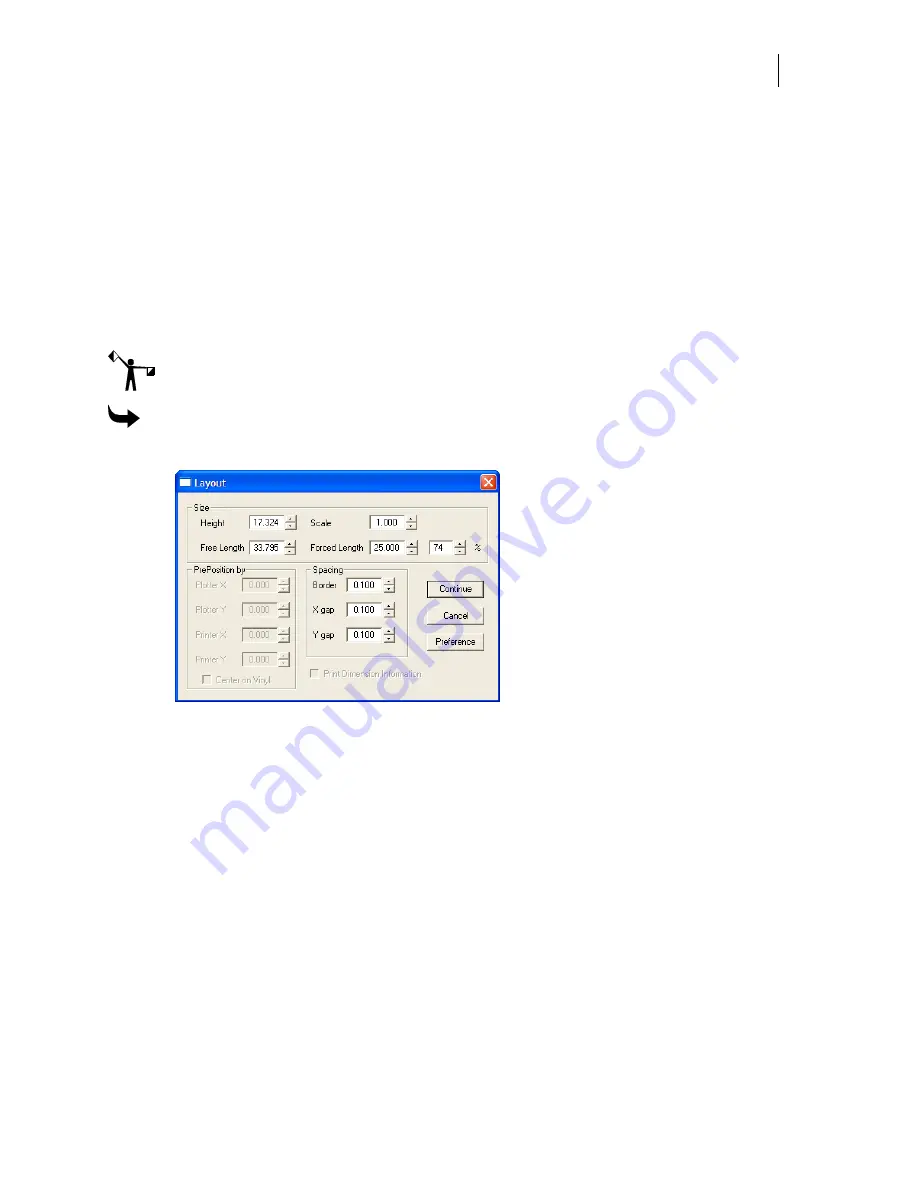
You can make the job longer or shorter to fit space requirements by changing the length of a job
without altering the height. Since you are not changing the size proportionally, however, the
appearance of the job will change.
In Forced Length, you alter a job by an exact measurement, or by a percentage of the original
length. An unaltered job has a value of 100%. Forced Length accepts percentage values between
1 and 999. Enter a value between 1 and 99 to compress an image. Enter a value between 101 and
999 to expand a job beyond its original length.
Forced length is unavailable if the job has an image, small text, or dimension objects.
Note: Using Forced Length compresses or expands the job, and alters its appearance.
Depending on your application, the resulting distortion may be unacceptable.
To size a job by forced length
1
Click Layout > Layout to open the Layout dialog box.
2
In the Size group box enter a value in the Forced Length text box or enter a percentage
in the % text box.
3
Click Continue.
Choosing specific layers, vinyls, or foils to be output
Choose to output specific layers, vinyls, or foils of a job using the Select Colors dialog box.
Layers, vinyls, and foils to be processed are indicated by a check mark in the black box
preceding them. Clear the check box to prevent a layer, vinyl, or foil from outputting. If you
turn off a layer, all vinyl and foil on the layer are also deselected. Turning off a printed vinyl
turns off all the foils to be printed on it.
If the job has layers and the Output by Layers option is turned on in GSPPlot, the Select Colors
dialog box displays each layer separately with the vinyls and foil colors indented beneath it.
Because each layer behaves as a separate job when outputting by layers, the same vinyl color
can be output multiple time from different layers. Likewise, the same foil can be output from
different layers.
Summary of Contents for OMEGA CP
Page 16: ......
Page 20: ......
Page 36: ......
Page 42: ...28 Chapter 4 Saving Files...
Page 44: ......
Page 68: ......
Page 92: ......
Page 96: ...82 Chapter 7 Selecting Elements of the Design...
Page 98: ......
Page 132: ......
Page 146: ......
Page 154: ......
Page 162: ......
Page 182: ......
Page 188: ......
Page 204: ......
Page 234: ......
Page 238: ......
Page 244: ......
Page 254: ...240 Chapter 22 Strokes Adding Print Thickness to the Outline of Objects...
Page 256: ......
Page 282: ......
Page 320: ......
Page 346: ......
Page 358: ......
Page 380: ......
Page 386: ......
Page 418: ......
Page 422: ......
Page 452: ......
Page 462: ......
Page 476: ......
Page 512: ...498 Chapter 44 Creating Special Effects...
Page 514: ......
Page 520: ......
Page 530: ......
Page 540: ......
Page 552: ......
Page 564: ......
Page 606: ......
Page 614: ...600 Chapter 51 Sending the Job to a Plotter or Printer...
Page 694: ......
Page 700: ......
Page 734: ......
Page 748: ......
Page 760: ...746...
Page 776: ......
Page 786: ......
Page 790: ......


