573
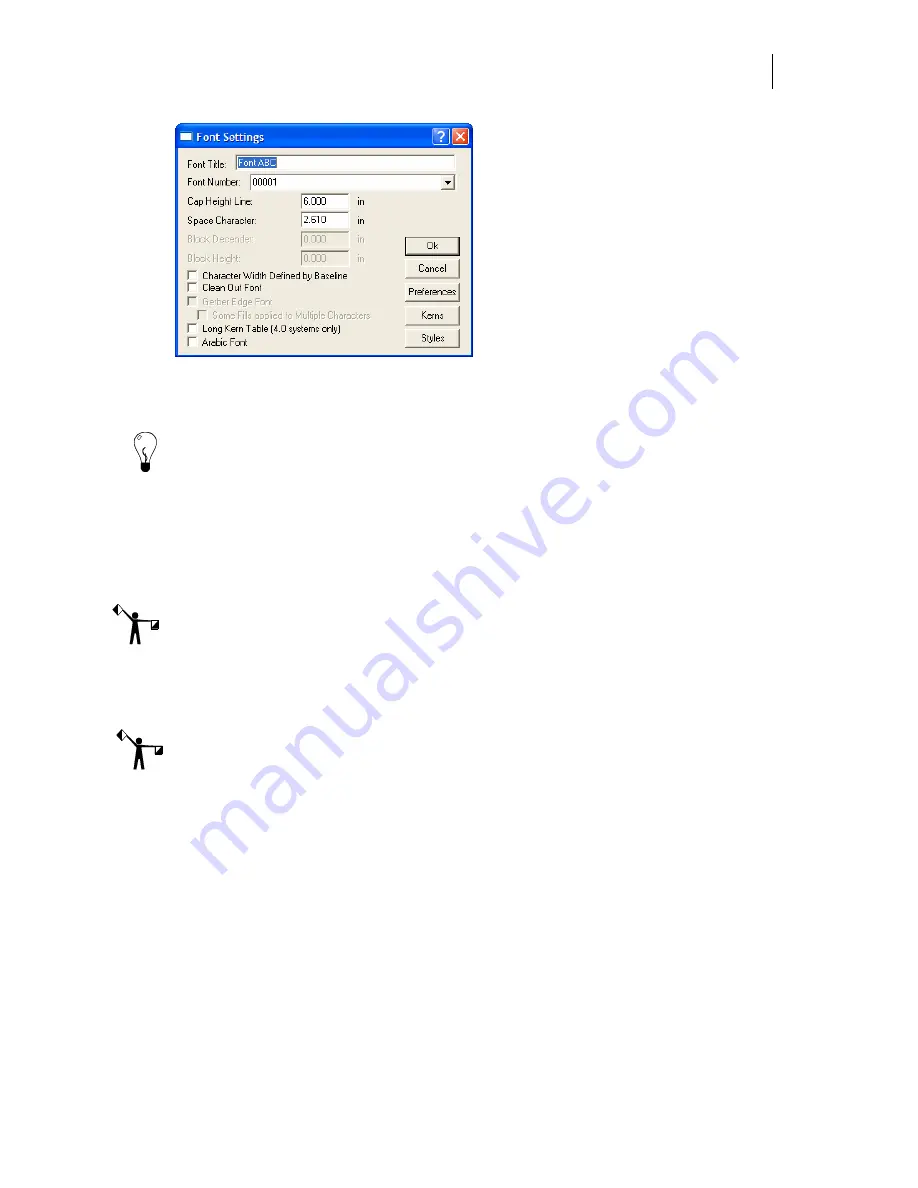
The Font Settings dialog box includes the following components:
♦
Font Title
– Enter a unique name (not to exceed 32 characters) to identify the font.
Tip: To avoid duplicate font titles, open GSP Tray and select Font Manager to open the Gerber
Font Manager dialog box. This dialog box allows you to view a list of all installed fonts.
♦
Font Number
– Font Designer automatically assigns the next available font number.
To overwrite the system-designated number, enter a five digit number from 00000-
99999 (no spaces between the numbers) to create a unique font file name.
♦
Cap Height Line
– Displays the standard size for uppercase letters in the font. The
system defaults to a capital height line value of 6" (152.4mm).
Note: To scale characters proportionately, the capital height line value must equal the height
line to baseline measurement used when the font was built.
♦
Space Character
–
Displays
the amount of space (between 0 and 12" or 0 - 304.80mm)
assigned to the space bar. The system automatically assigns a Space Character value
based on the Cap Height Line value.
Note: Make a note of the Font Title, Font Number, Capital Height Line, and Space Character
values for future reference.
If your GSP Font Designer ini file contains this
fontmaker
entry: bDefChBlk=1, the next two
fields will be active in your Font Settings dialog box:
♦
Block Descender
–
Displays
the distance from the baseline to the bottom of the block.
A block is an imaginary box located around the character.
♦
Block Height
–
Displays
the distance from the top of the block to the bottom of the
block.
In addition to the fields above, the Font Settings dialog box contains these check boxes:
♦
Character Width Defined by Baseline
– Turn this check box on to set the parameters
for a connected font. Expect these results:
♦
Characters in the font will not be left justified.
♦
Inruns (the distance value used to separate characters) will be set to zero.
♦
The length of the baseline determines character width.
Summary of Contents for OMEGA CP
Page 16: ......
Page 20: ......
Page 36: ......
Page 42: ...28 Chapter 4 Saving Files...
Page 44: ......
Page 68: ......
Page 92: ......
Page 96: ...82 Chapter 7 Selecting Elements of the Design...
Page 98: ......
Page 132: ......
Page 146: ......
Page 154: ......
Page 162: ......
Page 182: ......
Page 188: ......
Page 204: ......
Page 234: ......
Page 238: ......
Page 244: ......
Page 254: ...240 Chapter 22 Strokes Adding Print Thickness to the Outline of Objects...
Page 256: ......
Page 282: ......
Page 320: ......
Page 346: ......
Page 358: ......
Page 380: ......
Page 386: ......
Page 418: ......
Page 422: ......
Page 452: ......
Page 462: ......
Page 476: ......
Page 512: ...498 Chapter 44 Creating Special Effects...
Page 514: ......
Page 520: ......
Page 530: ......
Page 540: ......
Page 552: ......
Page 564: ......
Page 606: ......
Page 614: ...600 Chapter 51 Sending the Job to a Plotter or Printer...
Page 694: ......
Page 700: ......
Page 734: ......
Page 748: ......
Page 760: ...746...
Page 776: ......
Page 786: ......
Page 790: ......


