


308
Chapter 28:
Exporting Files from Composer
4
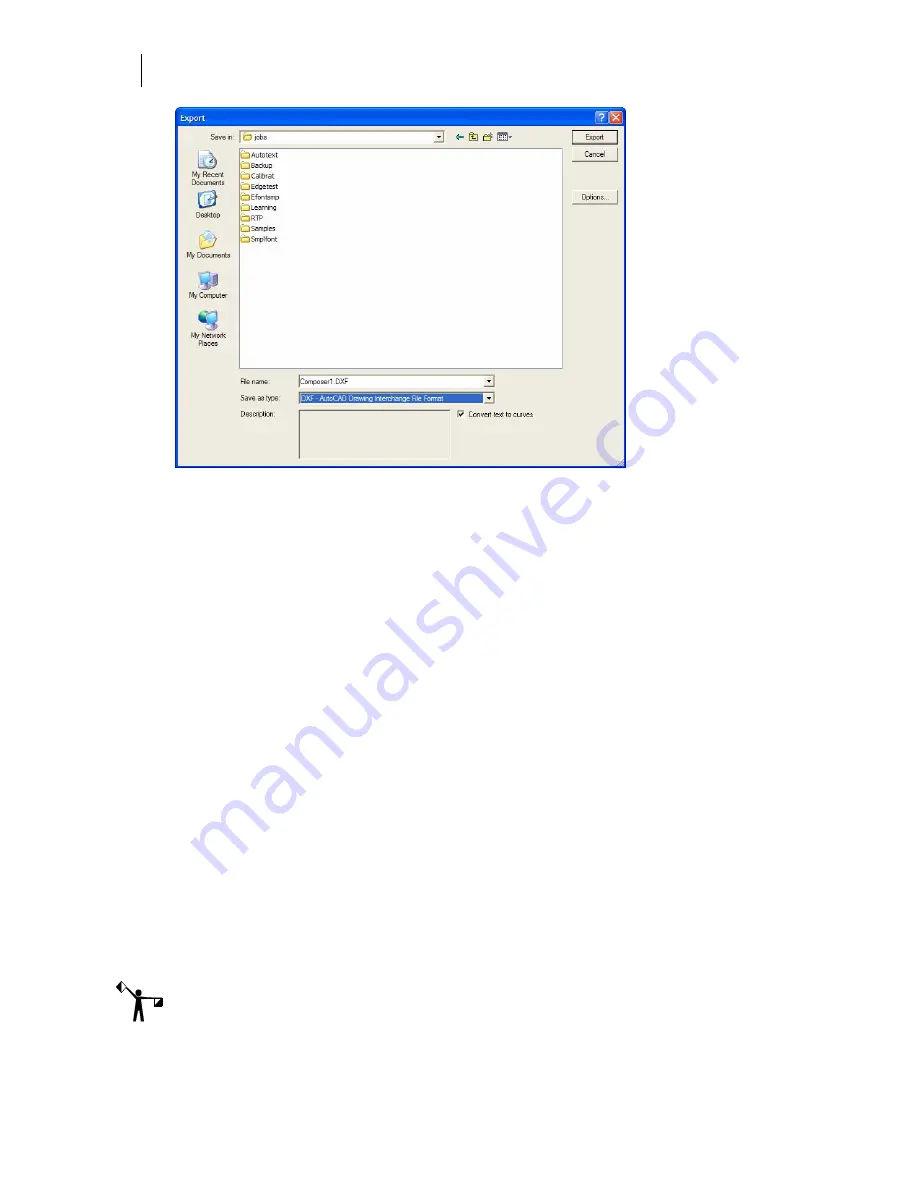
Enter a file name for the exported file. If you are exporting with the Selection or Vinyl
option, it is good idea to change the file name from the current file name so that you
don’t overwrite the open file.
5
Choose the folder in Save in.
6
Choose the file format from Save as type.
7
If you are saving the file as a PLT file, you can type comments in the Description text
box. The comments will appear in the Import or Open dialog box in the future.
8
Click Export.
9
If you are exporting only an embedded image the Export Original Image dialog box
displays. See “Exporting an Embedded Image” for details.
Maintaining the appearance of text when exporting
If you turn on the Convert text to curves check box, all text in the PLT file is exported as shapes
and the appearance of the job is maintained. If text is not converted to curves, effects such as
outline, shadow, distortion, and text strokes are lost. Color is retained only for plain text and
Gerber Small text; all other forms of text are black.
Setting export options
Some file types have export options available via the Options button. Click Options to display
the appropriate option dialog box for the file type you have chosen. If you do not click Options,
none of the dialog boxes will appear and files are exported using the format’s default settings.
Note: When importing an Adobe Illustrator (AI) file or an Encapsulated Postscript (EPS) file
using the GSP 2.1 as Vectors filter, OMEGA will automatically suggest using the GSP 2.5 as
Vectors filter if the GSP 2.1 filter fails.
Summary of Contents for OMEGA CP
Page 16: ......
Page 20: ......
Page 36: ......
Page 42: ...28 Chapter 4 Saving Files...
Page 44: ......
Page 68: ......
Page 92: ......
Page 96: ...82 Chapter 7 Selecting Elements of the Design...
Page 98: ......
Page 132: ......
Page 146: ......
Page 154: ......
Page 162: ......
Page 182: ......
Page 188: ......
Page 204: ......
Page 234: ......
Page 238: ......
Page 244: ......
Page 254: ...240 Chapter 22 Strokes Adding Print Thickness to the Outline of Objects...
Page 256: ......
Page 282: ......
Page 320: ......
Page 346: ......
Page 358: ......
Page 380: ......
Page 386: ......
Page 418: ......
Page 422: ......
Page 452: ......
Page 462: ......
Page 476: ......
Page 512: ...498 Chapter 44 Creating Special Effects...
Page 514: ......
Page 520: ......
Page 530: ......
Page 540: ......
Page 552: ......
Page 564: ......
Page 606: ......
Page 614: ...600 Chapter 51 Sending the Job to a Plotter or Printer...
Page 694: ......
Page 700: ......
Page 734: ......
Page 748: ......
Page 760: ...746...
Page 776: ......
Page 786: ......
Page 790: ......


