background image

Using Help

 | 

Contents

 | 

Index

Back

420  

Adobe Photoshop Help

Preparing Graphics for the Web 

Using Help

 | 

Contents

 | 

Index

Back

420  

Optimization options for GIF and PNG-8 formats

GIF is the standard format for compressing images with flat color and crisp detail, such as 
line art, logos, or illustrations with type. You can lower the size of GIF images by reducing 
the number of colors in the file. Like the GIF format, the PNG-8 format efficiently 
compresses solid areas of color while preserving sharp detail; however, not all Web 
browsers can display PNG-8 files. PNG-8 settings are very similar to the GIF settings. 
(See 

“About file formats” on page 453

.)

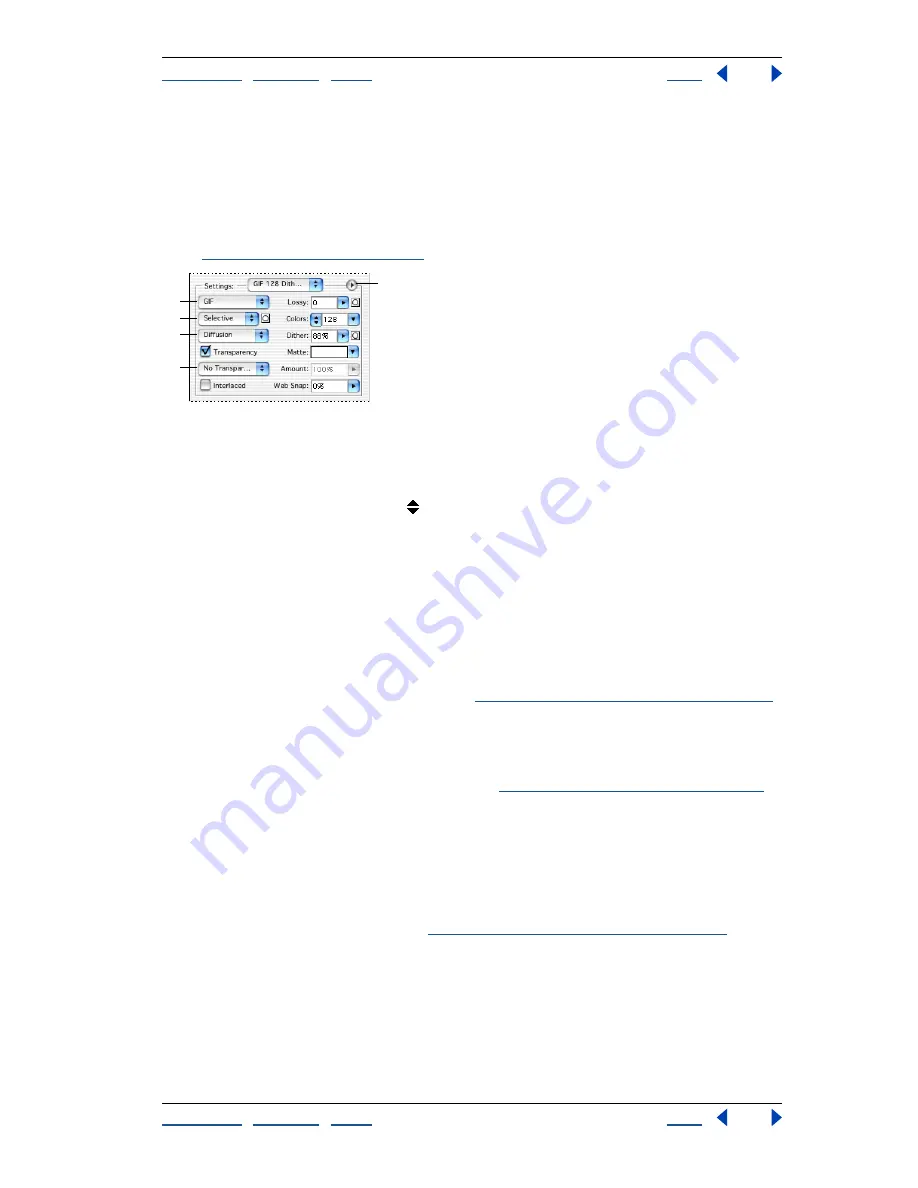
Optimization panel for GIF format: 

A.

 File format menu

B.

 Color Reduction Algorithm menu

C.

 Dither Algorithm menu

D. 

Transparency dithering menu

E.

 Optimize menu 

Note:

 In ImageReady, you can control which options show in the Optimize palette by 

clicking the Show Options control 

 on the Optimize palette tab. To show all options, 

choose Show Options from the Optimize palette menu.

Lossy (GIF only)

Specify a Lossy value to allow for lossy compression. Lossy compression 

reduces file size by selectively discarding data—a higher Lossy setting results in more data 
being discarded. You can often apply a Lossy value of 5–10, and sometimes up to 50, 
without degrading the image. File size can often be reduced 5%–40% using the Lossy 
option. 

You can use masks from type layers, shape layers, and alpha channels to vary lossy 
compression across an image. This technique produces higher-quality results in critical 
image areas without sacrificing file size. (See 

“Using weighted optimization” on page 428

.)

Note:

 You cannot use the Lossy option with the Interlaced option or with Noise or Pattern 

Dither algorithms.

Color Reduction Algorithm and Colors

Choose a algorithm for generating a color table 

from the Color Reduction Algorithm menu. (See 

“Generating a color table” on page 431

.) 

Then specify the maximum number of colors in the Colors text box. If you choose Web for 
the color reduction algorithm, the Auto option becomes active in the Colors pop-up 
menu. Use the Auto option if you want Photoshop or ImageReady to determine the 
number of colors in the color table based on the frequency of colors in the image.

You can use masks from type layers, shape layers, and alpha channels to vary color 
reduction across an image. This technique produces higher-quality results in critical image 
areas without sacrificing file size. (See 

“Using weighted optimization” on page 428

.)

C

E

D

A

B

Содержание 13101332 - Photoshop - Mac

Страница 1: ...You can also use the navigation arrows in the Acrobat toolbar Using bookmarks the table of contents the index and Find The contents of Help are shown as bookmarks in the bookmark pane To view subtopi...

Страница 2: ...robat will search the document starting from the current page and display the first occurrence of the word or phrase you are searching for 3 To find the next occurrence choose Edit Find Again Printing...

Страница 3: ...Consistent Color Photoshop 102 Making Color and Tonal Adjustments 129 Selecting 157 Transforming and Retouching 177 Drawing 200 Painting 222 Using Channels and Masks 266 Using Layers 284 Applying Fil...

Страница 4: ...o register online You can choose to submit the form directly or fax a printed copy You can also register by filling out and returning the registration card included with your software package Installi...

Страница 5: ...rency or weighted optimization See Using the Rollovers palette on page 398 to see how easy it is to manage slices rollovers image maps and animations See Creating and editing animations on page 404 to...

Страница 6: ...ion about the Adobe Photoshop and ImageReady tools and palettes and shortcuts for using them Shortcuts are also included in the online Help Using online Help Adobe Photoshop and ImageReady include com...

Страница 7: ...is information provides help on everything from common processes to the complex inter application tasks necessary to prepare graphics for the Web Troubleshooting Provides access to solutions to proble...

Страница 8: ...updates Note You can set Adobe Online preferences by choosing Edit Preferences Adobe Online Windows and Mac OS 9 or Photoshop Preferences Adobe Online Mac OS X Click Go Online to access the Adobe Web...

Страница 9: ...to demonstrate their product proficiency and promote their software skills as Adobe Certified Experts or Adobe Certified Training Providers Certification is available worldwide Visit the Partnering w...

Страница 10: ...you re working on and link layers to move them as a group The Layers palette also makes it easy to apply instant editable effects including blending modes adjustment layers and layer effects See Usin...

Страница 11: ...selec tions on page 157 Precision masking Masks let you hide part of an image or protect and preserve one section while you apply color changes filters or other effects to the rest of the artwork You...

Страница 12: ...palette to change the opacity of an image or to apply a blending mode that affects the way the color in one layer interacts with the layers below See Using the gradient tool Photoshop on page 244 and...

Страница 13: ...ing a filter for example or flattening the layers You can distort it warp it and apply layer effects and still use the type tool to retype the text See Working with type layers on page 345 Formatting...

Страница 14: ...from the beginning of the process to the end Cross platform compatibility Complete cross platform support ensures a smooth workflow between Windows and Mac OS systems WebDAV support Connect Photoshop...

Страница 15: ...rs that can t be repro duced in CYMK so you won t be disappointed with the results when you convert the finished flattened file to CMYK See About color modes and models Photoshop on page 86 and Identi...

Страница 16: ...Web page elements transparent in Photoshop and ImageReady by simply clicking on the color you want to knock out And with the new dithered trans parency option you can apply partial transparency to ble...

Страница 17: ...Then use scripts a Web production tool such as GoLive or an image server such as Adobe AlterCast to replace the variables with text or images pulled from an ODBC compliant database See About data driv...

Страница 18: ...le images on one page Enhancements to Photoshop 7 0 let you print to different page sizes add labels or text to each image print more than one image per page and output images as one flattened documen...

Страница 19: ...layered Photoshop files into a LiveMotion composition and quickly convert them into animation ready independent objects groups or sequences Photoshop blending modes layer masks and effects are preserv...

Страница 20: ...ools on page 24 Palette well Photoshop The palette well helps you organize the palettes in your work area See Using the palette well Photoshop on page 26 Palettes Palettes help you monitor and modify...

Страница 21: ...freehand polygonal straight edged and magnetic snap to selections The magic wand tool selects similarly colored areas The crop tool trims images The slice tool creates slices The slice selection tool...

Страница 22: ...tyles using a selected state or snapshot The magic eraser tool erases solid colored areas to trans parency with a single click The eraser tool erases pixels and restores parts of an image to a previou...

Страница 23: ...on lines and direction points The type tools create type on an image The type mask tools create a selection in the shape of type The pen tools let you draw smooth edged paths The custom shape tool mak...

Страница 24: ...ress its keyboard shortcut If the icon has a small triangle at its lower right corner hold down the mouse button to view the hidden tools Then click the tool you want to select Press the tool s keyboa...

Страница 25: ...h all tools except the move tool annotation tools and the type tool you can switch to precise cursors which appear as cross hairs centered around the hotspot To set the tool pointer appearance 1 Do on...

Страница 26: ...ol You can move the options bar anywhere in the work area and dock it at the top or bottom of the screen To display the tool options bar Do one of the following Choose Window Options Click a tool in t...

Страница 27: ...esets let you save and reuse tool settings You can load edit and create libraries of tool presets using the Tool Preset picker in the options bar the Tool Presets palette and the Preset Manager Tool P...

Страница 28: ...u Using palettes Palettes help you monitor and modify images By default palettes appear stacked together in groups To display one palette Choose the palette name in the Window menu To show or hide mul...

Страница 29: ...s from one group to another one at a time In Photoshop docked palettes and their locations are saved when you save a workspace In Photoshop you can also store palettes in the palette well of the tool...

Страница 30: ...dit Preferences General Photoshop In Mac OS X choose Photoshop Preferences General ImageReady In Mac OS X choose ImageReady Preferences General 2 Deselect Save Palette Locations The change takes effec...

Страница 31: ...nter a new name To delete an item in a pop up palette Do one of the following Select an item click the triangle in the upper right corner of the pop up palette and choose the Delete command from the p...

Страница 32: ...ee Identifying out of gamut colors Photoshop on page 136 When you use the marquee tool the Info palette displays the x and y coordinates of the pointer position and the width W and height H of the mar...

Страница 33: ...r This option does not apply to the background Any other option to display the color values in that color mode 3 For Second Color Readout choose a display option listed in step 2 4 For Ruler Units cho...

Страница 34: ...ge simultaneously For information on changing the view in the document window see Viewing optimized images ImageReady on page 418 You can open multiple windows to display different views of the same f...

Страница 35: ...g and reducing the view You can magnify or reduce your view using various methods The window s title bar displays the zoom percentage unless the window is too small for the display to fit as does the...

Страница 36: ...w ImageReady Click on the Zoom Level pop up menu at the lower left of the document window and choose a zoom level To magnify by dragging 1 Select the zoom tool 2 Drag over the part of the image you wa...

Страница 37: ...dy In the General section of the Preferences dialog box select a preference for the Redo key You can also set the key to toggle between Undo and Redo To free memory used by the Undo command the Histor...

Страница 38: ...palette lists the previous 20 states Older states are automatically deleted to free more memory for Photoshop To keep a particular state throughout your work session make a snapshot of the state For m...

Страница 39: ...ious state To delete one or more states of the image Photoshop Do one of the following Click the name of the state and choose Delete from the History palette menu to delete that change and those that...

Страница 40: ...the maximum number of items to include in the History palette and set other options that customize the way you work with the palette To set history options 1 Choose History Options from the History pa...

Страница 41: ...urrently listed in the History palette To create a snapshot 1 Select a state 2 To automatically create a snapshot click the New Snapshot button on the History palette or if Automatically Create New Sn...

Страница 42: ...te or snapshot of an image 1 Select the history brush tool 2 Do one of the following in the options bar Specify the opacity and blending mode See Setting options for painting and editing tools on page...

Страница 43: ...grid help you position images or elements precisely across the width or length of an image Note You can also align and distribute parts of an image using the Layers palette See Repositioning the conte...

Страница 44: ...age to fit exactly within a certain number of columns To specify columns for an image 1 Do one of the following In Windows and Mac OS 9 x choose Edit Preferences Units Rulers In Mac OS X choose Photos...

Страница 45: ...t angle of rotation required to straighten the image will already be entered into the Rotate Canvas dialog box Using guides and the grid Guides appear as lines that float over the entire image and do...

Страница 46: ...naps to the ruler ticks The pointer changes to a double headed arrow when you drag a guide To move a guide 1 Select the move tool or hold down Ctrl Windows or Command Mac OS to activate the move tool...

Страница 47: ...xtra or any combination of Extras without affecting the image You can also show or hide Extras by choosing the Extras command in the View menu For a description of using specific Extras see Using guid...

Страница 48: ...ded to the file This information includes standard file information and Digimarc watermarks Photoshop automatically scans opened images for watermarks using the Digimarc Detect Watermark plug in If a...

Страница 49: ...age s pixel dimensions Watermark Strength to view the strength of the Digimarc digital watermark in the optimized image if present Undo Redo Status to view the number of undos and redos that are avail...

Страница 50: ...ou create a note a resizable window appears for entering text When you record an audio annotation you must have a microphone plugged into the audio in port of your computer You can import both kinds o...

Страница 51: ...show hide or move the icons and edit the contents of notes Note Resizing an image does not resize the annotation icons and note windows The icons and note windows keep their locations relative to the...

Страница 52: ...s for the Web or other purposes Jumping between the applications allows you to use the full feature sets of both applications while maintaining a streamlined workflow Files and documents updated in on...

Страница 53: ...ing back to ImageReady from another application 1 Do one of the following In Windows and Mac OS 9 x choose Edit Preferences General In Mac OS X choose ImageReady Preferences General 2 Select Auto Upda...

Страница 54: ...ext time you launch ImageReady Managing libraries with the Preset Manager Photoshop The Preset Manager centralizes management of brushes swatches gradients styles patterns contours custom shapes and p...

Страница 55: ...preset item Shift click to select multiple items 2 Do one of the following Click Rename then enter a new name for the brush swatch and so on If the Preset Manager is set to display presets as thumbnai...

Страница 56: ...enu Photoshop In Mac OS X choose Photoshop Preferences and choose the desired preference set from the submenu ImageReady In Mac OS X choose ImageReady Preferences and choose the desired preference set...

Страница 57: ...otify you when it has finished To cancel operations Hold down Esc until the operation in progress has stopped In Mac OS you can also press Command period To set notification for completion of operatio...

Страница 58: ...dialog boxes or as filters in the Filter submenus Photoshop and ImageReady can accommodate a large number of plug ins However if the number of installed plug in modules becomes great enough Photoshop...

Страница 59: ...pen Mac OS 4 When you have highlighted the additional plug ins folder click OK Windows Select Mac OS or Choose Mac OS 9 0 and later 5 Restart Photoshop or ImageReady for the plug ins to take effect To...

Страница 60: ...ive than the one used for virtual memory Scratch disks should be on a local drive That is they should not be accessed over a network Scratch disks should be conventional non removable media Raid disks...

Страница 61: ...map images you edit pixels rather than objects or shapes Bitmap images are the most common electronic medium for continuous tone images such as photographs or digital paintings because they can repres...

Страница 62: ...e The display size of an image on screen is determined by the pixel dimensions of the image plus the size and setting of the monitor For example a 15 inch monitor typically displays 800 pixels horizon...

Страница 63: ...solution contains more and therefore smaller pixels than an image with a low resolution For example a 1 by 1 inch image with a resolution of 72 ppi contains a total of 5184 pixels 72 pixels wide x 72...

Страница 64: ...lution of 300 to 720 dpi To determine your printer s optimal resolution check your printer documentation Screen frequency The number of printer dots or halftone cells per inch used to print grayscale...

Страница 65: ...djust its size In Photoshop the Image Size command lets you adjust the pixel dimensions print dimen sions and resolution of an image in ImageReady you can only adjust the pixel dimen sions of an image...

Страница 66: ...xel dimensions on screen or print proofs at different resolutions resample a duplicate of your file Choosing an interpolation method When an image is resampled an interpolation method is used to assig...

Страница 67: ...he new file size for the image appears at the top of the Image Size dialog box with the old file size in parentheses For best results in producing a smaller image downsample and apply the Unsharp Mask...

Страница 68: ...ocument Size enter new values for the height and width If desired choose a new unit of measurement Note that for Width the Columns option uses the width and gutter sizes specified in the Units Rulers...

Страница 69: ...sts from being introduced by your scanner Scanner drivers are provided and supported by the manufacturers of the scanners not Adobe Systems Incorporated If you have problems with scanning make sure th...

Страница 70: ...otoshop works with Windows and your digital camera or scanner software to import images directly into Photoshop Note WIA Support is only available if you are using WindowsME or Windows XP To import im...

Страница 71: ...and final image dimen sions and the resolution of your output device Scan resolution translates into image resolution when you open the scanned image in Photoshop To estimate scan resolution 1 Do one...

Страница 72: ...f your scanner allows set the black and white points before scanning a file to produce the best tonal range and capture the widest dynamic range Then use Photoshop s color adjustment tools to set the...

Страница 73: ...with white the default background color Background Color to fill the background or first layer with the current background color See Choosing foreground and background colors on page 257 Transparent...

Страница 74: ...ble in the Open Recent submenu 1 Do one of the following Photoshop In Windows or Mac OS 9 x choose Edit Preferences File Handling Photoshop In Mac OS X choose Photoshop Preferences File Handling Image...

Страница 75: ...e and Preserve Embedded Profiles is selected for Color Management Policies in the Color Settings dialog box you can choose the profile from the mode pop up menu Select Constrain Proportions to maintai...

Страница 76: ...Using the Clipboard to copy between applications on page 171 To open an EPS file 1 Choose File Open 2 Select the file you want to open and click Open 3 Indicate the desired dimensions resolution and...

Страница 77: ...ed formats such as those created by scientific applications Compressed files such as PICT and GIF cannot be opened using this format To open a file using the Raw format 1 Choose File Open or File Open...

Страница 78: ...ile in the PICT Resource file format by choosing File Open choosing All Documents from the Show pop up menu selecting the file you want to open choosing PICT Resource from the Format pop up menu and c...

Страница 79: ...your digital camera For more information see Adding file information Photoshop on page 459 Selecting and deselecting files On the right side of the palette click a thumbnail to select the file or Shif...

Страница 80: ...p View from the palette menu Closing and reopening the File Browser also refreshes the view Displaying files in the Windows Explorer or Mac OS Finder Choose Reveal Location in Explorer Windows or Reve...

Страница 81: ...constrain the proportions of the artwork click the Constrain Proportions icon the option is on when the icon has a white background 6 If desired rotate the placed artwork by doing one or more of the f...

Страница 82: ...orkgroup management When working in a collaborative environment users must share files The process of passing files from one collaborator to another involves working with a workgroup Controlling the h...

Страница 83: ...Handling 2 Do one of the following To show the Workgroup pop up menu at the bottom of the application window Windows or document window Mac OS select Enable Workgroup functionality To hide the Workgr...

Страница 84: ...1 Open your local copy of the file 2 Do one of the following Choose File Workgroup Revert Choose Revert from the Workgroup pop up menu at the bottom of the application window Windows or document wind...

Страница 85: ...pen your local copy of the file 2 Do one of the following Choose File Workgroup Save Choose Save from the Workgroup pop up menu at the bottom of the application window Windows or document window Mac O...

Страница 86: ...inter You can customize the Info palette and color samplers to express color values using HSB RGB CMYK Lab or Grayscale modes without changing the mode of the image itself See Seeing the color values...

Страница 87: ...tting light through red green and blue phosphors Additive colors RGB RGB mode Photoshop s RGB mode uses the RGB model assigning an intensity value to each pixel ranging from 0 black to 255 white for e...

Страница 88: ...colors are complementary colors Each pair of subtractive colors creates an additive color and vice versa Subtractive colors CMYK CMYK mode In Photoshop s CMYK mode each pixel is assigned a percentage...

Страница 89: ...een red axis and the b component blue yellow axis can range from 128 to 128 In the Color palette the a component and the b component can range from 120 to 120 You can use Lab mode to work with Photo C...

Страница 90: ...otones on page 479 Indexed Color mode This mode uses at most 256 colors When converting to indexed color Photoshop builds a color lookup table CLUT which stores and indexes the colors in the image If...

Страница 91: ...r gamut Adjusting the monitor display Although the RGB color model used by computer monitors is capable of displaying much of the visible spectrum the video system sending data to a given monitor ofte...

Страница 92: ...to compensate for cross platform differences in RGB color display during image preview In Photoshop you can simulate cross platform differences by using the Macintosh RGB Windows RGB and Monitor RGB c...

Страница 93: ...l means more available colors and more accurate color representation in the digital image For example a pixel with a bit depth of 1 has two possible values black and white A pixel with a bit depth of...

Страница 94: ...on Flatten the file before converting it The interaction of colors between layer blending modes will change when the mode changes To convert an image to another mode Choose Image Mode and the mode you...

Страница 95: ...ens for Bitmap mode images on page 96 Custom Pattern to simulate the appearance of a custom halftone screen in the converted image See Specifying custom halftone screens for Bitmap mode images on page...

Страница 96: ...ortant The halftone screen becomes part of the image If you print the image on a halftone printer it will print with the halftone screen you choose here plus that of the printer On some printers the r...

Страница 97: ...creen patterns See the procedure to use a pattern from the PostScript Patterns folder in Filling and stroking selections and layers on page 249 Because the Custom Pattern option simulates dark and lig...

Страница 98: ...n a monitor display limited to 256 colors Uniform Creates a palette by uniformly sampling colors from the RGB color cube For example if Photoshop takes 6 evenly spaced color levels each of red green a...

Страница 99: ...s that lie adjacent to transparent areas of the image With Transparency selected the matte is applied to edge areas to help blend the edges with a Web background of the same color With Trans parency d...

Страница 100: ...Choose a color as explained in Using the Adobe Color Picker on page 261 and click OK If you are changing a range of colors Photoshop creates a gradient in the color table between the starting and endi...

Страница 101: ...ng color tables You use the Save and Load buttons in the Color Table dialog box to save your indexed color tables for use with other Adobe Photoshop images Once you load a color table into an image th...

Страница 102: ...ferent devices Color variations can result from different image sources scanners and software produce art using different color spaces differences in the way software applications define color differe...

Страница 103: ...us bar see Displaying file and image information on page 48 Documents without associated profiles are known as untagged and contain only raw color numbers When working with untagged documents Photosho...

Страница 104: ...uous tone art printed output and images on screen under the same intensity of light Remove colorful background and user interface patterns on your monitor desktop Busy or bright patterns surrounding a...

Страница 105: ...lowing options from the Settings menu in the Color Settings dialog box Color Management Off Uses passive color management techniques to emulate the behavior of applications that do not support color m...

Страница 106: ...gement setting Photoshop sets up a color management workflow that will be used as the standard for all documents and color data that you open or import For a newly created document the color workflow...

Страница 107: ...reuse and share them with other users and Adobe applications that use the same color management workflows The color management settings that you customize in the Color Settings dialog box are containe...

Страница 108: ...creases or decreases For example a 50 halftone screen may produce an actual density of 60 on the printed page exhibiting a dot gain of 10 The Dot Gain 10 option represents the color space that reflect...

Страница 109: ...colors are imported into a document via pasting drag and drop placing and so on You will be given the option to override the policy s default behavior The availability of options for Profile Mismatch...

Страница 110: ...choosing a rendering intent depends on the graphical content of documents and on the profiles used to specify color spaces Some profiles produce identical results for different rendering intents Diff...

Страница 111: ...all predefined configurations in the Settings menu of the Color Settings dialog box Absolute Colorimetric Leaves colors that fall inside the destination gamut unchanged This intent aims to maintain c...

Страница 112: ...with other users and applications that use the Color Settings dialog box such as Adobe Illustrator and Adobe InDesign You can also load previously saved color management configurations into the Color...

Страница 113: ...play an on screen preview of the document s colors as reproduced on a specified device In addition you can use your printer to produce a hard proof version of this soft proof See Using color managemen...

Страница 114: ...oof Setup dialog box is open 3 To use a preset proof setup as a starting point choose it from the Setup menu If the desired setup does not appear in the menu click Load to locate and load the setup 4...

Страница 115: ...ort to preserve the original color appearances To reassign or discard the profile of a document 1 Choose Image Mode Assign Profile 2 Select one of the following Don t Color Manage This Document to rem...

Страница 116: ...ose other save options and click Save Obtaining installing and updating color profiles Precise consistent color management requires accurate ICC compliant profiles of all of your color devices For exa...

Страница 117: ...use ColorSync 2 5 but have used earlier versions some profiles may still be stored in the System Folder Preferences ColorSync Profiles folder on your hard disk For compatibility with ColorSync 2 5 or...

Страница 118: ...f display intensity These parameters work just as they do on a television set Gamma The brightness of the midtone values The values produced by a monitor from black to white are nonlinear if you graph...

Страница 119: ...nted here may not be available To use Adobe Gamma 1 Start Adobe Gamma located in the Control Panels folder or in the Program Files Common Files Adobe Calibration folder on your hard drive 2 Do one of...

Страница 120: ...h it is a part and will not be available as a profile option in the Color Settings dialog box To load a custom profile 1 Do one of the following In Windows and Mac OS 9 x choose Edit Color Settings an...

Страница 121: ...g and loading working space profiles on page 119 Custom CMYK profiles are mainly useful for providing color management compatibility with documents created in versions of Photoshop prior to 6 0 In gen...

Страница 122: ...ry similar to another one But the amount of dot gain can vary significantly Thus for a different printer of the same type you may have to change the dot gain setting in the CMYK Setup dialog box but n...

Страница 123: ...the 50 mark of the printed calibration bar 3 In the Custom CMYK dialog box for Dot Gain choose Standard Then enter the total amount of dot gain measured by the densitometer For example if the densito...

Страница 124: ...ement GCR black ink is used to replace portions of cyan magenta and yellow ink in colored areas as well as in neutral areas GCR separations tend to reproduce dark saturated colors somewhat better than...

Страница 125: ...nk density your press can support Check with your print shop to see if you should adjust these values In the Gray Ramp graph these limits determine the cutoff points for the CMYK curves 4 If you selec...

Страница 126: ...lue The value then appears in the appropriate text box Click OK 7 Save the custom profile See Saving and loading working space profiles on page 119 To create a grayscale profile based on a custom gamm...

Страница 127: ...he Transfer Functions dialog box The imagesetter then prints the 50 dot you want When entering transfer function values keep in mind the density range of your image setter On a given imagesetter a ver...

Страница 128: ...ile of a document on page 115 3 Create a set of swatches that includes the following Four swatches each containing 100 of the CMYK colors 100 cyan 100 magenta 100 yellow and 100 black Four combination...

Страница 129: ...tail can be difficult if not impossible to correct Too many color corrections can also result in a loss of pixel values and too little detail The histogram also displays the overall distribution of sh...

Страница 130: ...ightness values of the entire image or of individual color components See Using the Hue Saturation command on page 147 Photoshop The Replace Color command replaces specified colors in an image with ne...

Страница 131: ...in the middle and highlights shown in the right part to make a good correction The histogram also gives a quick picture of the tonal range of the image or the image key type A low key image has detai...

Страница 132: ...r of pixels used to calculate the histogram Level Displays the intensity level of the area underneath the pointer Count Shows the total number of pixels corresponding to the intensity level underneath...

Страница 133: ...thumbnail of an existing adjustment layer in the Layers palette 3 To see your adjustments in the image before accepting them select Preview in the color adjustment dialog box To cancel changes without...

Страница 134: ...shortcuts To view the color values under the color samplers look at the lower half of the Info palette To place additional color samplers in the image while the adjustment dialog box is open Shift cl...

Страница 135: ...e and load the saved adjustment file If you often apply the same adjustment consider recording and running the adjustment as an action Comparing corrections in CMYK and RGB Photoshop Even though you c...

Страница 136: ...erting to CMYK In RGB mode you can identify out of gamut colors in the following ways In the Info palette an exclamation point appears next to the CMYK values whenever you move the pointer over an out...

Страница 137: ...Input slider to change the intensity values of the middle range of gray tones without dramatically altering the highlights and shadows Although the Levels sliders are not as exact as assigning target...

Страница 138: ...pixels with lower intensity values are mapped to corresponding darker values This darkens the image decreasing the contrast in highlight areas 4 To adjust the shadows and highlights automatically clic...

Страница 139: ...ral gray in an RGB image Using the Curves dialog box Photoshop Like the Levels dialog box the Curves dialog box lets you adjust the entire tonal range of an image But instead of making adjustments usi...

Страница 140: ...nding location on the curve are displayed in the Curves dialog box 5 Do any of the following to adjust the curve Drag the curve until the image looks the way you want it Click a point on the curve and...

Страница 141: ...rves the eyedropper tool is still active outside the dialog box You still have access to the scroll controls and to the hand and zoom tools by using keyboard shortcuts 3 Do one of the following to ide...

Страница 142: ...ely to the new highlight values Any pixels lighter than the area you clicked become specular white The Info palette shows the values both before and after the color adjustment 5 Do one of the followin...

Страница 143: ...The Threshold mode in Levels is not available for CMYK images 2 Hold down Alt Windows or Option Mac OS and drag the white or black Input Levels triangle The image changes to Threshold mode and a high...

Страница 144: ...erage lightest and darkest pixels in an image and uses them to maximize contrast while minimizing clipping The Auto Color command uses this algorithm 3 Select Snap Neutral Midtones if you want Photosh...

Страница 145: ...the View Preview commands adjust the appearance of the image on your monitor but do not change the image s pixel values To adjust the gamma value automatically 1 Choose Image Adjustments Gamma 2 Selec...

Страница 146: ...You can even combine these two correc tions minimizing their effect on overall lightness In an RGB image you can decrease magenta by removing red and blue or by adding green All of these adjustments...

Страница 147: ...s how the adjustment affects all of the hues at full saturation 2 Photoshop For Edit choose which colors to adjust Choose Master to adjust all colors at once Choose one of the other preset color range...

Страница 148: ...or example if you choose Yellow and alter its range so that it falls in the red part of the color bar the name changes to Red 2 You can convert up to six of the individual color ranges to varieties of...

Страница 149: ...ed colors are included in the selection 5 Drag the Hue Saturation and Lightness sliders or enter values in the text boxes to change the color of the selected areas Using the Selective Color command Ph...

Страница 150: ...to the tonal range of an image Unlike Curves and Levels this command makes the same adjustment to every pixel in the image The Brightness Contrast command does not work with individual channels and i...

Страница 151: ...ps the white and black pixels by 0 5 that is it ignores the first 0 5 of either extreme This ensures that white and black values are based on representative rather than extreme pixel values Auto Contr...

Страница 152: ...tinct colors in the original image are mapped to the same color Clipping does not occur when you adjust midtones Note Clipped colors are not the same as out of gamut colors 3 Select what to adjust in...

Страница 153: ...he inverse value on the 256 step color values scale For example a pixel in a positive image with a value of 255 is changed to 0 and a pixel with a value of 5 to 250 To use the Invert command Choose Im...

Страница 154: ...ite areas appear in the image and place a color sampler on one of the areas 4 To identify a representative shadow drag the slider to the far left until the image becomes pure white Drag the slider slo...

Страница 155: ...ghlights of the image are mapped respectively to the starting left color midpoint and ending right color of the gradient fill 3 Select either none or both of the Gradient Options Dither adds random no...

Страница 156: ...eas a higher value sharpens a wider band of pixels This effect is much less noticeable in print than on screen because a 2 pixel radius represents a smaller area in a high resolution printed image Dra...

Страница 157: ...t from its background and erase the background to transparency You can also make sophisticated selections using masks See Saving a mask selection on page 281 Making pixel selections You can select pix...

Страница 158: ...ormal to determine marquee proportions by dragging Fixed Aspect Ratio to set a height to width ratio Enter values decimal values are valid for the aspect ratio For example to draw a marquee twice as w...

Страница 159: ...lection border 3 To draw a straight edged selection border hold down Alt Windows or Option Mac OS and click where segments should begin and end You can switch between drawing freehand and straight edg...

Страница 160: ...d down Alt Windows or Option Mac OS and drag with the mouse button depressed To activate the polygonal lasso tool hold down Alt Windows or Option Mac OS and click 6 To erase recently drawn segments an...

Страница 161: ...red flower without having to trace its outline You specify the color range or tolerance for the magic wand tool s selection Note You cannot use the magic wand tool on an image in Bitmap mode To use th...

Страница 162: ...preview only the selection as you build it Image to preview the entire image For example you might want to sample from a part of the image that isn t on screen To toggle between the Image and Selectio...

Страница 163: ...se Select Color Range 2 For Select choose a color or tonal range The Out of Gamut option works only on RGB and Lab images An out of gamut color is an RGB or Lab color that cannot be printed using proc...

Страница 164: ...ion 2 Drag the border to enclose a different area of the image You can drag a selection border partly beyond the canvas boundaries When you drag it back the original border reappears intact You can al...

Страница 165: ...to subtract another selection To select only an area intersected by other selections 1 Make a selection 2 Using any selection tool do one of the following Select the Intersect with Selection option i...

Страница 166: ...in the range are selected any unselected pixels are added to the selection If most pixels are unselected any selected pixels are removed from the selection Note The relationship between physical dista...

Страница 167: ...ius may be so faint that its edges are invisible and thus not selectable If a message appears stating No pixels are more than 50 selected either decrease the feather radius or increase the selection s...

Страница 168: ...er you want to move Then drag the layer to a new position To align selections and layers within an image 1 Do one of the following To align the content of a layer to a selection make a selection in th...

Страница 169: ...Use the Image Size command to make the source and destination images the same resolution before copying and pasting See Determining a recommended resolution for an image Photoshop on page 68 Dependin...

Страница 170: ...tion The layer and layer mask are unlinked that is you can move each one independently Source selection pasted into destination selection For more information on editing layer masks see Applying and d...

Страница 171: ...rized at the resolution of the file into which you paste it To change the Export Clipboard preference Photoshop 1 Do one of the following In Windows and Mac OS 9 x choose Edit Preferences General In M...

Страница 172: ...o snap to guides See Using guides and the grid on page 45 Photoshop Grid to snap to the grid You cannot select this option when the grid is hidden See Using guides and the grid on page 45 Slices to sn...

Страница 173: ...ining pure colors those without background color For example if you select a yellow object on a blue background and then move the selection some of the blue background is selected and moved with the o...

Страница 174: ...xtract If you select a background layer it becomes a normal layer after the extraction To avoid losing the original image information duplicate the layer or make a snapshot of the original image state...

Страница 175: ...light the entire object To base the highlight on a selection saved in an alpha channel choose the alpha channel from the Channel menu The alpha channel should be based on a selection of the edge bound...

Страница 176: ...a value It is usually best to begin with a zero or small value to avoid unwanted blurring of details If there are sharp artifacts in the extraction result you can increase the Smooth value to help rem...

Страница 177: ...n terms of the columns specified in the Rulers Units preferences For more information see Using columns Photoshop on page 44 4 Do one of the following Enter the dimensions you want the canvas to be in...

Страница 178: ...the Trim command The crop tool provides the most options for cropping images To crop an image using the crop tool 1 Select the crop tool 2 Set the mode of the crop tool Photoshop To crop the image wit...

Страница 179: ...e bounding box and drag To scale the marquee drag a handle To constrain the proportions hold down Shift as you drag a corner handle To rotate the marquee position the pointer outside the bounding box...

Страница 180: ...quee B Adjust cropping marquee to match the object s edges C Extend the cropping bounds D Final image To transform the perspective in an image 1 Select the crop tool and set the crop mode See Cropping...

Страница 181: ...ces dialog box This option directly affects the speed and quality of the transformation Bicubic interpolation the default is slowest but yields the best results See Choosing an interpolation method on...

Страница 182: ...r of the bounding box click the top left square on the reference point locator To move the center point for the transformation 1 Select a transformation command as described in the following topics A...

Страница 183: ...ounding box If you chose Distort drag a corner handle to stretch the bounding box If you chose Perspective drag a corner handle to apply perspective to the bounding box For all types of transformation...

Страница 184: ...lative to specify the new position in relation to the current position Select Scale Enter the dimensions in the W and H text boxes or enter a scaling percentage in the Scale text box Select Constrain...

Страница 185: ...mes a white arrowhead with a small double arrow To skew numerically enter degrees in the H horizontal skew and V vertical skew text boxes in the options bar To apply perspective press Ctrl Alt Shift W...

Страница 186: ...he image such as a globe or ball to a spherical surface Cylinder to map the image such as a can or bottle to a cylindrical surface 3 Drag to create a cubic cylindrical or spherical wire frame over the...

Страница 187: ...tween 1 and 130 or drag the slider to the left to increase the apparent field of view right to decrease it The 3D Transform dialog box previews only the active layer As you manipulate an object in thr...

Страница 188: ...nal background Cloning and repairing images You can use the clone stamp tool pattern stamp tool healing brush tool and patch tool to clone pixels and repair images Using the clone stamp tool The clone...

Страница 189: ...inting and editing tools on page 241 Select a pattern from the Pattern pop up palette See Creating and managing patterns on page 252 Determine how you want to align the sampled pixels If you select Al...

Страница 190: ...om the Pattern pop up palette See Creating and managing patterns on page 252 Note The Pattern option is not available for 16 bit images 5 Determine how you want to align the sampled pixels If you sele...

Страница 191: ...mpled pixels and source pixels Patched image To repair an area using sampled pixels 1 Select the patch tool 2 Do one of the following Drag in the image to select the area you want to repair and select...

Страница 192: ...Shift drag Windows or Option Shift drag Mac OS in the image to select an area intersected by the existing selection 4 Select a pattern from the Pattern pop up palette in the options bar and click Use...

Страница 193: ...age you want to blur or sharpen Using the toning tools The toning tools consist of the dodge tool and the burn tool Used to lighten or darken areas of the image the dodge and burn tools are based on a...

Страница 194: ...Drag over the part of the image you want to modify Using the Liquify command The Liquify command lets you interactively scramble push pull rotate reflect pucker and bloat any area of an image The dist...

Страница 195: ...or Backdrop Mac OS specify an overlay opacity and choose an option from the pop up menu Note Only the active layer is distorted even if other layers are displayed Distorting images Several tools in th...

Страница 196: ...downward stroke Usually Alt dragging or Option dragging gives better results when you have frozen the area you want to reflect Use overlapping strokes to create an effect similar to a reflection in w...

Страница 197: ...e same effect on the thaw tool as it has on the freeze tool To thaw all frozen areas click Thaw All in the Freeze Area section of the dialog box To thaw all frozen areas and freeze the remaining areas...

Страница 198: ...frozen areas the unfrozen areas continue the distortions in the frozen areas As the distance from frozen areas increases the distortions lessen Smooth to propagate the distortions in frozen areas thro...

Страница 199: ...displacement rotation horizontal and vertical scaling and skew 2 Select the reconstruct tool and in the preview image hold down the mouse button or drag from a starting point This spreads the distorti...

Страница 200: ...a shape and you can edit a shape s outline called a path and attributes such as stroke fill color and style You can use shapes to make selections and create libraries of custom shapes with the Preset...

Страница 201: ...Select a drawing tool and set tool specific options 3 Choose one of the following in the options bar Add to Shape Area to add the new area to the existing shapes or path Subtract from Shape Area to r...

Страница 202: ...lude Overlapping Path Areas to exclude the overlap area in the consolidated path Use the following keyboard shortcuts while drawing with a shape tool Hold down Shift to temporarily select the Add to P...

Страница 203: ...shop 2 Set tool options in the options bar The available options vary by tool In Photoshop click the inverted arrow next to the shape buttons to view the options Arrowheads Start and End Renders a lin...

Страница 204: ...p Renders a polygon with smooth corners or indents Snap to Pixels Photoshop Snaps edges of a rectangle or rounded rectangle to the pixel boundaries Square Photoshop Constrains a rectangle or rounded r...

Страница 205: ...lowing tool specific options To add an anchor point when you click a line segment and delete an anchor point when you click it select Auto Add Delete in the options bar See Adding deleting and convert...

Страница 206: ...rve and drag the second direction point in the opposite direction to create a single curve Dragging both direction points in the same direction creates an S curve Drag in the opposite direction to cre...

Страница 207: ...next segment of a smooth curve position the pointer where you want the next segment to end and drag away from the curve Drag away from the curve to create the next segment To change the direction of...

Страница 208: ...a closed path click the initial point of the path a circle appears next to the pointer when it is aligned For more information on closed and open paths see About anchor points direction lines directi...

Страница 209: ...y editing the shape s fill layer You can also edit the shape s vector mask to modify the shape outline and apply a style to the layer To change the color of a shape Double click the shape layer s thum...

Страница 210: ...n the Paths palette Editing paths Photoshop A path is composed of one or more path components collections of one or more anchor points joined by segments Because they take up less disk space than pixe...

Страница 211: ...a corner point only the curve on the same side of the point as the direction line is adjusted Adjusting a smooth point and a corner point A path does not have to be all one connected series of segmen...

Страница 212: ...r segments When the direct selection tool is selected you can select the entire path or path component by Alt clicking Windows or Option clicking Mac OS inside the path To activate the direct selectio...

Страница 213: ...djust the angle or length of the segment select an anchor point 2 Drag the selected segment to its new position To move a curved segment 1 Select the direct selection tool and select the points or seg...

Страница 214: ...tor mask can be moved reshaped copied or deleted You can also use the Copy and Paste commands to duplicate vector objects between a Photoshop image and an image in another application such as Adobe Il...

Страница 215: ...entire path or the path components in the source image you want to copy 3 To copy the path component do any of the following Drag the path component from the source image to the destination image The...

Страница 216: ...an anchor point 1 Select the add anchor point tool and position the pointer on the path where you want the anchor point added a plus sign appears next to the pointer 2 Do one of the following To add...

Страница 217: ...again a new path will replace the existing one When you use a pen or shape tool to create a new shape layer the new path appears as a vector mask in the Paths palette Vector masks are linked to their...

Страница 218: ...ths palette 2 Do one of the following Drag the path to the Trash button at the bottom of the Paths palette Choose Delete Path from the Paths palette menu Click the Trash button at the bottom of the Pa...

Страница 219: ...h Add to Selection to add the area defined by the path to the original selection Subtract from Selection to remove the area defined by the path from the original selection Intersect with Selection to...

Страница 220: ...yer clipping mask or text layer is active To fill a path using the current Fill Path settings 1 Select the path in the Paths palette 2 Click the Fill Path button at the bottom of the Paths palette To...

Страница 221: ...path using the current Stroke Path settings 1 Select the path in the Paths palette 2 Click the Stroke Path button at the bottom of the Paths palette Each click of the Stroke Path button builds up the...

Страница 222: ...ions bar Choose a brush and set brush options See Working with brushes on page 228 Specify a blending mode See Selecting a blending mode on page 241 Specify an opacity See Specifying opacity flow stre...

Страница 223: ...mode on page 241 For the paintbrush tool and pencil tool specify an opacity See Specifying opacity flow strength or exposure on page 243 For the airbrush tool specify a paint flow See Specifying opaci...

Страница 224: ...for Block mode in Photoshop Photoshop In Brush mode specify a flow rate See Specifying opacity flow strength or exposure on page 243 Photoshop In Brush mode click the airbrush button to use the brush...

Страница 225: ...ct in the foreground By specifying different sampling and tolerance options you can control the range of the transparency and the sharpness of the boundaries The background eraser samples the color in...

Страница 226: ...urrent background color 5 Drag through the area you want to erase The background eraser tool pointer appears as a brush shape with a cross hair indicating the tool s hot spot Using the Auto Erase opti...

Страница 227: ...palette click the left column of the state or snapshot to use as the source for the art history brush tool A brush icon appears next to the source history state 2 Select the art history brush tool 3 D...

Страница 228: ...ing the Brushes palette Choose Window Brushes or click the palette button on the right side of the options bar for the painting tools erasing tools toning tools and focus tools Displaying options in t...

Страница 229: ...Stroke Thumbnail to view a sample brush stroke with each brush thumbnail To dynamically preview brush strokes in the Brushes palette position the pointer over a brush until the tool tip appears then m...

Страница 230: ...rush shape can be up to 2500 pixels by 2500 pixels in size To be most effective the shape should appear on a solid white background If you want to define a brush with soft edges select pixels with gra...

Страница 231: ...is a percentage of the brush diameter Brush strokes with different hardness values Spacing Controls the distance between the brush marks in a stroke To change the spacing type a number or use the slid...

Страница 232: ...hes palette select Shape Dynamics on the left side of the palette Be sure to click the name rather than the check box to select the item 2 Set one or more of the following options Size Jitter and Cont...

Страница 233: ...stroke Direction to base the angle of brush marks on the direction of the brush stroke Roundness Jitter and Control Specifies how the roundness of brush marks varies in a stroke For more information s...

Страница 234: ...cattering of brush marks based on the pen pressure pen tilt or position of the pen thumbwheel Count Specifies the number of brush marks applied at each spacing interval Type a number or use the slider...

Страница 235: ...en this option is not selected the Depth variance options are not available Mode Specifies the blending mode used to combine the brush and the pattern See Selecting a blending mode on page 241 Depth S...

Страница 236: ...he dual tip Enter a value in pixels drag the slider or click Use Sample Size to use the original diameter of the brush tip The Use Sample Size option is only available if the brush tip shape was creat...

Страница 237: ...er Specifies a percentage by which the hue of the paint can vary in a stroke Type a number or use the slider to enter a value A lower value changes the hue while maintaining a close proximity to the h...

Страница 238: ...aries in a brush stroke up to but not exceeding the flow value specified in the options bar For more information see About brush dynamics Photoshop on page 231 To specify a percentage by which the flo...

Страница 239: ...A check mark indicates that the option is enabled Protecting texture in brush strokes Photoshop The Protect Texture option applies the same pattern and scale to all brush presets that have a texture...

Страница 240: ...nd click OK If the Brushes palette is set to display brushes as thumbnails double click a brush enter a new name and click OK If the Brushes palette is set to display brushes as a list or text only do...

Страница 241: ...elected and is analogous to painting on the back of transparent areas in a sheet of acetate Clear Edits or paints each pixel and makes it transparent This mode is available for the line tool when fill...

Страница 242: ...were dodged If the blend color is darker than 50 gray the image is darkened as if it were burned in Painting with pure black or white produces a distinctly darker or lighter area but does not result...

Страница 243: ...eful for coloring monochrome images and for tinting color images Luminosity Creates a result color with the hue and saturation of the base color and the luminance of the blend color This mode creates...

Страница 244: ...hen click OK See Creating smooth gradient fills on page 245 4 Select an option for applying the gradient fill in the options bar Linear gradient to shade from the starting point to the ending point in...

Страница 245: ...resets section of the dialog box 4 Choose Solid from the Gradient Type pop up menu 5 To define the starting color of the gradient click the left color stop under the gradient bar The triangle above th...

Страница 246: ...to the default library the new presets will be lost To permanently save new presets save them in a library See Managing gradients on page 248 To add intermediate colors to a gradient In the Gradient E...

Страница 247: ...cy setting you specified Creating noise gradient fills In addition to creating smooth gradients the Gradient Editor dialog box lets you define a new noise gradient A noise gradient is a gradient that...

Страница 248: ...will appear at the bottom of the palette menu after you restart Photoshop To load a library of preset gradients Do one of the following Click Load to add a library to the current list Select the libra...

Страница 249: ...from all visible layers select All Layers See Sampling from layers on page 291 9 Click the part of the image you want to fill All specified pixels within the specified tolerance are filled with the fo...

Страница 250: ...d select a pattern from the pop up palette You can load additional patterns using the pop up palette menu Select the name of a library of patterns or choose Load Patterns and navigate to the folder co...

Страница 251: ...a softer border than one created using the Stroke layer style The Stroke layer style provides a resolution independent method to stroke a shape See Managing layers on page 292 You can use the Stroke...

Страница 252: ...ns folder which comes with Photoshop contains a single pattern in the Adobe Illustrator format You can scale and render these patterns at any resolution 2 Select the pattern file you want to use and c...

Страница 253: ...ns folder inside the Photoshop program folder the library name will appear at the bottom of the Pattern pop up palette menus after you restart Photoshop To return to the default library of patterns Ch...

Страница 254: ...transparency of the active layer is locked the Pattern Maker does not change the transparency of the layer when it tiles with a generated pattern To generate a pattern 1 Do one of the following Select...

Страница 255: ...iewing patterns on page 255 You can view the status of the current generation in the Photoshop status bar Press Esc to cancel the generation 7 Click Generate Again to generate additional patterns usin...

Страница 256: ...tant When you save a tile as a preset pattern only a single tile is saved not the full generated pattern To navigate through tiles and pattern previews Do one of the following Click the First Tile but...

Страница 257: ...ted tile Generated pattern with Smoothness of 1 and Smoothness of 3 Sample Detail If the sample contains details that are cut up in the generated pattern increase the Sample Detail value Example of sa...

Страница 258: ...ing the eyedropper tool The eyedropper tool samples color to designate a new foreground or background color You can sample from the active image or from anywhere else on the screen You can also specif...

Страница 259: ...page 262 To display the Color palette Choose Window Color or click the Color palette tab To change the color model of the color sliders Choose a Sliders option from the Color palette menu For more inf...

Страница 260: ...l List to display the name and thumbnail of each swatch To select a foreground or background color Do one of the following To choose a foreground color click a color in the Swatches palette To choose...

Страница 261: ...e Swatches palette menu 2 Choose a location for the swatch library enter a filename and click Save You can save the library anywhere However if you place the library file in the Presets Swatches folde...

Страница 262: ...r The color rectangle to the right of the color slider displays the new color in the top section of the rectangle The original color appears at the bottom of the rectangle Specifying a color using num...

Страница 263: ...bove the color ramp on the left side of the Color palette Click the alert cube to select the closest Web color In ImageReady drag around the alert icon to select other close Web colors If no alert cub...

Страница 264: ...nd matte stocks To simulate a PANTONE solid color in CMYK use the PANTONE Solid to Process Guide which displays a visual comparison of 1 089 solid PANTONE colors beside the closest process color match...

Страница 265: ...e plug in To use the Windows Color Picker Windows 1 Choose Edit Preferences General 2 Choose Windows from the Color Picker menu and click OK For more information see your Windows documentation To use...

Страница 266: ...channel information and can save space The uncompressed size of a file including alpha channels and layers appears as the rightmost value in the status bar at the bottom of the window when Document S...

Страница 267: ...ly transparent or selected pixels appear as gray These are the channel default options If you display an alpha channel at the same time as color channels the alpha channel appears as a transparent col...

Страница 268: ...or channels and then the alpha channels You cannot move or rename the default channels but you can rearrange and rename spot and alpha channels to suit the way you work Spot colors are overprinted in...

Страница 269: ...appears at the bottom of the Channels palette Choose Select All then choose Edit Copy Select the channel in the destination image and choose Edit Paste The pasted channel overwrites the existing chann...

Страница 270: ...appears in the Channels text box 4 If necessary enter a number in the Channels text box If you enter a number that is incompatible with the selected mode Multichannel mode is automatically selected Th...

Страница 271: ...YCbCr which is used in digital video Swap or duplicate channels To mix color channels 1 In the Channels palette select the composite color channel 2 Choose Image Adjustments Channel Mixer 3 For Outpu...

Страница 272: ...plates You can use up to four spot colors one per plate See Printing color separations on page 483 The names of the spot colors print on the separations Spot colors are overprinted on top of the full...

Страница 273: ...To convert an alpha channel to a spot channel 1 Do one of the following Double click the alpha channel thumbnail in the Channels palette Select the alpha channel in the Channels palette and choose Ch...

Страница 274: ...rge spot channels 1 Select the spot channel in the Channels palette 2 Choose Merge Spot Channel from the palette menu The spot color is converted to and merged with the color channels The spot channel...

Страница 275: ...nnels into layers in the Layers palette you may find it quicker to use the calculation commands to blend channel information The calculation commands perform mathematical operations on the correspondi...

Страница 276: ...s of the channel See Using channel calculations to blend layers and channels Photoshop on page 275 Using the Calculations command The Calculations command lets you blend two individual channels from o...

Страница 277: ...verage of the pixels in two channels you would add them divide by 2 and enter no Offset value The Scale factor may be any number between 1 000 and 2 000 Entering a higher Scale value darkens the image...

Страница 278: ...mix of soft and hard masking edges on the same layer By making changes to the layer mask or the vector masks you can apply a variety of special effects See Masking layers on page 314 Creating temporar...

Страница 279: ...urn off the quick mask and return to your original image A selection border now surrounds the unprotected area of the quick mask If a feathered mask is converted to a selection the boundary line runs...

Страница 280: ...el in Photoshop and then add a mask to it You can also save an existing selection in a Photoshop or ImageReady image as an alpha channel that will appear in the Channels palette in Photoshop About alp...

Страница 281: ...ew channel with default options Photoshop 1 Select the area or areas of the image that you want to isolate 2 Click the Save Selection button at the bottom of the Channels palette A new channel appears...

Страница 282: ...e channel in the Channels palette and choose Channel Options from the palette menu Double click the channel thumbnail in the Channels palette 2 Enter a new name for the channel 3 Choose display option...

Страница 283: ...lready has a selection indicate how to combine the selec tions For information on these options see Saving a mask selection on page 281 To load a saved selection into an image ImageReady Choose Select...

Страница 284: ...addition special features such as adjustment layers fill layers and layer styles let you create sophisticated effects Illustration of how transparent areas on a layer let you see through to the layer...

Страница 285: ...layer sets and layer effects you can add to an image is limited only by your computer s memory About the background layer When you create a new image with a white background or a colored background t...

Страница 286: ...s palette Ctrl click Windows or Command click Mac OS the New Layer button or New Layer Set button in the Layers palette to add a layer below the currently selected layer 2 Set layer options click OK N...

Страница 287: ...also select layers interactively as you use the move tool If Auto Select Layer is selected in the Move tool options the topmost layer containing pixels under the cursor will be selected See Moving sel...

Страница 288: ...Layers palette menu In Photoshop enter a name for the layer or layer set and click OK Photoshop Press Alt Windows or Option Mac OS and drag the layer or layer set to the New Layer button or the New La...

Страница 289: ...ommand applies to the stacking order within the layer set If the selected item is not in a layer set the command applies to the stacking order within the Layers palette Note By definition the backgrou...

Страница 290: ...linked layers to the left pixel on the active layer or the left edge of the selection border Horizontal Centers to align the horizontal center pixel on the linked layers to the horizontal center pixe...

Страница 291: ...layers in a layer set 1 Select a linked layer or a layer set 2 Choose Lock All Linked Layers or Lock All Layers in Set from the Layers menu or the Layers palette menu 3 Select lock options and click O...

Страница 292: ...r a new name in the Name text box and click OK ImageReady Select a layer or layer set and choose Layer Options or Layer Set Options from the Layers menu or the Layers palette menu Enter a new name in...

Страница 293: ...e Layers menu or the Layers palette menu To delete linked layers Photoshop Do one of the following To delete the linked layers with confirmation choose Delete Linked Layers from the Layers menu or the...

Страница 294: ...palette or the Layers palette menu To merge all the visible layers and layer sets in an image Choose Merge Visible from the Layers palette or the Layers palette menu To create a new layer from all vi...

Страница 295: ...large for your purposes If the file is becoming too large reduce the number of layers in the image or change the image size You can view file size information for an image at the bottom of the applica...

Страница 296: ...or layer set 1 Select a layer or layer set in the Layers palette 2 Choose a blending mode In the Layers palette choose an option from the Blend Mode pop up menu Photoshop Double click a layer thumbnai...

Страница 297: ...et you specify which layers punch through to reveal content from other layers For example you can use a text layer to knock out a color adjustment layer and reveal a portion of the image using the ori...

Страница 298: ...lipping group containing the knockout option Deep to knock out to the Background If there is no Background Deep knocks out to transparency 5 Lower the fill opacity or change the blending mode to creat...

Страница 299: ...oose Layer Layer Style Blending Options or choose Blending Options from the Layers palette menu Note To view blending options for a text layer choose Layer Layer Style Blending Options or choose Blend...

Страница 300: ...Layer Style dialog box choose an option from the Blend If pop up menu Gray to specify a blending range for all channels An individual color channel for example red green or blue in an RGB image to spe...

Страница 301: ...fects are modified correspondingly For example if you apply a drop shadow effect to a text layer the shadow will change automatically when you edit the text The effects that you apply to a layer becom...

Страница 302: ...on layer Photoshop Double click a layer thumbnail in the Layers palette and click on the word Styles in the Layer Styles dialog box top item in the list on the left side of the dialog box Click the st...

Страница 303: ...r s content Bevel and Emboss Adds various combinations of highlights and shadows to a layer Satin Applies shading to the interior of a layer that reacts to the shape of the layer typically creating a...

Страница 304: ...e to collapse the layer effects To expand or collapse all of the layer styles applied within a layer set hold Alt Windows or Option Mac OS and click the triangle or inverted triangle for the set The l...

Страница 305: ...shadow blends only with the layers beneath the active layer In most cases the default mode for each effect produces the best results See Choosing a blending mode on page 296 Choke Shrinks the boundar...

Страница 306: ...p up palette and choose a pattern Click the New preset button to create a new preset pattern based on the current settings Click Snap to Origin to position the origin of the pattern with that of the d...

Страница 307: ...d direction up down to which the texturing is applied Snap to Origin controls the snap of the pattern s origin with that of the document if Link With Layer is disabled and with the top left corner of...

Страница 308: ...e or drag the angle radius to set the Angle and Altitude and click OK Photoshop In the Layer Style dialog box for Drop Shadow Inner Shadow or Bevel select Use Global Light For Angle enter a value or d...

Страница 309: ...palette Press Alt Windows or Option Mac OS and click the layer style in the Styles palette Photoshop Select a style is the Styles section of the Layer Styles dialog box See Applying preset styles on...

Страница 310: ...e layer effect or drag the Effects bar from one layer to another to duplicate the layer style Drag one or more layer effects from the Layers palette to the image to apply the resulting layer style to...

Страница 311: ...tyle will no longer update as you change the original image layer Note The layers produced by this process may not result in artwork that exactly matches the version using layer styles In Photoshop yo...

Страница 312: ...a layer mask To confine the effects of an adjustment layer to a group of layers create a clipping group consisting of these layers You can place the adjustment layers in or at the base of the clipping...

Страница 313: ...e highlights shadows and midtones See Using the Levels dialog box on page 137 Curves Adjust the intensity values of pixels along a 0 255 scale while keeping up to 15 other values constant For more inf...

Страница 314: ...e layers in its own grouped layer with the layers it is linked to and with all other visible layers You cannot however use an adjustment layer or fill layer as the target layer for a merge When you me...

Страница 315: ...art of it using a layer mask You can also edit a layer mask to add or subtract from the masked region A layer mask is a grayscale image so what you paint in black will be hidden what you paint in whit...

Страница 316: ...ion into a layer mask Alt click Windows or Option click Mac OS the layer mask thumbnail in the Layers palette to select and display the mask channel Choose Edit Paste drag the selection in the image t...

Страница 317: ...create a layer with a vector mask you can apply one or more layer styles to it edit them if needed and instantly have a usable button panel or other Web design element To add a vector mask that shows...

Страница 318: ...layer To unlink a layer from its mask Click the link icon in the Layers palette To reestablish the link between a layer and its mask Click between the layer and mask path thumbnails in the Layers pale...

Страница 319: ...ase layer acts as a mask for the entire group For example you might have a shape on one layer a texture on the overlying layer and some text on the topmost layer If you define all three layers as a cl...

Страница 320: ...r from a clipping group Do one of the following Hold down Alt Windows or Option Mac OS position the pointer over the line separating two grouped layers in the Layers palette the pointer changes to two...

Страница 321: ...hosen appears at the top of the menu Filters are applied to the active visible layer Filters cannot be applied to Bitmap mode or indexed color images Some filters only work on RGB images Some filters...

Страница 322: ...ubset of those in the painting and editing tools options excluding the Behind and Clear modes Applying the Fade command is similar to applying the filter effect on a separate layer and then using the...

Страница 323: ...and brick or viewed through glass blocks To use texture and glass surface controls 1 From the Filter menu choose Artistic Rough Pastels Artistic Underpainting Distort Glass Sketch Cont Crayon or Textu...

Страница 324: ...38 Improve image quality and consistency You can disguise faults alter or enhance or make a series of images look related by applying the same effect to each Use the Actions palette to record the pro...

Страница 325: ...or more about the Displace filter see Defining undistorted areas on page 323 For more on Glass filter controls see Using texture and glass surface controls on page 323 Noise filters Photoshop Add or r...

Страница 326: ...which restricts the gamut of colors to those acceptable for television reproduction and the De Interlace filter which smooths moving images captured on video For more infor mation on Video filters see...

Страница 327: ...f stroked with colored pastel chalk on a textured background In areas of bright color the chalk appears thick with little texture in darker areas the chalk appears scraped off to reveal the texture Fo...

Страница 328: ...of color transitions Edge Only and Overlay Where significant contrast occurs Edge Only applies black and white edges and Overlay Edge applies white Brush Stroke filters Like the Artistic filters the B...

Страница 329: ...mine how undistorted areas of the image will be treated See Defining undistorted areas on page 323 5 Click OK 6 Select and open the displacement map The distortion is applied to the image The Displace...

Страница 330: ...ls in your selection The Ridges option sets the number of direction reversals of the zigzag from the center of the selection to its edge You also choose how to displace the pixels Pond Ripples displac...

Страница 331: ...f pixels within a selection The filter searches the radius of a pixel selection for pixels of similar brightness discarding pixels that differ too much from adjacent pixels and replaces the center pix...

Страница 332: ...ects for lighting 3D Transform Maps images to cubes spheres and cylinders which you can then rotate in three dimensions For more information see Transforming objects in three dimen sions on page 186 C...

Страница 333: ...the background color Chalk Charcoal Redraws an image s highlights and midtones with a solid midtone gray back ground drawn in coarse chalk Shadow areas are replaced with black diagonal charcoal lines...

Страница 334: ...lters The Stylize filters produce a painted or impressionistic effect on a selection by displacing pixels and by finding and heightening contrast in an image After using filters like Find Edges and Tr...

Страница 335: ...an image into a series of tiles off setting the selection from its original position You can choose one of the following to fill the area between the tiles the background color the foreground color a...

Страница 336: ...xture you select or create to an image See Using texture and glass surface controls on page 323 Video filters The Video submenu contains the De Interlace and NTSC Colors filters De Interlace Smooths m...

Страница 337: ...Maximum Photoshop Are useful for modifying masks The Minimum filter has the effect of applying a spread spreading out black areas and shrinking white areas The Maximum filter has the effect of applyin...

Страница 338: ...ctance Material determines whether the light or the object on which the light is cast reflects more light Plastic reflects the light s color Metallic reflects the object s color Exposure increases the...

Страница 339: ...drag the handle to shorten the line To decrease the light angle drag to lengthen the line To stretch the ellipse or rotate the light drag one of the handles Shift drag to keep the angle constant and...

Страница 340: ...ight Three spotlights with slight 35 intensity and wide 100 focus To add a light In the Lighting Effects dialog box drag the light icon at the bottom of the dialog box into the preview area Repeat as...

Страница 341: ...re from another image copy and paste the image into a new channel See Creating alpha channels Photoshop on page 280 2 In the Lighting Effects dialog box choose a channel from the Texture Channel menu...

Страница 342: ...save a PDF or EPS file or print the image to a PostScript printer As a result it s possible to produce type with crisp resolution independent edges Creating type You can create horizontal or vertical...

Страница 343: ...int type 1 Do one of the following Photoshop Select the horizontal type tool or the vertical type tool ImageReady Select the type tool 2 Click in the image to set an insertion point for the type The s...

Страница 344: ...ize rotate or skew the bounding box 6 Photoshop Commit the type layer See About using the type tools Photoshop on page 343 The type you entered appears in a new type layer To resize or transform a typ...

Страница 345: ...d copied filled or stroked just like any other selection To create a type selection border 1 Select the layer on which you want the selection to appear For best results create the type selection borde...

Страница 346: ...ayers You must rasterize the type prior to applying the command or using the tool Rasterizing converts the type layer to a normal layer and makes its contents uneditable as text A warning message appe...

Страница 347: ...nline and gives you more freedom in deciding whether to apply anti aliasing to type Note When you use anti aliasing type may be rendered inconsistently at small sizes and low resolutions such as the r...

Страница 348: ...an arc or a wave The warp style you select is an attribute of the type layer you can change a layer s warp style at any time to change the overall shape of the warp Warping options give you precise c...

Страница 349: ...yles to the layer however you cannot edit characters in the layer as text See Creating and editing vector masks on page 317 To convert type to shapes Select a type layer and choose Layer Type Convert...

Страница 350: ...aracter palette The Character palette provides options for formatting characters Some formatting options are also provided in the options bar To display the Character palette Do one of the following C...

Страница 351: ...n page 348 Choosing a type size The type size determines how large the type appears in the image In Photoshop the default unit of measurement for type is points One PostScript point is equal to 1 72 o...

Страница 352: ...sting color See Using layer effects and styles on page 301 In ImageReady you can drag a color from the toolbox color selection box the Color palette the Color Table palette or the Swatches palette and...

Страница 353: ...the default spacing negative values move characters closer together reducing the default spacing Kerning and tracking values are measured in units that are 1 1000 of an em space The width of an em spa...

Страница 354: ...ripts or subscripts Default and baseline shift of 10 points To specify baseline shift In the Character palette enter a value for Baseline Shift A positive value moves horizontal type above and vertica...

Страница 355: ...vertical type You can also apply a line through horizontal or vertical type The line is always the same color as the type color To apply an underline or strikethrough Choose an option Click the Under...

Страница 356: ...ctional character widths provide the best spacing for type appearance and readability However for type in small sizes less than 20 points displayed online fractional character widths can cause type to...

Страница 357: ...n confirm its spelling by adding the word to the dictionary If a questioned word is misspelled you can correct it To check and correct spelling 1 In the Character palette choose a language from the po...

Страница 358: ...embedded within a larger word For example if you are searching for any as a whole word many will be disregarded 6 Click Find Next to begin the search 7 Click the button that reflects what you want to...

Страница 359: ...for horizontal type are Aligns type to the left leaving the right edge of the paragraph ragged Aligns type to the center leaving both edges of the paragraph ragged Aligns type to right leaving the lef...

Страница 360: ...pecify paragraph spacing In the Paragraph palette enter a value for Space Before and Space After Specifying hanging punctuation Hanging punctuation controls whether punctuation marks fall inside or ou...

Страница 361: ...ingle line composer See About composition methods on page 362 3 To prevent capitalized words from being hyphenated deselect Hyphenate Capitalized Words Then click OK Preventing unwanted word breaks Yo...

Страница 362: ...e hyphenation and justification options you ve specified for a given paragraph The Every line Composer Considers a network of break points for a range of lines and thus can optimize earlier lines in t...

Страница 363: ...native language To display CJK type options 1 Do one of the following In Windows and Mac OS 9 x Choose Edit Preferences General In Mac OS X Choose Photoshop Preferences General 2 Select Show Asian Te...

Страница 364: ...ot available for vertical text To specify how leading is measured 1 Select the paragraphs you want to adjust 2 Choose Top to top Leading or Bottom to bottom Leading from the Paragraph palette menu A c...

Страница 365: ...n the Japanese Industrial Standard JIS X 4051 1995 Oidashi and Oikomi When kinsoku shori or mojikumi is on you can choose different methods for processing line breaks Oidashi push out line breaking is...

Страница 366: ...Mojikumi Set 3 and Mojikumi Set 4 To select a kinsoku shori set for a paragraph In the Paragraph palette choose an option from the Kinsoku Shori pop up menu None to turn off the use of kinsoku shori...

Страница 367: ...k indicates which option is selected Using burasagari Burasagari allows single byte periods double byte periods single byte commas and double byte commas to fall outside the paragraph bounding box To...

Страница 368: ...of GIF PNG JPEG and WBMP files HTML text linking information and JavaScript code for creating rollover effects You can integrate your Web production process by opening Photoshop files directly in Ado...

Страница 369: ...create using the slice tool are called user slices slices you create from a layer are called layer based slices When you create a new user slice or layer based slice additional auto slices are generat...

Страница 370: ...d resizing user slices on page 374 To create slices from guides 1 Add guides to an image See Using guides and the grid on page 45 2 Do one of the following Photoshop Select the slice tool and click Sl...

Страница 371: ...mbining linking and setting options for auto slices automatically converts them to user slices To convert an auto slice to a user slice 1 Select an auto slice In ImageReady you can select multiple sli...

Страница 372: ...hide slices Do one of the following Choose View Show Slices To hide and show slices along with other items use the Extras command For more information see Working with Extras on page 47 ImageReady Cl...

Страница 373: ...d slices The value determines by how much the brightness and contrast of unselected slices are dimmed Selecting and modifying slices You can move duplicate combine divide resize delete arrange align a...

Страница 374: ...Selection and select the name of the slice selection you want to delete from the submenu Deleting a slice selection does not delete the slices themselves Moving and resizing user slices You can move...

Страница 375: ...slices Select and enter a value for pixels per slice to divide each slice based on the specified number of pixels Any section of a slice that is left over is made into another slice For example if you...

Страница 376: ...lices 1 Select two or more slices 2 Choose Slices Combine Slices Arranging user slices and layer based slices When slices overlap the last slice you create is the top slice in the stacking order You c...

Страница 377: ...wing With the slice select tool active click a distribute option in the options bar Distribute Top Edges Distribute Vertical Centers Distribute Bottom Edges Distribute Left Edges Distribute Horizontal...

Страница 378: ...utton in the options bar This method is available only in the main Photoshop application not in the Photoshop Save for Web dialog box To display the Slice palette ImageReady Choose Window Slice or cli...

Страница 379: ...he effect of selecting a background color See Previewing an image in a browser on page 53 To choose a background color 1 Select a slice If you are working in the Photoshop Save for Web dialog box doub...

Страница 380: ...e Layer Apron options In ImageReady if the Dimensions or Layer Apron options aren t showing choose Show Options from the Slice palette menu or click the Show Options button on the palette tab to view...

Страница 381: ...splay the Slice Options dialog box 2 In the Slice Options dialog box Photoshop or the Slice palette ImageReady type the desired text in the Message text box Alt text box or both Adding HTML text to a...

Страница 382: ...ce area Bottom to align the text to the bottom of the slice area Optimizing slices You can optimize Image slices using the Save for Web dialog box Photoshop or the Optimize palette ImageReady All Imag...

Страница 383: ...o unlink all user slices in an image choose Slices Unlink All Creating and viewing image maps ImageReady Image maps enable you to link an area of an image to a URL You can set up multiple linked areas...

Страница 384: ...ngle or circle image map tool select Fixed Size to specify set values for the image map area s dimensions Enter pixel values in whole numbers 3 Do one of the following to define the image map area Wit...

Страница 385: ...appear in the document window You can set preferences for image map lines line color and color adjustments To show or hide image map areas Do one of the following Click the Image Map Visibility butto...

Страница 386: ...he selection You can also select multiple image map areas by clicking outside an image map area and dragging across the image map areas you want to select Moving and resizing tool based image maps You...

Страница 387: ...gon enter a value or choose a value from the Quality pop up slider to set the number of segments in the polygon Duplicating image maps You can create a duplicate image map area with the same dimension...

Страница 388: ...age Map Right Edges Choose an alignment command from the Image Map palette menu Distributing tool based image maps You can distribute tool based image map areas evenly along the vertical or horizontal...

Страница 389: ...mes and the current frame is a child The linked file displays in the current parent frame _top to replace the entire browser window with the linked file removing all current frames Note For more infor...

Страница 390: ...user who has knowledge of HTML you can also customize a style by editing a set of HTML template files or create a new style To create a Web photo gallery 1 Choose File Automate Web Photo Gallery 2 Und...

Страница 391: ...ation under each image Select Filename to display the filename or select Caption Credits Title and Copyright to display caption text drawn from the File Info dialog box For more information see Adding...

Страница 392: ...of each folder in this location appears as an option in the Styles pop up menu in the Web Photo Gallery dialog box Each folder contains the following HTML template files which Photoshop uses to gener...

Страница 393: ...rmation on the tokens that you can use in the template files see Using tokens in Web photo gallery styles on page 394 To customize an existing Web photo gallery style 1 Locate the folder for the Web p...

Страница 394: ...te files ALINK Determines the color of active links ALT Determines the name of an image file BANNERCOLOR Determines the color of the banner BANNERFONT Determines the font of the banner text BANNERFONT...

Страница 395: ...a thumbnail THUMBNAILSROWS This token is replaced with rows of thumbnails using the Thumbnail htm file for the non frame styles You must place this token alone in a single non breaking line in the HT...

Страница 396: ...nt for a rollover on its own layer allows you to use Layers palette commands and options to create rollover effects Likewise placing each element of an animation on its own layer enables you to change...

Страница 397: ...r image editing commands are inclusive Unifying and matching layers rollovers and animations By default changes you make to layers using Layers palette commands and options including layer visibility...

Страница 398: ...the Rollovers palette The Rollovers palette lets you create view and set options for the rollover states in an image By default every image has one state the Normal state The Normal state corre sponds...

Страница 399: ...ette Creating and editing rollovers You use the Rollovers palette in conjunction with the Layers palette to add rollover effects to an image When you save the image as a Web page ImageReady adds JavaS...

Страница 400: ...es are not visible in the Rollovers palette select Include Slices and Image Maps in the Palette Options dialog box to display them See Using the Rollovers palette on page 398 2 Do one of the following...

Страница 401: ...e Custom rollover option to function See a JavaScript manual for more information None Preserves the current state of the image for later use but does not output an image when the file is saved as a W...

Страница 402: ...e 1 In the Rollovers palette select the state in which you want to display an animation If necessary expand the slice or image map to view its states See Using the Rollovers palette on page 398 2 Do o...

Страница 403: ...from the Animation palette and paste them into the Rollovers palette as states or copy states from the Rollovers palette and paste them into the Animation palette as frames Note Copy commands in the...

Страница 404: ...ith different rollover states For example adding an animation to the Normal rollover state causes the animation to play when the Web page is first loaded by a Web browser Adding an animation to anothe...

Страница 405: ...select it as the current frame The contents of the current frame appear in the document window You can select multiple frames either contiguous or discontiguous to edit them or apply commands to them...

Страница 406: ...the frame you want to move in the Animation palette or the Rollovers palette 2 Drag the selection to the new position Note In the Animation palette you can select and change the position of multiple...

Страница 407: ...ination frames the newly pasted layers are visible and the original layers are hidden In the nondestination frames the newly pasted layers are hidden Paste Before Selection or Paste After Selection to...

Страница 408: ...layer in the selected frame or frames 5 Specify layer attributes to be varied Position to vary the position of the layer s content in the new frames evenly between the beginning and ending frames Opac...

Страница 409: ...e delay Choose a value from the pop up menu The last value used appears at the bottom of the menu Choose Other enter a value in the Set Frame Delay dialog box and click OK If you selected multiple fra...

Страница 410: ...ose a disposal method 2 Right click Windows or Ctrl click Mac OS the frame thumbnail to view the Disposal Method context menu 3 Choose a disposal method Automatic to determine a disposal method for th...

Страница 411: ...ying looping on page 409 2 To stop the animation click the Stop button 3 To rewind the animation click the Select First Frame button To preview an animation in a browser 1 Click the Preview in Default...

Страница 412: ...ors are consistent across frames See Generating a color table on page 431 Viewing animated images in Photoshop When you open a file containing an animation in Photoshop only the frame that was selecte...

Страница 413: ...es are hidden Opening existing animated GIF files in ImageReady is useful primarily for applying optimi zation settings to the files The one layer per frame structure of imported animated GIF files ma...

Страница 414: ...iles appear in the Animation palette as frames and in the Layers palette as layers with each layer assigned to a separate frame The image that is first alphabetically or numeri cally by filename is fr...

Страница 415: ...using the Save As command to save an image as a GIF JPEG or PNG file see Saving images on page 446 For precise optimization you can use the optimization features in Photoshop or ImageReady to preview...

Страница 416: ...ed 2 Up to view two versions of the image side by side or 4 Up to view four versions of the image side by side If the entire artwork is not visible in the Save for Web dialog box you can use the hand...

Страница 417: ...oggle Slices Visibility button To show or hide auto slices in the Save for Web dialog box Choose Hide Auto Slices from the Preview pop up menu A check mark indicates that slices are hidden To select s...

Страница 418: ...view the image with no optimization Optimized to view the image with the current optimization settings applied 2 Up to view two versions of the image side by side 4 Up to view four versions of the ima...

Страница 419: ...etermines which options are available to you For more information on specific optimization options see Optimization options for GIF and PNG 8 formats on page 420 Optimization options for JPEG format o...

Страница 420: ...data a higher Lossy setting results in more data being discarded You can often apply a Lossy value of 5 10 and sometimes up to 50 without degrading the image File size can often be reduced 5 40 using...

Страница 421: ...masks from type layers shape layers and alpha channels to vary the Dither percentage across an image This technique produces higher quality results in critical image areas without sacri ficing file s...

Страница 422: ...the color picker Alternatively choose an option from the Matte menu The matte color should match the background color of the Web page Transparency Dithering When the Transparency option is selected yo...

Страница 423: ...olor Table ImageReady Select to use the same color table for all rollover states Optimization options for JPEG format JPEG is the standard format for compressing continuous tone images such as photo g...

Страница 424: ...the original image Click the Matte color swatch and select a color in the color picker Choose an option from the Matte menu Pixels that were fully transparent in the original image are filled with th...

Страница 425: ...ings are just as you left them To save a named set of optimization settings 1 Set optimization options as desired and choose Save Settings from the Optimize pop up menu Photoshop or the Optimize palet...

Страница 426: ...ore information on interpolation see About resampling on page 66 5 Click Apply Controlling optimization ImageReady By default Photoshop and ImageReady automatically regenerate the optimized image when...

Страница 427: ...in the Default Optimization section Previous Settings to automatically apply the last used optimization settings Auto Selected GIF or JPEG to automatically optimize the image as a GIF or JPEG ImageRea...

Страница 428: ...ated by the mask button To access the weighted optimization dialog box simply click the mask button To create masks for use during optimization Do one or more of the following Create a type layer See...

Страница 429: ...e format menu 2 Click the mask button to the right of the Lossy text box 3 Choose which masks to use All Text Layers to use the masks from all text layers in the image All Vector Shape Layers to use t...

Страница 430: ...dithering drag the left black tab on the slider enter a value in the Minimum text box or use the arrows to change the current percentage 6 Click OK Using masks to modify color reduction When you use m...

Страница 431: ...8 format See Selecting slices on page 373 The color table for the selected slice appears in the Color Table palette Note In ImageReady the color table for the selected slice will not appear if Auto Re...

Страница 432: ...reate larger files and is recommended only when avoiding browser dither is a high priority Custom Preserves the current color table as a fixed palette that does not update with changes to the image Ma...

Страница 433: ...eyedropper tool in the Save for Web dialog box Photoshop or the toolbox ImageReady and click in the image Select the eyedropper tool click in the image hold the mouse down and drag anywhere on the de...

Страница 434: ...yed in a browser To select a color directly in the color table Click the color in the Color Table palette To select a contiguous group of colors press Shift and click another color All colors in the r...

Страница 435: ...ors to their original colors Do one of the following Double click the swatch for the shifted color The original color is selected in the color picker Click OK to restore the color To revert all shifte...

Страница 436: ...ors in the optimized image or color table See Selecting colors on page 434 2 Do one of the following Click the Map Transparency button in the Color Table palette Choose Map Selected Colors to Transpar...

Страница 437: ...into the palette when you reoptimize the image the Custom palette does not change when you reoptimize the image To delete selected colors 1 Select one or more colors in the color table See Selecting...

Страница 438: ...n a master palette 3 Choose Image Master Palette Add To Master Palette All color information for the current image is added to the master palette 4 Repeat steps 2 and 3 for all images whose colors you...

Страница 439: ...menu with the eyedropper tool or using menu commands In Photoshop you copy a color as a hexadecimal value while in the main work area not the Save for Web dialog box To copy a color as a hexadecimal v...

Страница 440: ...n step or you can drag a droplet onto a slice to apply the optimization settings to the slice To create a droplet for automating Optimize palette settings 1 With an image displayed in the image window...

Страница 441: ...ge This includes an HTML file and separate image files for the slices in the artwork The HTML file includes code for any links image maps and other effects in the document Images Only to save your art...

Страница 442: ...utput options Choose an option from the Settings pop up menu Switching to a different set of options Choose an options set from the pop up menu below the Settings menu Alternately click Next to displa...

Страница 443: ...se a one pixel GIF with width and height values specified on the IMG tag Select GIF TD W H to use a one pixel GIF with width and height values specified on the TD tag Select NoWrap TD W H to place a n...

Страница 444: ...op of the HTML body section Body to place the image map declaration above the IMG SRC tag for the associated slice Bottom to place the image map declaration at the bottom of the HTML body section Sett...

Страница 445: ...ight information to Web pages on page 445 Adding title and copyright information to Web pages You can add title and copyright information to a Web page by entering information in the File Info dialog...

Страница 446: ...saves to PSD format Export Original ImageReady to flatten the layers in a copy of the original image and save the copy in a variety of file formats Some information such as slices and optimi zation s...

Страница 447: ...o create a snapshot For more information see Making a snapshot of an image Photoshop on page 40 Setting file saving options Photoshop You can set a variety of file saving options in the Save As dialog...

Страница 448: ...EPS Encapsulated PostScript files To print EPS files you must use a PostScript printer To save a file in Photoshop EPS format 1 Save the artwork and choose Photoshop EPS from the Format menu See Savi...

Страница 449: ...lable for Photoshop EPS files For more infor mation see Saving files in Photoshop EPS format Photoshop on page 448 Additionally the DCS menu gives you the option of creating a 72 ppi composite file th...

Страница 450: ...d by most Web browsers Baseline Optimized for optimized color and a slightly smaller file size Progressive to display a series of increasingly detailed scans you specify how many as the image download...

Страница 451: ...and warped type cannot be embedded Selecting Embed Fonts increases the size of the saved file Use Outlines for Text saves text as paths Select this option if embedding fonts results in a file that is...

Страница 452: ...Photoshop or ImageReady Layer Compression Specifies a method for compressing data for pixels in layers as opposed to composite data Many applications cannot read layer data and will skip over it when...

Страница 453: ...amount of compression for each tile image choose an option from the Quality menu drag the Quality pop up slider or enter a value between 0 and 13 in the Quality text box Select Optimize Tables to crea...

Страница 454: ...th compression scheme supported by the TIFF file format in ImageReady only Photoshop format Photoshop format PSD is the default file format and the only format that supports all Photoshop features Whe...

Страница 455: ...itmap graphics and is supported by virtually all graphic illustration and page layout programs EPS format is used to transfer PostScript language artwork between applications When you open an EPS file...

Страница 456: ...when opened A higher level of compression results in lower image quality and a lower level of compression results in better image quality In most cases the Maximum quality option produces a result ind...

Страница 457: ...apbook PICT Resource format supports RGB images with a single alpha channel and indexed color grayscale and Bitmap mode images without alpha channels You can use the Import command or the Open command...

Страница 458: ...ve the file without a header and then use a file editing program such as HEdit Windows or Norton Utilities Mac OS to replace the zeroes with header information You can save the image in an interleaved...

Страница 459: ...n you add is embedded in the file using XMP eXtensible Metadata Platform XMP provides Adobe applications and workflow partners with a common XML framework that standardizes the creation processing and...

Страница 460: ...information from the file Adding digital copyright information You can add copyright information to Photoshop images and notify users that an image is copyright protected via a digital watermark that...

Страница 461: ...rk If needed compress the image by saving it in JPEG or GIF format If the image is intended for printed output perform the color separation Read the watermark and use the signal strength meter to veri...

Страница 462: ...o strike a balance between watermark durability and visibility in most images However you can adjust the Watermark Durability setting yourself to suit the needs of your images Low values are less visi...

Страница 463: ...tosh Thumbnail to display the preview in the Open dialog box Windows Thumbnail to save a preview that can display on Windows systems Full Size to save a 72 ppi version of the file for use in applicati...

Страница 464: ...ns resolution and color mode for the contact sheet Select Flatten All Layers to create a contact sheet with all images and text on a single layer Deselect Flatten All Layers to create a contact sheet...

Страница 465: ...ts using a text editing application The layout options in the Picture Package dialog box are determined by text files that are stored in the Layouts folder inside the Presets folder For example the fo...

Страница 466: ...as in images you place in page layout applications In addition Mac OS users can embed Photoshop images in many word processor files For assistance with image clipping paths choose Help Export Transpar...

Страница 467: ...obe InDesign or to Adobe PageMaker 5 0 or later Note If you import an EPS or DCS file with a TIFF preview into Adobe Illustrator the image clipping path transparency may not display properly This affe...

Страница 468: ...dding or linking an image in an OLE container application usually a word processor or page layout program For example you can insert Photoshop files and selections into other OLE applications such as...

Страница 469: ...ication to launch Adobe Photoshop if it is not already running and open the image for editing 2 Modify the image as desired 3 Do one of the following For embedded images close the file or choose File...

Страница 470: ...es of the dots in a halftone screen creates the optical illusion of variations of gray or continuous color in the image Color separation Artwork that will be commercially reproduced and that contains...

Страница 471: ...ed Then do one or more of the following Adjust the position and scale of the image in relation to the selected paper size and orientation See Positioning and scaling images on page 472 Set output opti...

Страница 472: ...e Many printer drivers such as AdobePS and LaserWriter provide a scaling option in the Page Setup dialog box This scaling affects the size of all page marks such as crop marks and captions whereas the...

Страница 473: ...printed on the page outside the image area For example a black or colored background may be desirable for slides printed to a film recorder To use this option click Background and then select a color...

Страница 474: ...ion marks on the image including bull s eyes and star targets These marks are used primarily for aligning color separations Corner Crop Marks Prints crop marks where the page is to be trimmed You can...

Страница 475: ...ional print production a halftone is produced by placing a halftone screen between a piece of film and the image and then exposing the film In Photoshop you specify the halftone screen attributes just...

Страница 476: ...gher printer or is not equipped with an Emerald controller this option has no effect 6 For Shape choose the dot shape you want If you want all four screens to have the same dot shape select Use Same S...

Страница 477: ...vers don t support files that are binary or JPEG encoded and some PostScript output devices accept binary and JPEG encoded image data only through their AppleTalk and Ethernet ports not their parallel...

Страница 478: ...ofing colors on page 113 Then print the document using the proof profile as the source space and the desktop printer profile as the printer space To color manage a document while printing 1 Choose Fil...

Страница 479: ...apping All colors spread under black Lighter colors spread under darker colors Yellow spreads under cyan magenta and black Pure cyan and pure magenta spread under each other equally To create trap 1 S...

Страница 480: ...age to duotone 1 Convert the image to grayscale by choosing Image Mode Grayscale Only 8 bit grayscale images can be converted to duotones 2 Choose Image Mode Duotone 3 In the Duotone Options dialog bo...

Страница 481: ...d these curves or curves created in the Curves dialog box including curves created using the Arbitrary Map option See Saving and loading duotone settings on page 482 You can use the Info palette to di...

Страница 482: ...ccurate as the preview in Duotone mode Important If you make any changes to the image in Multichannel mode you will be unable to revert to the original duotone state unless you can access the duotone...

Страница 483: ...s supported by applications such as Adobe PageMaker and QuarkXPress See Saving files in Photoshop EPS format Photoshop on page 448 To print separations from Photoshop 1 Choose File Print with Preview...

Страница 484: ...Actions can also include modal controls that let you enter values in a dialog box while playing an action Actions form the basis for droplets small applications that automati cally process all files t...

Страница 485: ...ons palette menu Choose Button Mode again to return to list mode Recording actions Keep in mind the following guidelines when recording actions You can record most but not all commands in an action Yo...

Страница 486: ...ptions Assign a keyboard shortcut to the action You can choose any combination of a Function key the Ctrl key Windows or Command key Mac OS and the Shift key for example Ctrl Shift F3 Photoshop Assign...

Страница 487: ...yourself what needs to be done before continuing with the action A Continue button can be included in the message box This lets you check for a certain condition in the file for example a selection an...

Страница 488: ...k mark disappears In addition the check mark of the parent action turns red to indicate that some of the commands within the action are excluded Inserting nonrecordable commands Photoshop The painting...

Страница 489: ...an action 2 Choose Image Image Size and enter the desired image dimensions See Changing the pixel dimensions of an image on page 67 3 Select Action Options 4 Choose an option from the Fit Image By men...

Страница 490: ...combination to the action press that combination to play the action automatically To play part of an action select the command from which you want to start playing and click the Play button in the Ac...

Страница 491: ...dditional commands in an action rerecord duplicate and delete commands and actions and change action options Rearranging actions and commands You can rearrange actions in the Actions palette and rearr...

Страница 492: ...ommand again 1 In the Actions palette double click the command 2 Enter the new values and click OK To duplicate an action or command Do one of the following Alt drag Windows or Option drag Mac OS the...

Страница 493: ...ad additional actions into the Actions palette Note Photoshop actions are not compatible with ImageReady and vice versa Saving and loading actions Photoshop Actions are automatically saved to the Acti...

Страница 494: ...dragging the actions out of the ImageReady Actions folder or by using the Delete Action command in the Actions palette menu Actions you remove by dragging can be saved in another folder Actions you re...

Страница 495: ...processed files to a new location you may want to create a new folder for the processed files before starting the batch For better batch performance reduce the number of saved history states and dese...

Страница 496: ...every file for example filename serial number or serial letter to prevent files from overwriting each other For File Name Compatibility choose Windows Mac OS and UNIX to make filenames compatible wit...

Страница 497: ...r the processed files from the Destination menu None to leave the files open without saving changes unless the action included a Save command Save and Close to save the files in their current location...

Страница 498: ...ate the droplet for use in Mac OS When creating a droplet in Mac OS use the exe extension to make droplets compatible with both Windows and Mac OS References to filenames are not supported between ope...

Страница 499: ...Select playback options Run In Background to hide ImageReady during droplet execution so that you can work in other applications while processing takes place When you select Run In Background other p...

Страница 500: ...ode of the image Record this command in an action to ensure that images use the correct color mode and avoid generating unwanted error messages Contact Sheet produces a series of thumbnail previews on...

Страница 501: ...accurately Let s say for example that you need to produce 500 different Web banners based on the same template In the past you had to manually populate the template with data images text and so on Wit...

Страница 502: ...unding box which may leave parts of the bounding box empty Fill to scale the image to entirely fill the bounding box which may cause the image to extend beyond the bounding box As Is to not scale the...

Страница 503: ...box or click Next Note You must define at least one variable before you can edit the default data set 2 Select a variable from the Name pop up menu or the list at the bottom of the dialog box 3 Edit t...

Страница 504: ...ew data driven graphics 1 Enable Preview Document mode 2 In the options bar choose a data set from the Data Set pop up menu click the Previous Data Set button or click the Next Data Set button The dat...

Страница 505: ...rcentage box active Return in Navigator palette Zooms in on specified area of an image drag over preview in Navigator palette Scrolls image with hand tool Spacebar drag or drag view area box in Naviga...

Страница 506: ...er drag except when or any pen tool slice path tool shape tool rectangle image map circle image map or polygon image map is selected Switches from to drag Switches from to click Moves copy of selectio...

Страница 507: ...ith foreground or background color Delete or Delete Fills from history Delete Displays Fill dialog box Delete Lock transparent pixels on off Connects points with a straight line Any painting tool clic...

Страница 508: ...ggles Subscript on off Chooses 100 horizontal scale X Chooses 100 vertical scale X Chooses Auto leading A Chooses 0 for tracking Q OS 9 or Control Q OS X Justifies paragraph left aligns last line J Ju...

Страница 509: ...n point Switches from or to when pointer is over anchor or direction point Closes path double click Closes path with straight line segment double click Result Action Toggles browser dither for selecte...

Страница 510: ...oom percentage box active Enter in Navigator palette Zooms in on specified area of an image Ctrl drag over preview in Navigator palette Scrolls image with hand tool Spacebar drag or drag view area box...

Страница 511: ...n or any pen tool path shape tool slice rectangle image map circle image map or polygon image map tool is selected Switches from to Alt drag Switches from to Alt click Moves copy of selection Alt drag...

Страница 512: ...foreground or background color Alt Backspace or Ctrl Backspace Fills from history Alt Ctrl Backspace Displays Fill dialog box Backspace Lock transparent pixels on off Connects points with a straight...

Страница 513: ...ggles Subscript on off Alt Ctrl Chooses 100 horizontal scale Ctrl X Chooses 100 vertical scale Alt Ctrl X Chooses Auto leading Alt Ctrl A Chooses 0 for tracking Ctrl Q Justifies paragraph left aligns...

Страница 514: ...ointer is over anchor or direction point Alt Closes path double click Closes path with straight line segment Alt double click Result Action Toggles browser dither for selected image pane in Optimized...

Страница 515: ...ystem 1989 All Rights Reserved Proximity Technology Inc Proximity and Linguibase are registered trademarks of Proximity Technology Inc Contains an implementation of the LZW algorithm licensed under U...

Страница 516: ...o Channel option 281 Add To Master Palette command 438 additive colors 87 Adjust commands See online Help adjustment layers 311 about 132 creating 312 editing 314 for color corrections 312 for filters...

Страница 517: ...ng and pasting frames 406 creating 404 413 414 delay time 409 deleting 406 disposal method for frames 410 flattening frames into layers 411 looping options 409 optimizing 411 previewing 411 rearrangin...

Страница 518: ...4 Batch command 495 Batch Rename command 79 Behind mode 241 Bevel and Emboss effect 303 Bicubic interpolation 67 Bilinear interpolation 66 Binary encoding in EPS and DCS files 448 bit depth about 93 c...

Страница 519: ...re 234 239 tips customizing 230 wet edges 238 Brushes palette 228 Build Master Palette command 438 bump maps 340 Burasagari option 367 burn tool 193 Button Mode command 485 C cache and histograms pref...

Страница 520: ...out 299 merging 294 clipping paths 466 clone stamp tool 188 Close command 34 57 closed paths 211 Clouds filter 332 CMM See color management engine CMYK color model 88 CMYK color spaces 88 black genera...

Страница 521: ...dels 86 See also gamut HSB RGB CMYK and LAB color models color modes Bitmap mode 89 changing automatically 500 CMYK mode 88 compared to color models 86 converting images between 90 94 97 Duotone mode...

Страница 522: ...imization to generate 430 color transitions quality of 63 color trap 479 color values clipping 152 color management and 103 measuring CMYK 88 previewing 133 specifying 262 color wheel 86 about 265 col...

Страница 523: ...ures between tools 239 See also duplicating copyright information adding to files 460 viewing 48 correcting mistakes about 37 reverting to saved image 37 undoing last action 37 Craquelure filter 336 C...

Страница 524: ...173 slice selections 374 slices 377 Desaturate command 153 Deselect All Colors command 435 Deselect command 157 deselecting selections 157 See also selecting Despeckle filter 330 destination channel 2...

Страница 525: ...lices 382 creating for optimization 440 499 creating in ImageReady 498 creating in Photoshop 497 editing 498 in actions 490 Dry Brush filter 326 dual brushes 236 Duotone mode 90 93 duotones about 90 4...

Страница 526: ...5 Extras choosing from hidden Extras 47 showing and hiding 47 target path 212 turning on or off 47 See also names of individual Extras Extrude filter 334 eyedropper tool about 134 141 copying hexadeci...

Страница 527: ...filter 335 Fine Grain filter 327 Finger Painting option 192 Fit Image command 500 Fit on Screen command 36 Fixed Size option 158 Flatten Frames into Layers command 411 Flatten Image command 295 flatte...

Страница 528: ...48 converting to Bitmap mode images 95 converting to high contrast black and white images 154 converting to indexed color images 97 create by mixing channels 271 creating from color images 153 definit...

Страница 529: ...color in 262 HTML Alt element 381 389 cell alignment for text 382 Message element 381 389 target frame 379 389 text in slices 381 URLs in image maps 389 URLs in slices 379 HTML output settings 442 443...

Страница 530: ...4 importing anti aliased PICT files 77 artwork by dragging 171 files as animation frames 413 PDF images 75 Photoshop images into other applications 466 PICT resources 78 See also scanning importing im...

Страница 531: ...ages 93 blending modes 296 channel display 267 labels printing 474 laser printers 64 lasso tools 157 159 Lasso Width option 160 layer clipping paths drawing 200 layer mask channel 316 Layer Mask Hides...

Страница 532: ...ding options 299 selecting 287 stroking 249 styles 301 thumbnails 285 unifying 397 viewing 287 See also type layers Layers palette 170 284 leading 352 leading for CJK type 364 learning resources overv...

Страница 533: ...command 436 locking colors 436 slices 378 type layers 291 locking layers 290 looping in animations 409 lossless compression CCITT 454 LZW 454 RLE 453 ZIP 454 lossy compression JPEG format 454 weighte...

Страница 534: ...465 mm_6467 465 mm_6468 465 mm_6469 465 modal controls in actions 487 Mode commands 94 95 96 97 models See color models modes See blending modes or color modes Modify Lossiness Setting dialog box 429...

Страница 535: ...s weighted optimization 430 numeric values specifying colors with 259 262 O Ocean Ripple filter 329 Offset filter 337 Oidashi option 365 Oikomi option 365 old style type 355 OLE automation 500 linking...

Страница 536: ...g in color picker 263 displaying in Info palette 32 selecting 163 Output Channel option 271 Output Settings dialog box file saving options 444 HTML options 442 443 444 loading output settings 442 savi...

Страница 537: ...h 349 Paths palette 209 Paths to Illustrator command 468 Pattern buffer 37 Pattern dither 421 422 425 pattern dithering 91 99 Pattern Maker 253 pattern stamp tool 189 patterns fill layers 313 filling...

Страница 538: ...images in 424 PNG 8 format optimizing images in 420 reducing colors 431 weighted optimization and 429 point type See type pointers See tool pointers Pointillize filter 332 points 352 Polar Coordinate...

Страница 539: ...jects 175 in a browser 53 layers 287 printed image 68 rollovers 401 Web pages 368 primaries See phosphors Print command 470 471 print dimensions changing 67 changing when printing 472 Print One Copy c...

Страница 540: ...s opening as animations 414 saving animations as 413 R Radial Blur filter 328 radial gradient tool 244 Randomize option 248 raster images See bitmap images Rasterize command 293 346 rasterized shapes...

Страница 541: ...on 188 Restore to Background option 410 restoring images 37 result color 241 Reticulation filter 334 retouching images 192 Reveal Location command 80 Reverse Frames command 406 Revert command 37 RGB c...

Страница 542: ...h command 218 Save Selection command 172 281 Save Slice Selection command 374 Save Workspace command 29 saving batch processed files 496 color range 163 color tables 101 437 duotone curves 481 duotone...

Страница 543: ...otoshop 167 creating edge effects with 323 creating slice from 370 customizing 158 160 161 deleting 173 deselecting 157 dragging between documents 169 editing as masks 278 feathering 166 279 filling 2...

Страница 544: ...Rulers command 43 Show Status Bar command See online Help Show Tool Tips preference 7 showing See hiding and showing Similar command 166 single column marquee tool 158 single row marquee tool 158 Sin...

Страница 545: ...ilter 336 Stamp filter 334 Standard Macintosh Color command 92 Standard mode 279 standard screen mode 34 Standard Windows Color command 92 status bar 48 straight edged selection border 159 Stroke comm...

Страница 546: ...layers 132 Auto Contrast command 151 automatic 150 automatic adjustments 151 Brightness Contrast command 150 canceling 133 color mode for 135 generalized adjustments 152 Hue Saturation command 147 14...

Страница 547: ...in TIFF files 452 using advanced blending options 173 See also opacity Transparency Gamut option 287 Trap command 479 trapping colors 275 Trim command 179 trimming an image 179 tritones 90 See also d...

Страница 548: ...Accurate Screens option 476 482 Use All Layers option 161 292 Use Embedded Color Profile command 92 Use Pixel Doubling preference 92 Use Printer s Default Screens option 475 Use Shift Key for Tool Sw...

Страница 549: ...e Color palette 263 weighted optimization about 428 GIF and PNG 8 color reduction 430 GIF and PNG 8 dithering 429 GIF lossiness 429 JPEG quality 428 wet edges 238 White Matte 163 white point 120 WIA s...

Отзывы: