background image

Using Help

 | 

Contents

 | 

Index

Back

196  

Adobe InDesign Help

Drawing 

Using Help

 | 

Contents

 | 

Index

Back

196  

To connect or merge two paths:

1

Select two paths.

2

Select the pencil tool.

3

Position the pointer on one path to continue the path, and then start dragging to draw 

the connecting path. 

4

As you drag, hold down Ctrl (Windows) or Command (Mac OS). The pencil tool displays 

a small merge symbol   to indicate the merging of the two paths.

5

When the paths are connected, release the mouse button, and then release the Ctrl or 

Command key.

Smoothing a path with the smooth tool

Use the smooth tool to remove excess angles from an existing path or a section of a path. 
The smooth tool retains the original shape of the path as nearby as possible. Smoothed 
paths generally have fewer points, which can make them easier to edit, display, and print.

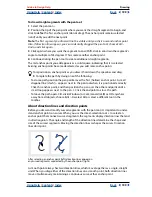
Path before and after using smooth tool

To use the smooth tool:

1

Select the path you want to smooth with the direct-selection tool  . 

2

Do one of the following:

Select the smooth tool  . 

If the pencil tool is selected, hold down Alt (Windows) or Option (Mac OS) to change the 

pencil to the smooth tool.

3

Drag the tool along the length of the path segment you want to smooth. The modified 

stroke or path usually has fewer anchor points than the original.

4

Continue smoothing until the stroke or path is of the desired smoothness.

Summary of Contents for InDesign 2.0

Page 1: ... You can also use the navigation arrows in the Acrobat toolbar Using bookmarks the table of contents the index and Find The contents of Help are shown as bookmarks in the bookmark pane To view subtopics click the plus sign next to a bookmark Each bookmark is a hyperlink to the associated section of the Help document To go to the information click its bookmark As the information is displayed in the...

Page 2: ...robat will search the document starting from the current page and display the first occurrence of the word or phrase you are searching for 3 To find the next occurrence choose Edit Find Again Printing the Help file Although the Help has been optimized for on screen viewing you can print pages you select or the entire file To print choose Print from the File menu or click the printer icon in the Ac...

Page 3: ... Creating Books Tables of Contents and Indexes 167 Drawing 192 Importing Exporting and Managing Graphics 219 Arranging and Combining Objects 256 Working with Transparency 287 Applying Color 300 Trapping Color 322 Producing Consistent Color 337 Creating Adobe PDF Files 361 Working with HTML Files 378 Printing 384 Producing Color Separations 414 Macintosh Shortcuts 427 Windows Shortcuts 434 Legal No...

Page 4: ...cking it The toolbox also contains several hidden tools related to the visible tools Hidden tools are indicated by arrows to the right of the tool icons Select a hidden tool by clicking the current tool in the toolbox and then selecting the tool that you want To find complete procedures for using any tool see the index To move the toolbox Drag the toolbox by the title bar To display the toolbox Ch...

Page 5: ...ter and Paragraph palettes work dynamically with one another For example when the type tool is selected and an insertion point is active the Character or Paragraph palette is active depending on which one was last used when any other tool is selected the Transform palette is active To show one palette Choose the palette name in the Window menu For example choose Window Stroke to display the Stroke...

Page 6: ...drag palette to new location top palettes are then separated bottom To move a palette to another group drag the palette s tab to that group To display a palette menu position the pointer on the triangle in the upper right corner of the palette and hold down the mouse button Note Not all palettes have a palette menu Palette menu To change the size of a palette drag any of its corners Windows or the...

Page 7: ...hem individually because docking involves dragging an individual palette s tab and not the title bar To dock palettes Drag a palette s tab to the lower edge of another palette When the lower edge of the other palette is highlighted release the mouse button To move a set of docked palettes Drag its title bar Compacting list palettes You can save space by compacting rows in palettes that display lis...

Page 8: ...tings For more information see Setting up measurement units and rulers on page 34 Tips for working with palettes Knowing a few techniques for changing and applying settings can help you work faster By using special keystrokes you can activate a palette specify the option that has focus and change that option s value To activate one palette using the keyboard Press the keyboard shortcut See the Ado...

Page 9: ...rd shortcuts InDesign provides a vast array of shortcuts to help you quickly maneuver through and alter a document without using the mouse You can use the default InDesign shortcut set or the QuarkXPress 4 0 shortcut set or create your own shortcut set The Adobe InDesign Quick Reference Card lists the most commonly used default shortcuts and tool tips provide an instantaneous reference for shortcu...

Page 10: ...r command InDesign displays that command under Current Shortcuts You can choose to change the original shortcut also or try another shortcut Note Do not assign single key shortcuts to menu commands because they interfere with the typing of text If an insertion point is active when you type a single key shortcut InDesign inserts the character in the text instead of carrying out the command 6 In the...

Page 11: ...tware that lets you open other file formats To open one or more InDesign documents 1 Choose File Open and select one or more documents 2 Do one of the following and click Open Select Normal Windows or Open Normal Mac OS to open the original document or a copy of a template Select Original Windows or Open Original Mac OS to open an original document or template Select Copy Windows or Open Copy Mac ...

Page 12: ...port new content You create a template the same way you create a regular document the only difference occurs when you save the document When you are preparing a template for others to use it s a good idea to add a layer containing instructions about the template simply hide or delete the layer before printing the document See Creating layers and specifying layer options on page 68 To save a docume...

Page 13: ...re converted based on their CMYK values QuarkXPress 4 1 HSB and LAB colors are converted to RGB and colors from the color library are converted based on their RGB values QuarkXPress 4 1 colors from the color library are converted based on their CMYK values All master pages and layers are converted to InDesign masters and layers For infor mation on converting Adobe PageMaker layers see the technica...

Page 14: ...orrectly for and compatible with InDesign 2 0 before you convert the document See Using plug in modules on page 28 InDesign 1 0 and 1 5 can t open InDesign 2 0 documents InDesign 2 0 can t save documents in InDesign 1 0 or 1 5 format When you convert a document you may see an alert message asking if you want to use the exception word list in the user dictionary or the one in the document For infor...

Page 15: ...ew and choose View Zoom Out to reduce the view to the previous preset percentage Type or choose a reduction level in the Zoom text box at the lower left corner of the document window To magnify by dragging 1 Select the zoom tool 2 Drag to create a dotted rectangle called a marquee around the area you want to magnify To activate the Zoom In tool while using another tool press Ctrl spacebar Windows ...

Page 16: ...s viewing may be easier if you resize the Navigator palette to make it tall and narrow To magnify or reduce the view using the Navigator palette Do one of the following Click the zoom in or zoom out button at the bottom of the Navigator palette Drag the zoom slider at the bottom of the palette In the Zoom text box type the magnification or reduction percentage and press Enter Windows or Return Mac...

Page 17: ...o jump from page to page in a document For example just as most Web browsers provide Back and Forward buttons to navigate through pages you ve visited InDesign keeps track of the order in which you ve viewed pages in a document You can use the Go Back and Go Forward commands in the Layout menu to move through pages according to the order in which you viewed them during the current session Note If ...

Page 18: ...er or the master page name and press Enter Windows or Return Mac OS If necessary choose Window Pages to see the Pages palette Double click a page icon to center that page in the document window or double click the page numbers to center a spread in the window Double click a page icon to center the page in the document window left double click the page numbers to center the spread in the document w...

Page 19: ...ay all windows equally without overlapping To activate a window Do one of the following Click the window title bar Choose the name of the view in the Window menu Multiple windows for a document are numbered in the order they were created To close all windows for the active document Press Shift Ctrl W Windows or Shift Command W Mac OS To close all windows for all open documents Press Shift Ctrl Alt...

Page 20: ...points that appear on a path you can instantly tell if a path is properly selected for the task you want to perform Use the selection tool for general layout tasks such as positioning and sizing objects When you select an object using this tool the object displays a bounding box rectangle with eight handles See Using the selection bounding box on page 22 Unselected path left and path selected usin...

Page 21: ... For more information see the index To temporarily activate the last used selection tool when using any other tool hold down Ctrl Windows or Command Mac OS Using the selection tool The selection tool is useful for general layout oriented selection tasks such as moving or resizing objects For more information see Arranging and Combining Objects on page 256 To select an object Using the selection to...

Page 22: ...t s bounding box With an object selected click the selection tool To deactivate an object s bounding box With an object selected click the direct selection tool The object remains selected You can use the selection tool keyboard shortcuts to activate or deactivate a bounding box quickly Press the V key to activate the bounding box or press A to deactivate These shortcuts work only when a graphics ...

Page 23: ...rting point for other documents See Creating and opening document templates on page 12 The Save Save As and Save a Copy commands store documents in the InDesign file format only For information about storing documents in other file formats see Exporting text on page 112 To save a document Do any of the following To save a document under a new name choose File Save As specify a location and filenam...

Page 24: ...ly recovered Note If InDesign fails after attempting to open a document using automatically recovered changes the automatically recovered data may be corrupted 3 Do one of the following To save the recovered data choose File Save As specify a location and a new filename and click Save The Save As command keeps the recovered version that includes the automatically recovered data the word Recovered ...

Page 25: ... name Local Settings Application Data Adobe InDesign Version 2 0 In Mac OS 9 the files are located in the System Folder Preferences Adobe InDesign Version 2 0 In Mac OS 10 1 the files are located in Users user name Library Preferences Adobe InDesign Version 2 0 Changing preference settings specifies how InDesign documents and objects behave initially Default settings are used for every new documen...

Page 26: ...pen your changes set the defaults for new documents If a document is open when you change settings the changes affect only that document Similarly if you change settings when no objects are selected your changes set the defaults for new objects To specify default settings for new documents 1 Close all InDesign documents 2 Change any menu items or palette or dialog box settings If you use the same ...

Page 27: ...es InDesign includes a number of ways in which you can store settings for later reuse including the following Creating paragraph and character styles See Using styles on page 146 Creating PDF styles See Using Adobe PDF export styles on page 364 Creating Printer styles All the attributes in the Print dialog box are included in the style See Using styles for printing on page 388 Creating Trapping st...

Page 28: ...lug Ins folder inside the Adobe InDesign 2 0 folder 2 Follow any installation instructions that come with the plug in Configuring plug ins Use the Configure Plug ins dialog box to inspect and customize the set of installed plug ins For example you can get detailed information about installed plug ins create custom plug in sets for different tasks or workgroups and isolate plug ins when troubleshoo...

Page 29: ...import contains a set that has the same name as an existing set the imported set will be renamed as a copy The first set in the file you import becomes the active set Note Windows only When importing plug in sets if you select Plug in Manager Import Files Family in the Files of Type menu in the Open a File dialog box plug in set files will appear only if the files are named with a filename extensi...

Page 30: ...Page Size section of the New Document dialog box specify the following options Number of Pages Type a value for the total number of pages for this document Facing Pages Select this option to make left and right pages face each other in a double page spread Deselect this option to let each page stand alone such as when you plan to print on both sides of a sheet of paper You can also create spreads ...

Page 31: ...e lines Magenta lines are margin guides Violet lines are column guides Lines of other colors are ruler guides which when present appear in the layer color when selected see Choosing a layer color on page 71 Column guides appear in front of margin guides When a column guide is exactly in front of a margin guide it hides the margin guide A Spread B Page size C Margin guides D Column guides To custom...

Page 32: ... and column settings 1 Do one of the following To change margin and column settings for one spread or page go to the spread you want to change or select one spread or page in the Pages palette To change margin and column settings for multiple pages select those pages in the Pages palette or select a master that controls the pages you want to change 2 Choose Layout Margins and Columns specify the f...

Page 33: ...that help you position and align objects precisely Grids and guides can be visible or hidden on screen and in print For information on printing guides and grids see Printing grids guides and other nonprinting objects on page 390 One set of rulers and grids exists per page but a guide can exist across all pages of a spread or within a single page only Rulers are dimmed on all spreads except the tar...

Page 34: ...r increments in the vertical ruler is useful for lining up a ruler s major tick marks with a baseline grid See Creating grids on page 37 Setting up measurement units and rulers You can set custom measurement units for the on screen rulers and for use in palettes and dialog boxes you can also change these settings at any time and temporarily override the current measurement units as you enter a val...

Page 35: ...ct By default the zero point is at the top left corner of the first page of each spread This means that the default position of the zero point is always the same relative to a spread but may seem to vary relative to the pasteboard The X andY position coordinates in theTransform palette are displayed relative to the zero point You can move the zero point to measure distances to create a new referen...

Page 36: ...he rulers and choose Lock Zero Point or Unlock Zero Point in the context menu To set the scope of the horizontal ruler origin 1 Choose Edit Preferences Units Increments Windows and Mac OS 9 or InDesign Preferences Units Increments Mac OS 10 1 2 In the Ruler Units section choose one of the following in the Origin menu Spread to set the ruler origin at the top left corner of each spread Page to set ...

Page 37: ...t grid can appear in front of or behind all guides layers and objects but cannot be assigned to any layer To set up a baseline grid 1 Choose Edit Preferences Grids Windows and Mac OS 9 or InDesign Preferences Grids Mac OS 10 1 2 Specify a baseline grid color by choosing a preset color in the Color menu You can also choose Other in the Color menu or double click the color box to specify a custom co...

Page 38: ...y a value for Subdivisions between each grid line Baseline grid at magnification below view threshold left and above view threshold right 4 To set vertical grid spacing specify a value for Gridline Every in the Vertical section of the Document Grid section and then specify a value for Subdivisions between each grid line 5 Do one of the following and click OK To put the document and baseline grids ...

Page 39: ...a new guide into the window the new guide becomes visible only on the target spread See Targeting and selecting spreads or pages on page 46 A Spread guide B Page guide To create guides 1 Make sure that the correct spread is targeted if necessary click the spread in the document window to target it 2 If the document contains multiple layers click a layer name in the Layers palette to target the lay...

Page 40: ...e layers click a layer name in the Layers palette to target the layer 2 Choose Layout Create Guides 3 For Number type a value to specify the number of rows or columns you want to create 4 For Gutter type a value to specify the spacing between rows or columns Start with a low value such as 1 pica large gutters leave little space for columns Note Columns created with the Create Guides command are no...

Page 41: ...e click the layer name 2 In the Layer Options dialog box select or deselect Show Guides or Lock Guides and then click OK To select a ruler guide Using the selection tool or the direct selection tool click the guide to highlight it in its layer color No additional handles or anchor points appear on selected ruler guides the way they do on other selected objects If you can t select a ruler guide and...

Page 42: ...on a spread Press Ctrl Alt G Windows or Command Option G Mac OS to select all ruler guides on the target spread and then press Delete To customize ruler guide color and visibility 1 Do one of the following To change options for one or more existing ruler guides select those ruler guides To set default options for new ruler guides deselect all guides by clicking in an empty area 2 Choose Layout Rul...

Page 43: ... will snap to pulled toward the nearest grid intersection or guide when you draw move or resize the objects The exact range within which an object snaps to guides is called the snap to zone which you can adjust When you select both the Snap to Guides and the Snap to Document Grid commands the grid takes precedence Keep the following guidelines in mind as you align objects to guides and grids Guide...

Page 44: ...o zone Previewing a document Use Preview Mode to quickly hide such nonprinting elements as rulers grids and frame edges You can turn off individual nonprinting elements by choosing the appropriate command in the View menu such as View Hide Guides To turn on Preview mode Click the Preview mode icon at the bottom of the toolbox To return to Normal View mode Click the Normal View mode icon at the bot...

Page 45: ... To display page icons as a series of horizontal rows deselect Show Vertically 4 To set the size for master icons choose an option in the Icon Size menu in the Masters section 5 To display master icons in one vertical column make sure that Show Vertically is selected in the Masters section To display master icons as a series of horizontal rows deselect Show Vertically 6 In the Palette Layout secti...

Page 46: ...ltiple spreads in a document A selected spread is indicated by the highlighted page icons not highlighted page numbers in the Pages palette To target a spread Do one of the following In the document window modify any object on a spread or its pasteboard In the document window click a spread or its pasteboard In the Pages palette double click the page numbers under a spread If the spread is not com...

Page 47: ...n identify a multiple page spread in the Pages palette by the brackets around its page numbers A One page spread B Four page spread identified by brackets around page numbers C Entire two page spread selected In Western languages an odd numbered page is always a right recto page and an even numbered page is a left verso page As a result the odd numbered first page of a document or of a section dep...

Page 48: ... objects that originally spanned multiple pages or extended onto the pasteboard Objects that span multiple pages stay with the page on which they cover the most area To add a page after the active page or spread Click the New Page button in the Pages palette The new page uses the same master as the existing active page Using the File Document Setup dialog box to increase the number of pages you ca...

Page 49: ...oving a page s position To duplicate a page or spread In the Pages palette do one of the following Drag the page range numbers under a spread to the New Page button The new spread appears at the end of the document Select a page or spread and then choose Duplicate Page or Duplicate Spread in the Pages palette menu The new page or spread appears at the end of the document Press Alt Windows or Optio...

Page 50: ...he Pages palette menu Controlling spread pagination You can easily create spreads of more than two pages However most documents use two page spreads exclusively You can prevent unexpected pagination by making sure that your document contains only two page spreads The Allow Pages to Shuffle command specifies how pages and spreads are redistributed when you add remove or arrange pages To specify how...

Page 51: ...the first page becomes a verso left page To add an automatically updated page number 1 Do one of the following to specify where the page number marker appears If you want a page number to appear on all pages based on a master double click the master in the Pages palette If you want the page number to appear on a specific page only double click a page in the top half of the Pages palette 2 On the m...

Page 52: ...umbering and Section Options You can divide content into sections that are numbered differently For example the first ten pages of a book the front matter might use Roman numerals and the rest of the book might use Arabic numerals starting at the eleventh page which is numbered page 1 in this example To provide for multiple kinds of page numbering you can set up named sections within individual do...

Page 53: ... marks the selected page as the beginning of a new section 4 As necessary specify the following options and then click OK Select Automatic Page Numbering if you want the page numbers of this section to follow the numbering of the previous section When you select this option this section s page numbers update automatically when you add pages before the first page of this section Select Start Page N...

Page 54: ... in the document window 5 To end the section repeat the section numbering steps on the first page that follows the section To add section marker text to a page or master 1 On a page or master that you re using in a section drag the type tool to create a text frame large enough for the section marker text or click in an existing frame 2 Right click Windows or Control click Mac OS and choose Insert ...

Page 55: ...e box at the bottom of a document window However it does not change the appearance of page numbers on document pages To display absolute or section numbering in the Pages palette 1 Choose Edit Preferences General Windows and Mac OS 9 or InDesign Prefer ences General Mac OS 10 1 2 For Page Numbering choose a numbering method in the View menu Pages palette showing absolute numbering left and section...

Page 56: ...pecial Character Previous Page Number You can also right click Windows or Control click Mac OS the text frame and in the context menu that appears choose Insert Special Character Previous Page Number To add a continued to page number choose Type Insert Special Character Next Page Number You can also right click Windows or Control click Mac OS the text frame and in the context menu that appears cho...

Page 57: ...n and apply a three page master to your three page spreads for a consistent look If you want to create a set of masters that are slight variations on one main design don t recreate each master completely instead create a main master and base design varia tions on it See Basing one master on another on page 62 If you don t specify options for a new master it uses a default prefix and name and is no...

Page 58: ...click OK For Prefix type a prefix that identifies the applied master for each page in the Pages palette You can type as many as four characters For Name type a name for the master spread For Based on Master choose an existing master spread on which you ll base this master spread see Basing one master on another on page 62 or choose None For Number of Pages type a value for the number of pages you ...

Page 59: ... page numbers using section numbering you can type page ranges with hyphens and you can separate pages and ranges with commas For example you can type 5 7 9 13 16 as a single entry Applying a master to a range of pages To edit a master 1 In the Masters section of the Pages palette double click the icon for the master you want to edit or select the master page from the text box list at the bottom o...

Page 60: ... an object You can selectively override one or more attributes of a master object For example suppose a document page contains a frame from a master and you override the frame s size If you resize the original frame on the master the size of the frame on the document page remains unchanged However if you change the fill color of the same frame on the master the fill color changes on the resized fr...

Page 61: ...s or Command Shift Mac OS as you select any object belonging to the master applied to the page or master applied to the master page 2 Change the object as desired To remove master overrides from one or more objects 1 On a document spread select objects that were originally master objects 2 In the Pages palette target a spread and choose Remove Selected Local Overrides in the Pages palette menu To ...

Page 62: ...ges palette do one of the following Select a master spread and choose Master Options for master spread name in the Pages palette menu For Based on Master choose a different master and click OK Drag the master spread you want to use as the base onto a different master icon to apply it to a master page or onto page numbers under a different master spread to apply it to an entire spread As you drag o...

Page 63: ...a drawing program such as Adobe Illustrator Frames are identical to paths with only one difference they can be containers for text or other objects A frame can also exist as a placeholder a container without contents As containers and placeholders frames are the basic building blocks for a document s layout A Path B Frame as graphic container C Frame with placed graphic You can draw both paths and...

Page 64: ...y of the text ports on text frames Note The frame edge is defined as a frame s stroke not the outer edge of the stroke s weight To show or hide frame edges and placeholder indicators Choose View Show Hide Frame Edges You can also hide frame edges by clicking Preview Mode at the bottom of the toolbox See Previewing a document on page 44 Using placeholders to design pages When your final text and gr...

Page 65: ...s are moved and resized as necessary based on the new relative positions of column guides page margins and page edges Note Dragging column guides does not trigger layout adjustment About automatic layout adjustment When you change a layout setting that affects page size margins or columns and the Layout Adjustment feature is enabled that feature uses a set of logical rules to move and resize page ...

Page 66: ...portant to remember that changing options in the Layout Adjustment dialog box does not immediately change anything because layout adjustment is triggered only by changes to page size page orientation margins or column settings When you want to restore a layout to its previous state you must undo the action that triggered the layout adjustment See Undoing mistakes on page 24 To set layout adjustmen...

Page 67: ...nts for different regions For information on converting layers from Adobe PageMaker or QuarkXPress see the related technical support documents on the Adobe Web site About the Layers palette The Layers palette lists layers with the frontmost layer appearing at the top of the palette Use it to create and delete layers hide and lock them merge them and specify options that determine how layers are di...

Page 68: ...ate a new layer using default settings Do one of the following To create a new layer at the top of the Layers palette list click the New Layer button To create a new layer above the selected layer hold down Ctrl Windows or Command Mac OS as you click the New Layer button To create a new layer and specify options 1 Choose New Layer in the Layers palette menu 2 Specify the following options and then...

Page 69: ...ols Importing placing or pasting text or graphics Selecting objects on other layers and then moving them to the new layer See Selecting moving and copying objects on layers on page 70 You cannot draw or place a new object on a hidden or locked layer When you select a drawing tool or the text tool or place a file when the target layer is hidden or locked the pointer changes to a crossed out pencil ...

Page 70: ...r hold down Alt Windows or Option Mac OS as you drag the colored dot on the right side of the layer list to the other layer To copy selected objects to a hidden or locked layer hold down Ctrl Alt Windows or Command Option Mac OS as you drag the colored dot Copying and pasting objects on layers The Paste Remembers Layers command affects how objects pasted from other locations interact with existing...

Page 71: ...ning a color to a layer makes it easier to distinguish the layers of different selected objects For each layer that contains a selected object the Layers palette displays a dot in the layer s color On the page each object displays the color of its layer in its selection handles bounding box text ports text wrap boundary if used and frame edges including the X displayed by an empty graphics frame T...

Page 72: ...hide or show one layer at a time In the Layers palette click the square at the far left of a layer name to hide or show the eye icon for that layer To hide all layers except the selected layer Choose Hide Others in the Layers palette menu To show all layers Do one of the following Choose Show All Layers in the Layers palette menu When only one layer is hidden click its eye icon to show it Locking ...

Page 73: ... Layers palette and choose Delete Layer layer name from the Layers palette menu If you select multiple layers the command is Delete Layers To delete all empty layers Choose Delete Unused Layers in the Layers palette menu Merging layers and flattening a document You can reduce the number of layers in a document without deleting any objects by merging layers When you merge layers objects from all se...

Page 74: ...contains just one layer called Layer 1 InDesign converts Adobe PageMaker 6 5 documents differently to accommodate the differences in PageMaker and InDesign layers In PageMaker 6 5 master page objects on layers always appear behind all objects on document pages In InDesign however master objects on layers appear at the back of each corresponding layer See Opening PageMaker and QuarkXPress files in ...

Page 75: ...e page or spread or on another page in the document The process of connecting text among frames is called threading text Each text frame contains an in port and an out port which enable connections to other text frames An empty in port or out port indicates the beginning or end of a story respec tively An arrow in a port indicates that the frame is linked to another frame A red plus sign in an out...

Page 76: ...frame to frame See Adding automatic page numbers for story jumps on page 55 To add a new frame to the thread 1 Using the selection tool select a text frame and then click the in port or out port to load a text icon Clicking the in port lets you add a frame before the selected frame clicking the out port lets you add a frame after the selected frame 2 Position the loaded text icon where you want a ...

Page 77: ...es To add a frame inside a sequence of threaded frames 1 Using the selection tool click the out port at the point in the story where you want to add a frame When you release the mouse button a loaded text icon appears Open the case for the first time and take in the sights and smells of your hand made instrument See the way the light reflects off the handrubbed satin finish Breath in the perfume o...

Page 78: ...ntained but the frames are no longer threaded to the original story Although the frame or frames were removed with a copy of the text no text is removed from the original story When you cut and paste a series of threaded text frames at once the pasted frames maintain their connection to each other but lose connection to any other frames in the original story Adding text to frames Add text to a doc...

Page 79: ...processing application When you paste text from another application InDesign preserves formatting attributes and adds any styles used to format the text to the Paragraph Styles palette If the pasted text is formatted with fonts not available in InDesign the text is highlighted as a missing font see Handling missing fonts on page 125 When you drag text into InDesign from another application InDesig...

Page 80: ...es 6 If you want the imported text to replace the currently selected text or frame select Replace Selected Item 7 To display additional options for importing the type of file you ve selected select Show Import Options or Shift click Open For more information on additional import options see Working with text import filters on page 109 8 Click Open If you selected Show Import Options or held down S...

Page 81: ...u define 3 If there is more text to be placed click the out port and repeat steps 1 and 2 until all text has been placed See Threading text through frames on page 76 Note When you place text in a frame that is threaded to other frames text autoflows through the threaded frames regardless of the text flow method you choose To flow text semi automatically With a loaded text icon Alt click Windows or...

Page 82: ... Text Frame option so that an empty text frame is placed on the document s default master page This frame has the column and margin attributes specified in the New Document dialog box Follow these guidelines for using text frames on master pages Set master text frames when you want each page in your document to contain a page sized text frame into which you can flow or type your text If your docum...

Page 83: ...sound so different from the multitude of other instruments available to the discerning musician and collector To this day each guitar mandolin banjo and dulcimer produced at Anton is afforded the same care and attention to detail as those he created Open the case for the first time and take in the sights and smells of your hand made instrument See the way the light reflects off the handrubbed sati...

Page 84: ...Offset do one of the following Select Ascent so that the height of the d character in the font falls below the top inset of the text frame Select Cap Height so that the top of uppercase letters touch the top inset of the text frame Select Leading to use the text s leading value as the distance between the baseline of the first line of text and the top inset of the frame Select x Height so that the...

Page 85: ...rd processors Hold down Shift while using the above keyboard shortcuts to select text To move the insertion point Press One character right Right arrow One character left Left arrow Up one line Up arrow Down one line Down arrow Right one word Ctrl Right arrow Windows or Command Right arrow Mac OS Left one word Ctrl Left arrow Windows or Command Left arrow Mac OS Up one paragraph Ctrl Up arrow Wind...

Page 86: ...druple click anywhere in a paragraph to select the entire paragraph or quintuple click to select the entire story Click anywhere in a story and choose Edit Select All to select all the text in that story To determine whether triple clicking selects a line or a paragraph 1 Choose Edit Preferences Text Windows and Mac OS 9 or InDesign Preferences Text Mac OS 10 2 Select Triple Click to Select a Line...

Page 87: ...g with nonprinting markers for indexes hyperlink anchors and XML tags see Working with markers on page 190 Nonprinting characters hidden top and visible bottom To view hidden characters Choose Type Show Hidden Characters A check mark appears next to the menu command To hide visible characters choose the command again to deselect it Hidden characters appear in the same color as the current layer To...

Page 88: ... the Glyphs palette select a different font such as Adobe Caslon Pro and type style if available 4 In the Show pop up menu choose Entire Font If you selected an OpenType font you can choose from a number of OpenType categories such as fractions oldstyle figures and small caps see About OpenType fonts on page 115 5 Scroll through the display of characters until you see the glyph you want to insert ...

Page 89: ...space 2 Choose Type Insert White Space and then select one of the spacing options such as Flush Space in the context menu To specify the kinds of quotation marks to be used 1 Choose Edit Preferences Dictionary Windows and Mac OS 9 or InDesign Prefer ences Dictionary Mac OS 10 2 Do one of the following For Double Quotes select a pair of quotation marks or type the pair of characters you want to use...

Page 90: ... for a frame break press Shift Enter and for a page break press Ctrl Enter Windows or Command Enter Mac OS To remove a break character 1 If necessary choose Type Show Hidden Characters 2 Select and delete the break character Editing and updating a linked text file When you place text the name of the text file appears in the Links palette which you can use to update and manage the file When you upd...

Page 91: ... page 94 Using Find Change You can find and change text across a selection one or more stories a document or multiple open documents To find and change text 1 To narrow your search do one of the following To search in a story use the type tool to click in a text frame To search only within a selection select the text you want to search To search in one or more stories use the selection tool to sel...

Page 92: ...dded within a larger word For example if you are searching for any as a whole word InDesign disre gards many Case Sensitive searches for only the word or words that exactly match the capitalization of the text in the Find What box For example a search for PrePress will not find Prepress prepress or PREPRESS 8 Click Find Next to begin the search 9 To continue searching click Find Next Change Change...

Page 93: ...ing Find Change on page 91 2 Click More Options to display Find Format and Change Format options 3 Click Format in the Find Format Settings section Registered Trademark Symbol r Section Symbol 6 Tab Character t Right Indent Tab y Indent to Here i Em Dash _ Em Space m En Dash En Space Flush Space f Hair Space Nonbreaking Space s Thin Space White Space any space or tab w Discretionary Hyphen Nonbrea...

Page 94: ...ay have included in a previous search Also if you have pasted text into the Find What or Change To boxes nonprinting characters like tabs or returns are included as part of the text that is searched for or replaced InDesign remembers as many as the last 15 entries in the Find What or Change To boxes Click the down arrow next to these boxes to select one of your previous searches However these save...

Page 95: ...ultiple fonts in the Fonts in Document list 4 To see details about a selected font click More Info To hide the details click Less Info The Info area is blank if you selected multiple fonts in the list Note A font may be listed as Unknown if the file of the selected graphic doesn t supply information about it Fonts in bitmap graphics such as TIFF images won t appear in the list at all because they ...

Page 96: ...nore or Ignore All to continue spell checking without changing a certain word The word will be ignored until you restart InDesign Select a word from the Suggested Corrections list or type the correct word in the ChangeTo box and then click Change to change only that occurrence of the misspelled word You can also click Change All to change all occurrences of the misspelled word in your document Cli...

Page 97: ...nstalled a hyphenation component from a company other than Adobe select it in the Hyphenation menu 4 If you have installed a spelling dictionary component from a company other than Adobe select it in the Spelling menu 5 In the Compose Using menu in the Hyphenation Exceptions menu do one of the following To compose text using the hyphenation exceptions list stored in the external user dictionary ch...

Page 98: ...o the selected Target word list choose Added Words To modify the list of words that are ignored by the selected Target word list choose Removed Words 4 Click Hyphenate to see the word s default hyphenation Tildes indicate possible hyphenation points 5 If you don t like InDesign s hyphenation points follow these guidelines to indicate your preferred hyphenation of the word Type one tilde to indicat...

Page 99: ...f who is working on it If you are using the Proximity dictionaries installed by InDesign you can recognize the user dictionary file for each language by its udc filename extension such as usa udc Use your system Find command to locate user dictionary files and copy them from one workstation to another Make sure that all persons in the InDesign workgroup use the customized user dictionary installed...

Page 100: ...nt the inline frame to appear 4 Choose Edit Paste To create an inline frame by placing 1 Using the type tool click in a text frame where you want the inline frame to appear 2 Choose File Place 3 Locate and select the graphics file you want to import and then click Open InDesign places the graphic as an inline frame at the insertion point If autoleading is turned on you may see increased space abov...

Page 101: ...t time and take in the sights and smells of your hand made instrument See the way the light reflects off the handrubbed satin finish Breath in the perfume of the finest exotic tone woods Then finally take it in your hands and begin to play The experience will leave you swept away and your life and your music will never be the same again For the select few thousand indiv iduals across the continent...

Page 102: ...annels with the image To generate the text wrap boundary from a path saved with the image choose Photoshop Path and then choose the path you want to use in the Path menu on the Text Wrap palette If the Photoshop Path option isn t available no named paths were saved with the image To construct the text wrap boundary from the container frame choose Graphic Frame To use the imported image s clipping ...

Page 103: ...nt See the way the light reflects off the handrubbed satin finish Breath in the perfume of the finest exotic tone woods Then finally take it in your hands and begin to play The experience will leave you swept away and your life and your mu sic will never be the same again For the select few thousand in dividuals across the continent playing Antons it no mystery as why our guitars look and sound so...

Page 104: ...s so you can thread text to and from it A Start bracket B In port C Center bracket D End bracket E Out port indicating threaded text Keep the following points in mind as you create path type The alignment setting in the Paragraph palette controls the alignment of path type You can include only one line of type on a path so any type that won t fit on the path will be overset hidden unless you ve th...

Page 105: ...haracters in the path type To select characters drag through the path type 2 Edit the text as needed To delete type from a path 1 Using the selection tool or direct selection tool select one or more path type objects 2 Choose Type Type on a Path Delete Type from Path If the path text is threaded type moves to the next threaded text frame or path type object If the path text isn t threaded text is ...

Page 106: ...type 2 Choose Type Type on a Path Options 3 Choose one of the following in the Align menu to specify how to align all characters to the path relative to a font s total height To align by the font s top edge choose Ascender To align by the font s bottom edge choose Descender To align by the point halfway between the font s ascender and descender choose Center To align by baselines choose Baseline T...

Page 107: ...er bracket until a center bracket icon appears next to the pointer 3 Drag the center bracket across the path Position pointer on center bracket and then drag across path to flip type To flip path type using a dialog box 1 Using the selection tool or the type tool select the path type 2 Choose Type Type on a Path Options 3 Select the Flip option and then click OK To apply a path type effect 1 Using...

Page 108: ...o follow waves or go around a cylinder as on a beverage can label To keep characters horizontal edges perfectly horizontal regardless of the path shape while keeping each character s vertical edge perpendicular to the path choose 3D Ribbon To keep the left edge of each character s baseline on the path without rotating any characters choose Stair Step To keep the center of each character s baseline...

Page 109: ...ignores most page layout information such as margin and column settings which you can set in InDesign The import options appear when you select Show Import Options in the Place dialog box If this option is deselected InDesign uses the import options last used for a similar document type The options you set remain in effect until you change them If InDesign cannot find a filter that recognizes a fi...

Page 110: ...osoft Word InDesign does not support Microsoft Word 7 0 and earlier To import a file from an earlier version of Word either save the file in RTF format or open it in a more recent version of Word and then save it in an importable format If you select Show Import Options when placing a Microsoft Word file you can choose from these options Table of Contents Text Imports the table of contents as part...

Page 111: ...ument Decimal Places Specifies the number of decimal places This option is available only if you select Decimal Cell Alignment Show Hidden Cells Includes any cells formatted as hidden cells in the Excel spreadsheet Tagged text import options You can import or export a text file capable of taking advantage of InDesign s formatting capabilities by using the tagged text format Tagged text files are t...

Page 112: ... story 1 Using the type tool click in the story you want to export 2 Choose File Export 3 Specify a name and location for the exported story and select a text file format under Save as Type If you don t see a listing for your word processing application you may need to save the document in a format the application can import such as RTF If your word processing application doesn t support any other...

Page 113: ... and that nothing is selected 3 If the Character palette is not already visible choose Type Character to display it To format all text in the story use the selection tool to select the text frame and then use the Character palette or Type menu commands to format the text 4 Specify settings as explained in the following topics About fonts A font is a complete set of characters letters numbers and s...

Page 114: ...ners specify that when you apply bold to a font the semibold variation is applied To best preserve the font designer s intentions InDesign does not synthesize many type faces such as shadow or outline that are not part of the original font However for some fonts InDesign provides additional faux styles faux bold and faux italic that can make any font wider or slanted These faux styles are availabl...

Page 115: ...pe features Note that OpenType fonts vary greatly in the number of type styles and kinds of features they offer Square brackets indicate a feature not supported by the currently selected font Discretionary Ligatures Font designers may include optional ligatures that should not be turned on in all circumstances Selecting this option allows these additional optional ligatures to be used if they are ...

Page 116: ...te make sure that an OpenType font is selected 2 Choose OpenType in the Character palette menu and then select an OpenType attribute such as Discretionary Ligatures or Fractions Square brackets indicate a feature not supported by the currently selected font Using or modifying multiple master fonts Multiple master fonts are customizable Type 1 fonts whose typeface characteristics are described in t...

Page 117: ...palette menu 3 For Auto Leading specify a new default percentage The minimum value is 0 and the maximum value is 500 To change the preferences setting so that leading applies to the entire paragraph 1 Choose Edit Preferences Text Windows and Mac OS 9 or InDesign Preferences Text Mac OS 10 2 Select Apply Leading to Entire Paragraph and then click OK Note When you use a character style to apply lead...

Page 118: ...t adjust individual pairs of letters and then tighten or loosen a block of text without affecting the relative kerning of the letter pairs A Original B Kerning applied between W and a C Tracking applied When you click to place the insertion point between two letters InDesign displays kerning values in the Character palette Metrics and optical kerning values or defined kern pairs appear in parenthe...

Page 119: ...ad use tracking 2 Do any of the following In the Character palette type or select a numeric value in the Kerning menu Press Alt Left Right Arrow Windows or Option Left Right Arrow Mac OS to decrease or increase the kerning between two characters When you kern using these shortcuts the increment used is 1 50 of the em space for the current type size Holding down Ctrl or Command when you use these k...

Page 120: ...caling Scaling type attributes Use the AdjustText AttributesWhen Scaling text preferences option to determine whether the appearance of text is scaled or whether text attributes are adjusted when you scale a text frame For example suppose you double the scale of a text frame that has 12 point type and a 2 pica tab setting If this option is turned on when you scale by 200 the text will be formatted...

Page 121: ...e graphics Baseline shift values applied to a picture font To apply baseline shift In the Character palette type a numeric value for Baseline Shift Positive values move the character s baseline above the baseline of the rest of the line negative values move it below the baseline To increase or decrease the value click in the Baseline Shift box and then press the Up or Down Arrow key Hold down Shif...

Page 122: ...ly typed in all caps selecting Small Caps will not change the text Note Applying Small Caps or All Caps to text does not change the case only the appearance For example if you type spiders in your document and then apply All Caps using Find Change with Case Sensitive selected to search for SPIDERS will not find the instance of spiders to which All Caps was applied To specify the size for synthesiz...

Page 123: ...ettings in the Text Preferences dialog box These values do not appear in the Baseline Shift or Size boxes of the Character palette when you select the text If you re using an OpenType font you may want to take advantage of the OpenType Superscript Subscript and Numerator Denominator attributes to create more elegant type see About OpenType fonts on page 115 To make selected type superscript or sub...

Page 124: ...onary Ligatures command see About OpenType fonts on page 115 To apply ligatures to selected letter pairs Select Ligatures in the Character palette menu Changing the color and gradient of type You can apply colors and gradients to the stroke and fill of characters and continue to edit the text When applying color to the text rather than the container make sure that you select the Formatting Affects...

Page 125: ...t message appears indicating which fonts are missing If you select text that uses a missing font the Character palette indicates that this font is missing by displaying Missing in the font style pop up menu InDesign substitutes missing fonts with available matching fonts When this happens you can select the text and apply any other available font Missing fonts for which others have been substitute...

Page 126: ...atting for future text frames make sure that the insertion point is not active and that nothing is selected Note When you press Enter or Return in text you create a new paragraph with the same formatting as the previous paragraph When you create a new text frame and start typing you create a paragraph that uses the document s default paragraph formatting 3 Do one of the following If necessary choo...

Page 127: ...line Changing space above or below paragraphs You can control the amount of space between paragraphs If a paragraph begins at the top of a column or frame InDesign does not insert extra space before the paragraph In such a case you can increase the leading of the first line of the paragraph or increase the top inset of the frame see Setting text frame properties on page 83 To adjust space above or...

Page 128: ...t Baseline Offset option in the Text Frame Options dialog box affects this value for more information about the First Baseline Offset option see Setting text frame properties on page 83 The bottom of the frame is defined as the baseline of the last line of bottom aligned text When the Align to Baseline Grid option is applied to paragraphs with Top Center or Bottom alignment all lines will be align...

Page 129: ...s expanded up to the value you specify if the text still doesn t fill the frame the space between lines is adjusted until the frame is filled The paragraph spacing limit value is applied in addition to the Space Before or Space After values entered on the Paragraph palette Paragraph spacing limit set to zero left and 1 pica right 5 Click OK An easy way to adjust the Paragraph Spacing Limit value i...

Page 130: ...the placement If you want more control over the position of your drop cap you can place it in a separate frame and then apply a text wrap To remove a drop cap In the Paragraph palette type 0 for Drop Cap Number of Lines Adding rules above or below paragraphs Rules are paragraph attributes that move and are resized along with the paragraph on the page If you re using a rule with headings in your do...

Page 131: ... tint is based on the color you specified Note that you can t create tints of the built in colors None Paper Regis tration or Text Color 8 Choose the width of the rule You can choose either Text from the left edge of text to the line end or Column from the left edge of the column to the right edge of the column If the left edge of the frame has a column inset the rule begins at the inset 9 To dete...

Page 132: ...nd other breaks 1 Choose Keep Options in the Paragraph palette menu 2 Select any of these options and then click OK For Keep With Next _ Lines specify the number of lines up to five of the subsequent paragraph that the last line of the current paragraph stays with This option is especially useful for making sure that a heading stays with the next few lines of the paragraph that follows it Select t...

Page 133: ...ame size as the text Setting indents Indents move text inward from the right and left edges of the frame Use first line indents not spaces or tabs to indent the first line of a paragraph A first line indent is positioned relative to the left margin indent For example if a paragraph s left edge is indented one pica setting the first line indent to one pica indents the first line of the paragraph tw...

Page 134: ... Press Tab and type any additional paragraph text Good garden design begins with vision planning and a lot of doing There are no shortcuts to producing lush passionate gardens Once you understand the dynamics of color shape and texture you can begin to experiment with different designs to find what inspires you The look of your garden should reflect your sense of beauty and style without overwhelm...

Page 135: ...pe Insert Special Character Indent to Here Note If you insert more than one Indent to Here special character on a line InDesign uses the one furthest to the right Working with tabs Tabs position text at specific horizontal locations in a frame The default tab settings depend on the unit of measurement selected in the Units Increments preferences dialog box Tabs apply to an entire paragraph The fir...

Page 136: ...the top of the text frame and then click the magnet icon on the Tabs palette The Tabs palette snaps to the top of the column that includes the selection or the insertion point To set a tab 1 Press Tab in the paragraphs where you want to add horizontal space You can also add tabs after you create your tab settings Press Tab to insert horizontal space 2 To specify which paragraphs will be affected s...

Page 137: ...bs palette select a tab on the tab ruler 2 Choose Repeat Tab in the Tabs palette menu The Repeat Tab command creates multiple tabs based on the distance between the tab and the left indent or the previous tab stop Using the Repeat Tab command To move a tab 1 In the Tabs palette select a tab on the tab ruler 2 Do one of the following Type a new location for X and press Enter or Return Drag the tab ...

Page 138: ...he tab 3 To change the font or other formatting of the tab leader select the tab character in the text frame and use the Character palette or Type menu to apply formatting Setting a right indent tab In one step you can add a right aligned tab at the right indent making it easier to prepare tabular text that spans an entire column Right indent tabs are slightly different from regular tabs A right i...

Page 139: ...ropper 2 With the eyedropper tool select the text you want to change The selected text takes on the attributes loaded in the eyedropper As long as the eyedropper tool is loaded you can select additional text to apply the loaded formatting 3 To deselect the eyedropper tool click another tool Type attributes copied to unselected text Note If you use the eyedropper tool to copy a paragraph style from...

Page 140: ...d then click OK To copy or apply paragraph attributes only without having to change settings in the Eyedropper Options dialog box hold down Shift as you click text with the eyedropper tool Working with composition The appearance of text on your page depends on a complex interaction of processes called composition Using the word spacing letterspacing glyph scaling and hyphenation options you ve sel...

Page 141: ...sition preferences 1 Choose Edit Preferences Composition Windows and Mac OS 9 or InDesign Preferences Composition Mac OS 10 2 To use on screen highlighting to identify compositional problems select Keep Viola tions and H J Violations hyphenation and justification See Highlighting loose or tight lines on page 145 3 To justify text that wraps around an object select Justify Text Next to an Object Se...

Page 142: ...t other points To turn automatic hyphenation on or off for a paragraph In the Paragraph palette select or deselect the Hyphenate option You can also include this option in a paragraph style To set automatic hyphenation options for a paragraph 1 Click in a paragraph or select the range of paragraphs you want to affect 2 Choose Hyphenation in the Paragraph palette menu 3 Select the Hyphenate option ...

Page 143: ...Do one of the following Choose Type Insert Special Character Nonbreaking space Press Ctrl Alt x Windows or Option spacebar Mac OS About spacing in justified text Using the options in the Justification dialog box you can set the degree to which you will allow InDesign to deviate from normal word spacing letter spacing and glyph scaling Minimum Maximum and Desired The Minimum and Maximum values appl...

Page 144: ...hen click OK For justified text only type values for Minimum and Maximum to define a range of acceptable spacing Word spacing values can range from 0 to 1000 Letter spacing can range from 100 to 500 Type a value for Desired to set the spacing for the selected paragraphs Note Entering a Glyph Scaling value other than 100 for Desired for nonjustified text is the same as entering a value for Horizont...

Page 145: ...er To insert a flush space 1 Using the type tool click directly in front of the end of story character 2 Choose Type Insert White Space Flush Space Note The effect of a flush space is not apparent until you apply the Justify All Lines option to the paragraph Highlighting loose or tight lines Because composing a line of type involves many factors in addition to word spacing and letterspacing hyphen...

Page 146: ... you select a range of text covering multiple styles no style is highlighted in the Styles palette A Style name B Style with additional formatting overrides C Imported style D New Style button E Trash button To display the Paragraph Styles palette Choose Type Paragraph Styles To display the Character Styles palette Choose Type Character Styles Creating styles If the styles you want already exist i...

Page 147: ...ing or character styles applied to the text although you have the option of removing existing formatting when you apply a style A plus sign appears next to the current style in the Styles palette if the selected text uses a character or paragraph style and also uses additional formatting that isn t part of the applied style Note After you apply a style to text applying No Paragraph Style or No Cha...

Page 148: ...aracter Color in the Modify Style Options dialog box you can create a new color by double clicking the fill or stroke box To redefine the currently selected style based on selected text 1 Using the type tool select the text formatted with the style you want to redefine 2 Make changes to the paragraph or character attributes 3 Choose Redefine Style in the Styles palette menu To select unused styles...

Page 149: ...tting is no longer associated with a style For information on removing assigned styles from text see Removing assigned styles from text on page 149 To delete a style 1 Select the style name or names in the Styles palette 2 Do one of the following Choose Delete Styles in the palette menu Click the Trash button at the bottom of the palette Drag the style to the Trash button at the bottom of the pale...

Page 150: ...aded style will overwrite the existing style and apply its new attributes to all text in the current document that uses the old style You can also use the Books feature to share styles see Synchronizing documents in a book file on page 169 To load styles from another InDesign document 1 In the Styles palette do one of the following Choose Load Character Styles or Load Paragraph Styles in the Style...

Page 151: ...ault height of a row is equivalent to the slug of the current text attributes at the insertion point A slug is the approximate height of the highlighting in selected text Tables flow with surrounding text just as inline graphics do For example a table moves through threaded frames when the text above it changes in point size or when text is added or deleted However a table cannot appear on a text ...

Page 152: ...utside the table use the selection tool to resize and cut the image and then use the type tool to paste the image into the table cell Use the selection tool to cut or copy a graphic or a frame use the type tool to position the insertion point in the table and then choose Edit Paste Moving around in a table You can navigate from one cell to the next using the mouse or keyboard You can also specify ...

Page 153: ... from other applications When you use the Place command to import a Microsoft Excel spreadsheet or a Microsoft Word document that includes tables the imported data appears in an InDesign table which you can edit or update using the Links palette You can also copy and paste data from Excel or Word into an InDesign document For information on importing from other applications see Working with text i...

Page 154: ...h the insertion point at the end of a cell press Shift Right Arrow or Shift Down Arrow With the insertion point at the beginning of a cell press Shift Left Arrow or Shift Up Arrow To select the cell press Esc Press Esc again to place the insertion point at the beginning of the cell To select entire columns or rows Using the type tool do any of the following Click inside a table or select text and ...

Page 155: ... columns by dragging on page 156 To insert a row 1 Place the insertion point in a row below or above where you want the new row to appear 2 Choose Table Insert Row 3 Specify the number of rows you want 4 Specify whether the new row or rows should appear above or below the current row and then click OK You can also create a new row by pressing Tab when the insertion point is in the last cell To ins...

Page 156: ...that it s tall enough to contain text Note that dragging to insert rows or columns doesn t work at the top or left edges of a table To insert a row or column by dragging Position the type tool over the border of a column or row so that a double arrow icon or appears hold down the mouse button and then hold down Alt Windows or Option Mac OS while dragging down to create a new row or to the right to...

Page 157: ... 1 Select the cells you want to cut or copy see Selecting cells rows and columns on page 154 and then choose Edit Cut or Copy 2 Do any of the following To embed a table within a table place the insertion point in the cell where you want the table to appear and then choose Edit Paste To replace existing cells select one or more cells in the table making sure that there are sufficient cells below an...

Page 158: ...rtical alignment E Cell inset values F Number of columns G Cell content rotation Resizing rows and columns Drag a row or column border to change the row height or column width When you drag to resize the row or column the width or height of the table changes unless you hold down Shift Holding down Shift while dragging inside row or column borders affects only two rows or columns at once one row or...

Page 159: ...rease the table size Hold down Shift to maintain the table s height and width proportions Note If the table spans more than one frame in a story you cannot use the mouse pointer to resize the entire table Distributing columns or rows evenly After you resize column widths or row heights you can choose a menu command to give the selected rows or columns a uniform height or width To evenly distribute...

Page 160: ...xed value make sure that you leave enough room for the inset values to avoid causing overset text To change cell insets 1 Using the type tool place the insertion point in or select the cell or cells you want to affect 2 Choose Table Cell Options Text or display the Table palette 3 Under Cell Insets specify values for Top Bottom Left and Right and then click OK Changing the alignment of a table wit...

Page 161: ...the vertical alignment of text within a cell 1 Using the type tool select the cell or cells you want to affect 2 Choose Table Cell Options Text 3 Under Vertical Justification select an Align setting Top Center Bottom or Justify If you select Justify specify the Paragraph Spacing Limit this will set a maximum amount of space to be added between paragraphs For more information on these options see A...

Page 162: ...end beyond any cell edge are clipped to the cell boundary To display the contents of an overset cell Do one of the following Increase the size of the cell Change the text formatting To select the cell s contents click in the overset cell press Esc and then use the Character palette to format the text To clip contents to the cell 1 Place the insertion point in the cell you want to clip or select th...

Page 163: ...er 1 With the insertion point in the table choose Table Table Options Table Setup 2 Under Table Border specify desired Weight Color and Type settings and specify a Tint percentage 3 If you do not want stroke formatting of individual cells to be overridden select Preserve Local Formatting and then click OK To add stroke and fill to cells using the Cell Options dialog box 1 Using the type tool place...

Page 164: ... not the cells 5 Specify a weight value and stroke type To add a fill to cells using the Swatches palette 1 Select the cell or cells you want to affect 2 Choose Window Swatches to display the Swatches palette 3 Make sure the Object button is selected If the Text button is selected the color changes will affect the text not the cells 4 Select a swatch To add diagonal lines to a cell 1 Using the typ...

Page 165: ...n so that they alternate Note In tables that span multiple frames alternating strokes and fills for rows do not restart at the beginning of additional frames in the story see Breaking tables across frames on page 157 4 Select Preserve Local Formatting if you want formatted strokes previously applied to the table to remain in effect 5 For Skip First and Skip Last specify the number of rows or colum...

Page 166: ... columns at the beginning and end of the table in which you do not want fill attributes to appear and then click OK To turn off alternating strokes and fills for a table 1 Place the insertion point in the table 2 Choose Table Table Options Alternating Row Strokes Alternating Column Strokes or Alternating Fills 3 For Alternating Pattern choose None and then click OK ...

Page 167: ...ook file is saved with an indb extension To add documents to a book file 1 Choose Add Document in the Book palette menu or click the plus button at the bottom of the Book palette 2 Select the InDesign document or documents you want to add If you include InDesign 1 5 or earlier documents they will be converted to 2 0 format when added to the book You must convert PageMaker or QuarkXPress documents ...

Page 168: ...amed or deleted modified repaginated or edited while the book was closed or in use if someone else has the document open No icon appears next to closed documents To remove or replace a missing document 1 Select the missing document in the Book palette 2 Do one of the following Choose Remove Document in the Book palette menu Choose Replace Document in the Book palette menu locate the document you w...

Page 169: ...yles and swatches that have identical names Use the Synchronize Options dialog box to determine which styles and swatches are copied If styles and swatches in the style source are not found in the document being synchro nized they are added If styles and swatches in the document being synchronized aren t in the style source they are left intact You can synchronize the book while documents in the b...

Page 170: ...y default InDesign repaginates when you add or remove pages in booked documents or when you make changes to the book file such as reordering adding or removing documents You can turn off automatic pagination and repaginate a book manually If a document is missing or cannot be opened the page range is shown as from the place where the missing document should be to the end of the book indicating tha...

Page 171: ...eflight package or export to PDF selected booked documents or the entire book For more information on printing and outputting InDesign files look up the appro priate topic in the index To print or output documents in a book 1 In the Book palette select the documents you want to output When no documents are selected you can output the entire book 2 Choose an output command such as Print Book or Pri...

Page 172: ... to jump to and type the name of the page desti nation It is generally a good idea to add a descriptive name for the page such as Intro duction instead of Page 3 In this example if you add or remove pages before page 3 the destination name may no longer correspond to the page you wanted to link to 5 For Zoom Setting do one of the following to select the view state of the page being jumped to and t...

Page 173: ...on as necessary Click Delete to remove the destination 5 When you are finished editing or deleting destinations choose OK Creating hyperlinks Once you ve created destinations you can establish hyperlinks between those destina tions and the source text or graphics in your document If you have not created hyperlink destinations you can create unnamed destinations to pages within the current document...

Page 174: ...d PDF file For Color select a color for the hyperlink rectangle For Width select Thin Medium or Thick to determine the thickness of the hyperlink rectangle For Style select Solid or Dashed To create a hyperlink from a URL 1 Using the type tool select a URL such as http www adobe com that you ve typed in your document 2 Choose New Hyperlink from URL in the Hyperlinks palette menu To show or hide hy...

Page 175: ...inks palette menu If the item is a URL desti nation InDesign starts or switches to your Web browser to display the destination If the item is a text anchor or page destination InDesign jumps to that location About the Table of Contents feature You can create a table of contents TOC for any document or book in InDesign You can even have multiple tables of contents in a document for example a list o...

Page 176: ... addition you can create character styles to format the TOC entries and page numbers For example if you want the page numbers to be in bold create a character style that includes the bold attribute and then select that character style when you create the table of contents For information on creating paragraph and character styles for the TOC see Using styles on page 146 Creating a table of content...

Page 177: ...ok file isn t open 5 Under Styles in Table of Contents double click paragraph styles in the Other Styles box to move them into the Include Paragraph Styles box For information on table of contents styles see Creating styles for a table of contents on page 176 6 To format the TOC text select an item under Include Paragraph Styles and then select a style in the Entry Style pop up menu to format the ...

Page 178: ... how to work with them see Inserting common symbols spaces and hyphens on page 89 Note Make sure that you select the existing text in the text box before you select a different special character so that you don t include for example both a tab character and an em space You may want to create a character style that formats the space between the entry and the page number You can then select this sty...

Page 179: ...ing a book file on page 167 Use styles consistently throughout the book Avoid creating documents with styles that have identical names but different definitions If multiple styles have the same name but different style definitions InDesign uses the style definition in the current document if a definition exists there or the first occurrence of the style in the book If the necessary styles do not a...

Page 180: ...hoose Open 3 Click OK Creating an index You can create a simple keyword index or a comprehensive detailed guide to the infor mation in your book InDesign lets you focus on the planning and structure while it does the hard work tracking index entries as pages change even across several documents You can even edit index entries in the palette without having to hunt down individual topics An index en...

Page 181: ...x text on a master page the master page label appears in the Index palette If you index text on the pasteboard PB appears in the index palette However these labels will not appear in the generated index To add index references 1 Using the type tool place the insertion point where you want the index marker to appear or select text to use as the basis for an index reference Note When selected text c...

Page 182: ...try without a page number choose Suppress Page Range in the Type menu Although no page number will appear in the generated index the page number appears in parentheses in the Index palette 9 To create index entries that refer to other entries choose an option such as See or See Also in theType menu and then type the entry in the Referenced box or drag the existing entry from the list at the bottom...

Page 183: ...n insertion point or select text where the index marker will appear 2 In the Index palette select Reference and scroll the preview area to the entry you want to copy 3 Do one of the following Drag an entry to the New button to insert an index marker at the insertion point or at the beginning of the selection Select an entry in the palette preview area and then hold down Alt Windows or Option Mac O...

Page 184: ...To End of Document The page range extends from the index marker to the end of the document To End of Section The page range extends from the index marker to the end of the current section as defined in the Pages palette see Changing Numbering and Section Options on page 52 For Next of Paragraphs The page range extends from the index marker to the end of the number of paragraphs specified in the ad...

Page 185: ... If you make changes to the index itself these changes will be lost when you regenerate the index References appear in the Index palette The list is alphabetized and divided into sections by letter Triangles appear next to references You can click these triangles to expand or condense index entries You can edit either topic entries or page reference entries If you select an entry or subentry you c...

Page 186: ... To update the preview area Choose Update Preview in the Index palette menu This option is especially useful if you ve edited your document extensively or moved index markers in the document window To find an index entry in the Index palette 1 Choose Find in the Index palette menu 2 Type the name of the entry you want to located and then click the Up Arrow or Down Arrow Deleting index entries To r...

Page 187: ...operly 3 Choose Generate Index in the Index palette menu 4 For Title type the text that will appear at the top of the index To determine how the title is formatted select a style in the Title Style pop up menu 5 To generate a new index story without changing the existing one deselect Replace Existing Index This option is dimmed if you haven t generated an index 6 Select Include Book Documents to c...

Page 188: ... headings consisting of alphabet characters A B C and so on representing the section that follows Include Empty Index Sections Select this option to generate section headings for all letters of the alphabet even if the index lacks any first level entries that begin with a particular letter Level Style For each index level choose a paragraph style to be applied to each level of index entries You ca...

Page 189: ...as Animals 38 43 The default is an en dash Determine formatting for this character by switching or editing the Page Number style Entry End Type or select a special character to appear at the end of entries If Run in is selected the specified character appears at the end of the last cross reference The default is no character Capitalizing topics The Capitalize dialog box provides a global solution ...

Page 190: ...pic name for example animals in the first box To create a subentry type a name cats in the second box In this example cats is indented under animals For more detailed information see Adding page references to an index on page 181 6 Click Add to add the topic which will now appear in the New Topic dialog box as well as the Index palette 7 Click Done when you ve finished To import topics from anothe...

Page 191: ...story are registered by the hyperlink text marker and appear in the exported PDF file however any new entries you add later to the placed index or table of contents story are not detected and will not have a hyperlink jump in the PDF file For more information on creating PDF files see Exporting a document or book to Adobe PDF on page 361 To display markers Choose Type Show Hidden Characters To sel...

Page 192: ...rea is called a fill A stroke can have weight thickness color and a dash pattern After you create any path you can change the characteristics of its stroke and fill A Stroke with open path B Fill with open path C Both stroke and fill with open path D Stroke with closed path E Fill with closed path F Both stroke and fill with closed path Contents You can put text or graphics inside a path When you ...

Page 193: ...oint C Curved path segment D Direction line Paths can have two kinds of anchor points corner points and smooth points At a corner point a path abruptly changes direction At a smooth point path segments are connected as a continuous curve You can draw a path using any combination of corner and smooth points If you draw the wrong kind of path you can always change it A Four corner points B Same poin...

Page 194: ...lar polygon 1 In the toolbox do one of the following To draw a path select the line ellipse rectangle or polygon tool in the toolbox To draw an placeholder empty graphics frame select the ellipse frame rectangle frame or polygon frame tool in the toolbox 2 Drag in the document window to create the path or frame You can constrain the shape as you draw by doing one or both of the following To constr...

Page 195: ...draw you cannot apply them to a polygon you ve already created Drawing with the pencil tool Use the pencil tool to draw open and closed paths as if you were drawing with a pencil on paper It is most useful for fast sketching or creating a hand drawn look To draw a freeform path with the pencil tool 1 Select the pencil tool 2 Position the pointer where you want the path to begin and drag to draw a ...

Page 196: ...mooth tool to remove excess angles from an existing path or a section of a path The smooth tool retains the original shape of the path as nearby as possible Smoothed paths generally have fewer points which can make them easier to edit display and print Path before and after using smooth tool To use the smooth tool 1 Select the path you want to smooth with the direct selection tool 2 Do one of the ...

Page 197: ...lts use a single smooth dragging motion Anchor points are added to the ends of the resulting paths Setting preferences for the pencil and smooth tools You can set preferences for the pencil tool and the smooth tool The preferences include tolerances that control how sensitive the pencil and smooth tools are to the movement of your mouse or graphics tablet stylus an option for a path to remain sele...

Page 198: ...ically applied when you use the pencil tool 3 To keep the path selected after you draw it click Keep Selected This option is selected by default 4 Pencil tool only Select Edit Selected Paths the default to edit or merge a path when you are within a certain distance of it 5 Pencil tool only For Within type a value or drag the slider to determine the pixel distance Note If the Edit Select Paths opti...

Page 199: ...n pointer over the first hollow anchor point A small diagonal line slash appears next to the pen tool when it is positioned correctly Click this anchor point and then position the pen over the other endpoint until a small loop appears next to the pen Click the endpoint to close the path To leave the path open Ctrl click Windows or Command click Mac OS anywhere away from all objects choose Edit Des...

Page 200: ...urve and the length of each direction line determines the height or depth of the curve Moving and resizing direction lines changes the slope of curves Drawing curved segments Create curves by using the pen tool to add anchor points where a curve changes direction and to drag the direction lines that shape the curves Curves are easier to edit and your system can display and print them faster when y...

Page 201: ... add a second anchor point 5 Position the pen tool where you want the curve segment to end and then do one of the following To create a C shaped curve drag in the opposite direction of to the previous direction line A Starting to drag second smooth point B Dragging away from previous direction line to create a C shaped curve C Result after releasing mouse button To create an S shaped curve drag in...

Page 202: ...ed segments on a single path or when you want to draw two curved segments that are connected by a corner point To draw a straight segment followed by a curved segment 1 Using the pen tool click corner points in two locations to create a straight segment 2 Position the pen tool over the selected endpoint A convert point icon appears next to the pen tool when it is positioned correctly To set the sl...

Page 203: ...oint A convert point icon appears next to the pen tool when it is positioned correctly Click the anchor point to convert the smooth point to a corner point A Positioning pen tool over existing endpoint B Clicking endpoint C Result after clicking 4 Click the next corner point to complete the straight segment Extending a curved segment with a straight segment To draw two curved segments connected by...

Page 204: ...path s anchor points To adjust a curved segment move one or more of its anchor points or direction lines You can also adjust a path by converting smooth points to corner points and vice versa Adding deleting and converting anchor points You can add or delete anchor points on any path Additional anchor points can give you more control over the path or extend an open path You can also connect two op...

Page 205: ... the new segment and click If you are extending a path that ends at a smooth point the new segment will be curved by the existing direction line To create a smooth point position the pen tool where you want to end the new curved segment and drag To connect the path to another open path click an endpoint on the other path When you precisely position the pen tool over the other path s endpoint a sma...

Page 206: ... drag direction lines out of a corner point making it a smooth point Release the mouse button and then drag either direction line To convert a smooth point to a corner point with independent direction lines drag either direction line Converting smooth point to corner point To temporarily switch from the convert direction point tool to the last used selection tool press Ctrl Windows or Command Mac ...

Page 207: ...ne of the handles on the sides of its bounding box To adjust a curved segment 1 Using the direct selection tool select the anchor point on either end of a curved segment Direction lines appear on the anchor point and on the adjacent anchor points if any are present some curved segments use just one direction line 2 Do one of the following Drag the anchor point Shift drag to constrain movement to m...

Page 208: ...ift as you click the path segments you want to select To move a straight path segment With the direct selection tool drag any of the path segments Note If the entire path moves choose Edit Undo and then make sure that you click only the path itself do not click the fill All points should be hollow not solid You can move a curved segment only by Shift selecting and then dragging the points that def...

Page 209: ...wing in mind If you want to split a closed path into two open paths you must slice in two places along the path If you slice a closed path only once you get a single path with a gap in it Any paths resulting from a split inherit the path settings of the original path such as stroke weight and fill color You can t split a frame containing text Use the type tool to select all of the text characters ...

Page 210: ...the path using the direct selection tool You can specify how stroke weight affects the bounding box edge and Transform palette measurements See Changing how stroke weight affects bounding box and path dimen sions on page 213 and Including stroke weight in measurements on page 273 Editing stroke characteristics Use the Stroke palette to select the stroke attributes If you want to apply a stroke col...

Page 211: ...ed squared off join The default miter limit is 4 which means that when the miter extends from the path by at least four times the stroke weight the path switches from a miter join to a bevel join A miter limit of 1 results in a bevel join The Miter Limit does not apply to a round join 3 Choose one of the following options in the Join menu to specify the appearance of the stroke at corner points A ...

Page 212: ...point s direction line End shapes appear at endpoints of open paths only they won t appear on individual dashes of a dashed stroke If you apply end shapes to a compound path that includes open subpaths each open subpath will use the same end shapes You can apply end shapes to a closed path but they won t be visible unless you open the path Adding start and end shapes Use the Start and End menus in...

Page 213: ...ot change how the weight of the stroke itself increases or decreases weight always changes equally on both the inside and the outside of a path You can observe this by selecting a path with the direct selection tool before changing its stroke weight To change how stroke weight affects a path s bounding boxes In the Stroke palette menu do one of the following Leave the Weight Changes Bounding Box d...

Page 214: ...ject Corner Effects 3 Choose a corner effect in the Effect menu 4 For Size type a value to specify the radius by which the corner effect extends from each corner point 5 Select Preview if you want to see the results of the effect before applying it Then click OK Working with compound paths You can combine several paths into a single object called a compound path Create a compound path when you wan...

Page 215: ...e area within the enclosed path However with a compound path InDesign must determine whether the intersections created by a compound path s subpaths are inside filled areas or outside holes The direction of each subpath the order in which its points were created determines whether the area it defines is inside or outside If a subpath is filled when you want it be a hole or vice versa reverse the d...

Page 216: ...onvert selected text characters into a set of compound paths that you can edit and manipulate as you would any other path The Create Outlines command is useful for creating effects in large display type but it is rarely useful for body text or other smaller size type If you simply want to apply a color stroke or a gradient fill or stroke to text characters you don t need to convert the text to out...

Page 217: ...ng and editing compound paths on page 215 Converting text outlines to paths By default creating outlines from type removes the original text However if you prefer you can make outlines appear over a copy of the original text so that none of the text is lost When you select type characters in a text frame and convert them to outlines the resulting outlines become inline graphics that flow with the ...

Page 218: ...to select one or more characters 2 Hold down Alt Windows or Option Mac OS as you choose Type Create Outlines The copy is created exactly on top of the original use the selection tool to drag it away if you like Note Some font manufacturers block the information needed to create outlines If you select such a protected font and choose Type Create Outlines a message will explain that the font cannot ...

Page 219: ...vector graphics Bitmap images also called raster images are composed of small squares known as pixels that lie on grids also known as a bitmaps or rasters Bitmap images are the most common electronic medium for such continuous tone images as photographs or images created in painting programs like Adobe Photoshop Bitmap images are resolution dependent that is they represent a fixed number of pixels...

Page 220: ...ersions for layout and then replace them with high resolution versions at print time using the Links palette or the Open Prepress Interface See Managing links and embedded graphics on page 235 and Determining how graphics print on page 399 Desktop printing usually requires images within the range of 72 ppi for photographs printed on a 300 ppi printer to 150 ppi for photographs printed on devices u...

Page 221: ...is option provides the highest quality but the slowest performance Use this option when you want to fine tune an image Note Image display options don t affect output resolution when exporting or printing images within an InDesign document When printing to a PostScript device or exporting to HTML EPS or PDF files the final image resolution depends on the output options you choose when you print or ...

Page 222: ... and feathers CMYK mattes and spread isolation Note When a document s blending space is CMYK and you have either enabled the overprint preview mode or soft proofing opacity matting is done in CMYK rather than RGB This means that partially transparent CMYK colors display as tinted CMYK colors For more information on transparent objects see About transparency on page 287 Enable Anti Aliasing Control...

Page 223: ...ing graphics on page 233 Note If you place or drag and drop a graphic from a removable medium such as a CD ROM the link will break when you remove that medium from your system To import a graphic by placing it 1 Do one of the following To import a graphic without first creating a frame make sure that nothing in the document is selected To import a graphic into an existing frame select the frame To...

Page 224: ...e options for controlling how the file is imported By identifying the scope and purpose of your document and workflow and consulting with the service providers who will help you produce your document you can clarify which options to use You can then plan your document around only those formats and options that best apply to your project The options available to you when you place a graphics file d...

Page 225: ...orting and to activate the other options in this panel Deselect this option if consistent color is not required for this graphic Profile If Use Embedded is selected leave this option unchanged Otherwise choose a color source profile that matches the gamut of the device or software used to create the graphic This profile enables InDesign to properly translate its color to the gamut of the output de...

Page 226: ...e acceptable quality when printed on low resolution or non PostScript printers DCS DCS Desktop Color Separations DCS developed by Quark is a version of the standard EPS format The DCS 2 0 format supports multichannel CMYK files with a single alpha channel and multiple spot channels the DCS 1 0 format supports CMYK files without alpha channels InDesign recognizes clipping paths in Photoshop created...

Page 227: ...mitted TIFF or bitmap image you ll want to select this option so that InDesign can access the TIFF information when you output the file Apply Photoshop Clipping Path Select this option to import a clipping path from a Photoshop 4 0 and later EPS file which you can later edit in InDesign Proxy Generation This creates a low resolution bitmap representation of an image when drawing the file to the sc...

Page 228: ...s in JPEG files created in Adobe Photoshop JPEG can be used for both online and commercially printed documents work with your prepress service provider to preserve JPEG quality in printing PICT PICT The Macintosh PICT or Picture format is widely used for Mac OS graphics and page layout applications and for transferring files between applications The PICT format is especially effective in compressi...

Page 229: ... PDF page as a single graphic in InDesign using the Place command see Placing a PDF file on page 230 or you can create an Acrobat 5 0 compatible PDF file using the Export command see Creating Adobe PDF Files on page 361 If an imported PDF 1 4 Acrobat 5 0 file contains transparent objects the transparency is preserved and will allow underlying artwork to show through PNG PNG The Portable Network Gr...

Page 230: ...t was saved with the graphic To change the value type a positive number from 0 01 to 3 0 Scitex CT SCT The Scitex Continuous Tone CT format is used for high end image processing on Scitex computers Scitex CT files often come from Scitex scanners which produce high quality scans for commercial printing The Scitex CT format supports CMYK RGB and grayscale files but does not support alpha channels Co...

Page 231: ...age you want to place Click the arrows or type a page number under the preview image to view a page before you place the file 5 For Crop to specify how much of the PDF page to place Crop places the PDF only in the area that is displayed or printed by Adobe Acrobat Content places the PDF page s bounding box or the minimum area that encloses the objects on the page including page marks Art places th...

Page 232: ...ake the background transparent in a frame containing a PDF graphic you can make it opaque later by adding a fill to the frame 7 To add a graphic to the layout click the place icon where you want the upper left corner of the graphic to appear Comparing screen and device resolution in placed PDF pages A placed PDF page displays at the best resolution possible for the given scale and screen resolutio...

Page 233: ...age is linked to the original PDF file the placed page also includes the security settings of the original file If someone later changes the security settings in the original file the security settings are updated in the placed PDF page when you update the links Whenever a placed PDF page has tighter security than the InDesign document to be exported the placed PDF page will export as a gray box A...

Page 234: ... InDesign or another program select the original graphic and choose Edit Copy 2 Switch to an InDesign document window and choose Edit Paste Dragging and dropping graphics Select a graphic from Adobe Illustrator Explorer Windows the Finder Mac OS your desktop or any removable medium and drag it into InDesign The image must be in a format that InDesign can import After dragging and dropping a file f...

Page 235: ...the pattern is complex it may be cumbersome to work with in InDesign Note When importing from Illustrator 9 0 and later using the default preference settings it is best to import the file as a PDF to preserve gradients colors and patterns as well as transparency and blends However a PDF is imported as one object which is not editable within InDesign and will not have a link reference in the Links ...

Page 236: ...D Modified link E Missing link icon F Relink button G Go To Link button H Update Link button I Edit Original button A linked file can appear in the Links palette in any of the following ways An up to date file displays only the file s name and its page in the document A modified file displays a modified link icon a yellow triangle with an exclamation point This icon means that the version of the f...

Page 237: ... information about the linked file at the time it was last placed or updated The Link Needed section specifies whether or not a link to a full resolution version of the file is needed Files that are automatically embedded at import those under 48K and text files do not require links To display link information 1 Double click a link or select a link and choose Link Information in the Links palette ...

Page 238: ...eplacing links Use the Links palette to check the status of any link or to replace files with updated or alternate files When you update or reestablish relink a link to a file any transformations performed in InDesign are preserved For example if you import a 4 by 4cm square graphic and rotate it 30 degrees and then you relink it to an unrotated 6 by 8cm graphic InDesign will scale the replacement...

Page 239: ... by clicking the bottom of the Links palette Select all missing links 2 Click the Relink button or choose Relink in the Links palette menu 3 If the Relink dialog box appears click Browse and locate the file then click Open Windows or Choose Mac OS 4 Repeat for every file that appears in the Relink dialog box To replace an imported file using the Place command 1 Do one of the following To replace t...

Page 240: ...server however other users can t make changes to the managed file until it is checked in This check out check in system allows multiple users to access the same file but prevents users from overwriting each other s work Getting started with workgroup management To use the workgroup management features in InDesign you must be able to connect to a WebDAV server You can find detailed information and ...

Page 241: ...erly access a WebDAV server check to see whether you are going through a proxy server If you are having connection problems with a proxy server ask your network manager or ISP provider if the proxy server supports HTTP 1 1 traffic If not you will need to bypass that proxy server in order to use the WebDAV features Opening managed files To view a managed file open a copy of the file from a WebDAV s...

Page 242: ...n Checking out a file prevents other users from making changes to it on the WebDAV server When you re finished making edits check the file in to update your changes to the server and release your lock on the managed file You can save changes to the managed files you have checked out To save changes to a managed file that has not been checked out use the Save As command and add that new file to the...

Page 243: ...a single managed document as a link in a checked out managed file You can place documents from the current workgroup server only To manage links for managed files see Managing files using WebDAV on page 240 To place a managed file 1 Make sure that you are connected to the network and that you have access to the managed server 2 Open the checked out version of a managed file 3 Choose File Workgroup...

Page 244: ...1 Open your local copy of the file 2 Choose File Workgroup Save Adding files to the server Adding a file to a WebDAV server initiates workgroup management for the file in other words you create a managed file by adding it to a server You can add files to a server using the File Workgroup Save As command The Save command adds to the server a managed file that has been altered the Save As command ad...

Page 245: ...he server 4 Select one of the following options for Update Links from Server Ask displays a dialog box when you open a file that contains links Never opens the local copy of the file without displaying a dialog box and without updating links Always automatically updates links when you open a file Verify Only checks if links are broken and if so display icons next to the broken links in the Links p...

Page 246: ...you can replace all blank items and those currently empty and merge lists like Keywords and large text blocks like Description with the contents of the chosen metadata file All other fields are left untouched Using object libraries Object libraries help you organize the graphics text and pages you use most often You can also add ruler guides grids drawn shapes and grouped images to a library You c...

Page 247: ... name as styles used in the destination document are converted to the destination document s styles those that have different names are added to the document The original layers of an object are preserved when the Paste Remembers Layers option is selected in the Layers palette menu Working with object libraries An object library exists as a named file on disk When you create an object library you ...

Page 248: ...formation dialog appears as the item is added to the library To add an object library object to the document Do one of the following Drag an object from the Object Library palette to a document window In the Object Library palette select an object and choose Place Item s in the Object Library palette menu To copy an object from one library to another 1 Drag one library s palette tab out of the Obj...

Page 249: ...verter plug in to the Plug ins Filters folder in the InDesign application folder Important Be sure that you do not place the plug in in the InDesign Version 2 0 folder 4 Restart InDesign 1 5 2 and choose Window Libraries Convert to Library Document and then double click the library file you want to export 5 When the Save As dialog box appears specify a name for the exported version of the library ...

Page 250: ...how and hide specific categories of objects For example you can display only object items with the word star in their names To find objects 1 Choose Show Subset in the Object Library palette menu or click the Show Library Subset button 2 Do one of the following To search all objects in the library select Search Entire Library To search only within the objects currently listed in the library refini...

Page 251: ...le which tells the RIP or a post processor where the font should be included This option is appropriate if the fonts reside in the printer TrueType fonts are named according to the PostScript name in the font however not all applications can interpret these names To ensure that TrueType fonts are interpreted correctly use one of the other font downloading options Complete downloads all fonts requi...

Page 252: ...profiles to represent colors optimally on that device For example InDesign uses source files for the color conversion and the separations profile for conversion to CMYK or the monitor profile for conversion to RGB otherwise the InDesign defaults are used Process colors created in InDesign are preserved in the exported file however process colors from imported graphics except placed PDF pages are c...

Page 253: ...n preserves the OPI links and includes the low resolution proxy in the export file Deselect this option to have an OPI server replace OPI linked graphics later in the workflow For information about OPI linking and EPS files see EPS EPS on page 226 Transparency Flattener When exporting a document that has transparent objects InDesign performs a process called flattening In the Transparency Flattene...

Page 254: ...Select the pages that you want to export The Range text box allows you to specify specific pages use a hyphen to separate page numbers in a range or a comma to separate individual page numbers or ranges The Export command exports only the selected text objects or both this option will be disabled unless one or more page items is selected The Spreads option exports each set of facing pages to a sin...

Page 255: ...ize The Style Attributes Entity References results in faster rendering times and reduced SVG file size The Style Elements method is used when sharing files with HTML documents By selecting Style Elements you can then modify the SVG file to move a style element into an external stylesheet file that is also referenced by the HTML file however the Style Elements option also results in slower renderin...

Page 256: ... frame and setting the frame s fill color To paste an object into a frame 1 Do one of the following To paste one object inside a frame select the object To paste two or more objects inside a frame group them first because a frame can contain only one object To paste a text frame inside another frame and preserve its current appearance select the entire text frame using the selection or direct sele...

Page 257: ...tioning of text itself using the Text Frame Options command and the Paragraph Paragraph Styles and Story palettes Note Use Fitting commands to align a text frame nested within another frame but not paragraphs in a text frame To align an object within a graphics frame Do any of the following To center content within a frame select a graphics frame and choose Object Fitting Center Content The propor...

Page 258: ...to try deselecting everything first Do this by pressing Control Shift A Windows or Command Shift A Mac OS To move a graphics frame or its content Do any of the following To move a frame together with its content drag them using the selection tool To move content without moving the frame that is to pan content behind its frame using the direct selection tool drag the contents The direct selection t...

Page 259: ...nd fill independently of its content A Photo in its graphics frame B Frame with stroke applied C Frame enlarged with both stroke and fill applied To add a rectangular keyline or border to an imported graphic 1 Using the selection tool click an imported graphic to select the bounding box of its frame 2 Use the Swatches palette and the toolbox to apply a stroke color to the frame 3 If desired adjust...

Page 260: ...or efficient printing only the data for the visible parts of cropped or masked images is sent when you output the document However you will still save disk space and RAM if you crop or mask images to their desired shapes and sizes before importing them into your document To crop or mask an object Do any of the following To crop an imported image or any other graphic already inside a rectangular fr...

Page 261: ...hics using a program such as Adobe Photoshop Use the Detect Edges option in the Clipping Path command to generate a clipping path for a graphic that was saved without one Use the pen tool to draw a path in the shape you want and then use the Paste Into command to paste the graphic into the path When you use one of InDesign s automatic methods to generate a clipping path an InDesign clipping path i...

Page 262: ...raser or the magic eraser A Original graphic B Alpha channel C Placed graphic D Original graphic E Graphic with embedded path F Placed graphic Using clipping paths to remove backgrounds from imported graphics If you import a graphic saved in EPS TIFF or Photoshop format and the graphic already contains a clipping path or an alpha channel simply place it and InDesign will use the path or channel au...

Page 263: ...lipping path using imported alpha channels or automatic edge detection 1 Select an imported graphic and choose Object Clipping Path 2 Choose one of the following options in the Type menu To create a clipping path that hides either the lightest or the darkest tones in the image choose Detect Edges By default the lightest tones are excluded to exclude the darkest tones also select the Invert option ...

Page 264: ...hold levels at 25 left and 55 right Tolerance Type a value or drag the slider to specify how similar a pixel s lightness value can be to the Threshold value before the pixel is hidden by the clipping path Increasing theTolerance value is useful for removing unwanted bumps caused by stray pixels that are darker than but close to the lightness value of the Threshold value Higher Tolerance values usu...

Page 265: ...hat must be visible For example if you choose Include Inside Edges for a graphic of silver eyeglasses and the lenses become transparent very light areas of the eyeglass frame may also become transparent such as its specular highlights If areas become transparent when that wasn t your intent try adjusting the Threshold Tolerance and Inset Frame values Restrict to Frame Select this option to create ...

Page 266: ...working with a stack of overlapping objects and you group some objects that aren t adjacent in the stacking order the selected objects will be pulled together in the stacking order right behind the frontmost selected object If you group objects that exist on different named layers all of the objects move to the frontmost layer on which you selected an object Also the objects you select must either...

Page 267: ...ntent to select it independently of the group 2 Switch to the selection tool to activate the object s bounding box To select multiple nested objects 1 Using the direct selection tool click the nested object 2 Hold down Shift as you click each additional nested object you want to select Selection of multiple images in a nested group To select up or down through a hierarchy of nested objects 1 Using...

Page 268: ...trl Windows or Command Mac OS as you click an object on a stack within a single layer To select the next object in front of a selected object press Ctrl Alt Windows or Command Option Mac OS as you click an object on a stack within a single layer 2 If the selected object is not the one you want continue pressing the appropriate keys and click repeatedly until the object you want is selected Note Th...

Page 269: ...tton all selected objects align to the left edge of the selected object furthest to the left To align objects 1 Select at least two objects to align 2 In the Align palette click the button for the type of alignment you want Distributing objects You can use the Align palette to space selected objects horizontally or vertically in the following ways Distribute objects within the boundaries of the se...

Page 270: ...ositive values move objects right along the horizontal axis or down along the vertical axis Specifying a positive value adds space between objects and specifying a negative value removes space between objects To distribute objects within the selection boundary with equal space between facing edges 1 If the Distribute Spacing section of the Align palette isn t visible choose Show Options in the Ali...

Page 271: ... selected objects Choose Object Lock Position To unlock the positions of selected objects Choose Object Unlock Position You can also use the Layers palette to lock one or more layers This locks the positions of all objects on a layer and also prevents them from being selected Using the Transform palette Use the Transform palette to view or specify geometric information for any selected object incl...

Page 272: ...the Transform palette Setting the reference orientation for nested objects TheTransform palette orients an object to a spread s pasteboard where a horizontal line has a rotation angle of zero degrees By default this is true even if the object is nested inside a transformed parent object that is if the object is part of a transformed group or pasted inside a transformed frame For example if you pas...

Page 273: ...ale frame content when you scale a frame The Scale Content command does not apply when you scale by dragging instead be sure that you selected the frame with the selection tool To change the Scale Content setting In the Transform palette menu do one of the following Leave Scale Content deselected the default if you are using the Transform palette to crop graphics by altering frame size Choose Scal...

Page 274: ...t of origin for transformations All transformations occur in relation to a fixed point on or near the object called the point of origin which you can change The point of origin is marked by an icon when a trans formation tool such as the scale tool is active Point of origin moved to center left and object scaled right The default point of origin depends on the object For most objects the default p...

Page 275: ...of the following To drag the point of origin select the rotate tool scale tool or shear tool position the tool over the point of origin and drag it to a new location To specify a point of origin at a corner side or the center of the selected objects click any of the nine points on the proxy in the Transform palette Note The point of origin always shows the last position chosen whenever you deselec...

Page 276: ...to the right of the x axis negative values move the object up and to the left Enter the distance and angle for the move The angle you enter is calculated in degrees from the x axis Positive angles specify a counterclockwise move negative angles specify a clockwise move You can also enter values between 180 and 360 degrees these values are converted to their corresponding negative values for exampl...

Page 277: ...n many pages consider creating a master page with the object on it For more information see Creating and applying masters on page 57 To set keyboard preferences that affect how objects move 1 Choose Edit Preferences Units Increments Windows and Mac OS 9 or InDesign Preferences Units Increments Mac OS 10 1 Units Increments 2 For Cursor Key specify the distance you want each press of an arrow key to...

Page 278: ...form just a part of a path without its content For more information see Working with multiple anchor points and segments on page 207 A transformation affects all selected objects as a single unit For example if you select multiple objects and rotate them 30 degrees they all rotate around one point of origin If you want to rotate each selected object 30 degrees around its own point of origin you mu...

Page 279: ... Angle option Enter a negative angle to rotate the object clockwise enter a positive angle to rotate the object counterclockwise 3 If the selected object is a frame with content and you want the content to rotate with the frame make sure that Move Content is selected This option is selected by default 4 Do one of the following To preview the effect before you apply it select Preview To rotate the ...

Page 280: ...axes or both x and y axes proportionally by holding down Shift as you drag the scale tool For finer control start dragging farther from the object s point of origin To scale selected objects using a preset percentage value Choose a value in the menu next to the Scale X Percentage or Scale Y Percentage options in the Transform palette To scale selected objects by specifying a value in the Transform...

Page 281: ... one percent press Ctrl Windows or Command Mac OS To reduce by one percent press Ctrl Windows or Command Mac OS To enlarge or reduce by five percent use either of the preceding shortcuts while also holding down Alt Windows or Option Mac OS It s easy to remember these shortcuts because they correspond to the keys that use the greater than symbol and the less than symbol The shortcuts aren t listed ...

Page 282: ...n as both a horizontal and vertical axis choose Flip Both in the Transform palette menu which results in a 180 rotation An object reflected using Flip Both You can reflect an object at an angle other than those specified by rotating the object first Shearing selected objects Shearing an object slants or skews it along its horizontal axis and can also rotate both of the object s axes Shearing is us...

Page 283: ...ositive or negative value to specify the shearing angle and press Enter or Return To shear selected objects using a preset percentage value Choose a value in the menu next to the Shear option in the Transform palette To shear an object precisely using dialog box options 1 With the selection tool select the object or objects to shear Choose Object Transform Shear Double click the shear tool To chan...

Page 284: ...oviding a way to perform any transformation with just one tool You can combine trans formations such as rotating and scaling while the free transform tool is active You can use keyboard shortcuts to instantly switch between the transform tool press E the selection tool V and the direct selection tool A To move with the free transform tool 1 Select the object or objects to move 2 Select the free tr...

Page 285: ...nstantly The new copy appears on the layout slightly offset down and to the right from the original To duplicate an object Select an object and choose Edit Duplicate Duplicating objects as you transform them You can duplicate an object each time you change its position orientation or propor tions For example you can create a flower by drawing one petal setting its point of origin at the base of th...

Page 286: ...ke not counting the original 3 For Horizontal Offset and Vertical Offset specify how far to shift the position of each new duplicate from the previous duplicate along the x and y axes respectively and click OK To create a page full of duplicates first use Step and Repeat withVertical Offset set to 0 zero this will create one row of duplicates Then select the entire row and use Step and Repeat with...

Page 287: ...bjects placed from Photoshop and Adobe Illustrator It s possible to add transparency to your artwork without realizing it for example by adding drop shadows and feathering to objects or by placing files with transparency that originated in other applications such as Photoshop or Adobe Illustrator Be aware of when you re using transparency because you need to set some extra options when printing an...

Page 288: ...transparency to selected objects and groups including graphic and text frames but not to individual text characters or layers and you cannot apply different transparency values to the fill and stroke of an object However imported graphics with those types of transparency effects will display and print correctly Note To ensure that transparent objects imported from Illustrator 9 0 and later Acrobat...

Page 289: ...mage display quality and performance on page 221 Use the View menu to quickly change transparency display between Optimized Typical and High Quality Note Before you print a file containing transparency effects make sure that you check the transparency preferences first Printing automatically flattens the artwork and may affect the appearance of the transparency effects To turn off transparency so ...

Page 290: ...ing on the base color Patterns or colors overlay the existing artwork preserving the highlights and shadows of the base color while mixing in the blend color to reflect the lightness or darkness of the original color Soft Light Darkens or lightens the colors depending on the blend color The effect is similar to shining a diffused spotlight on the artwork If the blend color light source is lighter ...

Page 291: ...ration of the blend color This preserves the gray levels in the artwork and is useful for coloring monochrome artwork and for tinting color artwork Luminosity Creates a color with the hue and saturation of the base color and the luminance of the blend color This mode creates an inverse effect from that of the Color mode Note The Difference Exclusion Hue Saturation Color and Luminosity modes do not...

Page 292: ...e blending space is applied for screen and in the flattener For more information about the flattener see About flattening on page 294 The blending space is applied only to those spreads that contain transparency To specify a blending color space Choose Edit Transparency Blend Space and then choose one of the document s color spaces Note For a typical print workflow choose the CMYK color space Crea...

Page 293: ... page 289 5 Enter the amount of opacity you want for the shadow 6 Enter the distance you want the drop shadow to be offset from the object on the x axis or the y axis 7 Enter the distance from the edge of the shadow where you want any blurring to occur 8 For Color choose a color to specify the shadow color 9 Select Preview to display the results on screen 10 Click OK Feathering edges The Feather c...

Page 294: ... 294 Flattening cuts transparent art apart to represent overlapping areas as discrete pieces that are either vector objects or rasterized areas this example involves only vector objects Controlling flattener settings and results using styles If you regularly export or print documents that contain transparency you can automate the flattening process by saving flattener settings in a flattener style...

Page 295: ...ion set an output resolution for rasterized artwork except for gradient objects In most cases 300 dpi is sufficient For Gradient Resolution set an output resolution for gradient objects In most cases 150 is sufficient 6 Select any of the following and then click OK Force Text to Outlines to expand all text to outlines throughout the document Otherwise only transparent portions of the text may get ...

Page 296: ...s case you can flatten the complex spread at a high quality and use a faster and lower quality flattener style on the other spreads At print or export time you can revert to the flattener settings for the document or book To flatten a spread 1 Display the spread in the Document window 2 Choose Spread Flattening in the Pages palette menu 3 Choose any of the following and then click OK Default to us...

Page 297: ...ity Display and Overprint Preview in the View menu Overprint Preview gives an approximation of how spot inks that overprint or interact with transparent objects will appear If the visual effect is not what you want do any of the following Use a different blend mode or no blend mode Avoid these blend modes when working with spot colors Difference Exclusion Hue Saturation Color and Luminosity Use a ...

Page 298: ...ion see Exporting options on page 251 Color conversions If a transparent object overlaps a spot color object undesirable results may occur when you export to EPS format and then convert spot colors to process colors upon printing or create color separations in an application other than InDesign To prevent problems in these cases make sure that your spot inks are consistent in both the original app...

Page 299: ...y if they don t interact with transparent objects To overcome DCS limitations save your multitone images as EPS files Trapping Flattening may convert vectors to rasterized areas Traps applied to artwork in Adobe Illus trator using strokes and placed in InDesign will be preserved However traps applied to vector artwork drawn in InDesign that becomes rasterized will be removed To keep as many object...

Page 300: ...l printer Several color matching system libraries are included with InDesign see Loading colors from other color systems on page 308 Keep the number of spot colors you use to a minimum Each spot color you create will generate an additional spot color printing plate for a printing press and increase your printing costs If you think you might need more than four colors consider printing your documen...

Page 301: ...ivalents to global process colors are swatches Swatches make it easier to modify color schemes without having to locate and adjust each individual object This is especially useful in standardized production driven documents like magazines Because InDesign colors are linked to swatches in the Swatches palette any change to a swatch affects all objects to which a color is applied The InDesign equiva...

Page 302: ...rect selection tool You can only apply two colors to a grayscale or monochrome image For text characters use the type tool to change the text color of a single word or the entire text within a frame 2 In the toolbox or Swatches palette select the Fill box or the Stroke box to specify the fill or stroke of the object If you selected an image the Stroke box has no effect 3 Select a color tint or gra...

Page 303: ...ow red green and blue To change the swatches that appear by default in new documents edit the Swatches palette when no documents are open A Fill stroke B Text object control C Tint control D Color name E Color swatch F Gradient swatch G None H CMYK color I Registration color J Spot color K Process color L Color tint M RGB color N LAB color O Show All Swatches button P Show Color Swatches button Q ...

Page 304: ...e the Registration color so that printing plates can be aligned precisely on a press You cannot edit or remove this swatch You can also add any colors from any swatch library to the Swatches palette so that they are saved with your document See Using swatch libraries on page 308 Working with the Swatches palette Use the Swatches palette to create and name any color or tint or to edit any named col...

Page 305: ... printing plate To add a new color swatch to the Swatches palette 1 If you want to base your new swatch on the fill or stroke color of an existing object select the object In the Swatches palette select the Fill box or the Stroke box 2 Do one of the following Choose New Color Swatch in the Swatches palette menu Choose Add to Swatches in the Color palette menu 3 For Color Type choose the method you...

Page 306: ...swatch and click the New Swatch button at the bottom of the palette Drag a swatch to the New Swatch button on the bottom of the palette To delete a swatch from the Swatches palette 1 Select one or more swatches 2 Do one of the following Choose Delete Swatch in the Swatches palette menu Click the Trash button at the bottom of the Swatches palette Drag the selected swatches to the Trash button 3 InD...

Page 307: ...ing on or off 1 Double click a process color in the Swatches palette 2 Do one of the following and click OK To let InDesign rename the swatch when you adjust its CMYK percentages make sure that the Name with Color Value option is selected To rename a swatch when you adjust its CMYK values make sure that the Name with Color Value option is deselected Note The new swatch is automatically renamed New...

Page 308: ...her Library from the Color Mode list and then click Open Windows or Choose Mac OS DIC Color Provides 1280 CMYK spot colors from the DIC Process Color Note Colors may be matched against the DIC Color Guide published by Dainippon Ink Chemicals Inc For more information contact Dainippon Ink Chemicals Inc in Tokyo Japan Focoltone Consists of 763 CMYK colors You can use Focoltone colors to help avoid p...

Page 309: ...his library helps you create artwork for the Web using colors that display consistently across Windows and Macintosh systems Loading colors from other files You can import colors and gradients from other documents When you do so all of the source file s spot and process colors and gradients are added to a new palette You can load colors from the following Adobe InDesign documents Windows filename ...

Page 310: ...lay the Color palette Do one of the following Choose Window Color Double click the fill and stroke proxy in the toolbox To edit the fill or stroke color of selected text or objects using the Color palette 1 Select the Fill box or the Stroke box in the Color palette 2 Do one of the following Adjust the Tint slider which appears by default if the object uses a swatch from the Swatches palette See Ab...

Page 311: ...swatch located next to the out of gamut icon in a palette You can drop colors or gradients on the following objects and palettes The fill or stroke of a path To drop color on a fill or stroke position the center of the drag icon precisely over the path s fill or stroke while you drag a color and then release the mouse button The Swatches palette If you drag one or more Swatches palette swatches or...

Page 312: ...ts based on the same swatch To create a tint swatch using the Swatches palette 1 In the Swatches palette select a color swatch 2 Select the arrow next to the Tint box 3 Drag the Tint slider and click the New Swatch button or select New Color Swatch in the Swatches palette menu The tint appears in the Swatches palette with the name of its base color and the percentage of the tint To create a tint s...

Page 313: ... and a midpoint at 50 A Gradient fill B Gradient type drop down C Reverse button D Starting color stop E Midpoint F Ending color stop Creating gradients You can create name and edit gradients using the same Swatches palette you use to work with solid colors and tints To create a gradient swatch 1 Choose New Gradient Swatch in the Swatches palette menu 2 For Swatch Name type a name for the gradient...

Page 314: ...e click the Gradient tool in the toolbox To create an unnamed gradient for selected text or objects 1 Click the Fill or Stroke box in the Swatches palette or the toolbox If the Gradient Fill box is not visible choose Show Options in the Gradient palette menu 2 To define the starting color of a gradient click the leftmost color stop below the gradient bar and then do one of the following Alt click ...

Page 315: ...ion of a gradient its beginning point and endpoint and apply a gradient across multiple objects To use the gradient tool on selected text or objects with an existing gradient 1 In the Swatches palette or toolbox select the Fill box or the Stroke box depending on where the original gradient was applied 2 Select the gradient tool and position it at the place where you want to define the beginning po...

Page 316: ...ow the characters are redistributed across the gradient and the colors of individual characters change accordingly A Underlying gradient fill B Text characters with gradient applied C Text added and text shifting position relative to gradient fill If you want to adjust a gradient so that its complete color range spans a specific range of text characters you have two options Use the gradient tool t...

Page 317: ...d apply a unique gradient to each range Each gradient is added to the text frame and tracked separately with the characters you selected when you applied each gradient However the endpoints of the gradient are still anchored to the text frame s bounding box not to individual ranges of text Using the Ink Manager The Ink Manager provides nonbinding control over inks at output time Changes you make u...

Page 318: ...on the ink list changes to CMYK color mode and the spot colors disappear from the Ink List To restore your spot colors deselect All to Process Note The process color equivalents may not exactly match the original spot colors Selecting this option removes any ink aliases you have set up in the Ink Manager and can also affect overprinting and trapping settings in your document To convert individual ...

Page 319: ...ool 1 Select one or more objects that have the fill and stroke attributes you want to change 2 Select the eyedropper tool 3 Click any object that has the fill and stroke attributes you want to sample A loaded eyedropper appears and the selected objects are automatically updated with the fill and stroke attributes of the object you clicked 4 To change other objects to the same attributes click the ...

Page 320: ...colors from imported graphics to your document or to apply them to objects in your document This is useful for coordinating layout colors with images For more information about the eyedropper tool see Copying attributes between objects on page 319 For best results with color separations you may want to make sure that color names types such as spot and process and models such as RGB and CMYK of the...

Page 321: ...ess color swatch This provides flexibility for adapting colors even those in imported graphics to your current output requirements To change an imported spot color to a process color 1 In the Swatches palette double click the swatch you want to edit 2 In the Swatch Options dialog box choose Process in the Color Type menu Note This changes the color type in the InDesign document only To permanently...

Page 322: ...rneath to prevent unwanted color mixing but trapping requires that inks overprint or print on top of each other so that at least a partial overlap is achieved Misregistration with no trap left and with trap right Most traps employ spreading expanding a light object into a dark object Because the darker of two adjacent colors defines the visible edge of the object or text expanding the lighter colo...

Page 323: ...rapping settings you specify in the Trap Styles palette modify the trapping engine s results Comparing Adobe In RIP Trapping and built in trapping While built in trapping and Adobe In RIP Trapping are quite similar they can produce significantly different output from the same document For best results read the following sections and learn about the differences between the two trapping engines Requ...

Page 324: ...images using TIFF format not EPS If the images are TIFF it may be possible to use built in trapping as long as you don t select any Omit For OPI options at output time Omit For OPI options are located in the Advanced panel of the Print dialog box when a PostScript printer is targeted Note The behavior and precision of trapping within an OPI workflow depends on many factors such as the downsampling...

Page 325: ...eed trapping such as pages containing black text only You can use trap styles to enable trapping only for the page ranges that require it for more information see Assigning a trap style to pages on page 329 The speed with which built in trapping is accomplished depends on the speed of your computer system If you re trapping every page of a long document use the fastest computer system you have Bui...

Page 326: ...rovider and read the trapping topics referred to in the following procedure to make sure that you understand how trapping options work in the context of your specific document and printing conditions When trapping multiple documents in a book make sure that you assign any custom trap styles to page ranges within the individual documents of the book You cannot assign trapping settings to an entire ...

Page 327: ...ange will use the Default trap style The Default style is a collection of typical trap settings that are applied to all pages of a new document by default To assign a different style or to use no style see Assigning a trap style to pages on page 329 The way individual trapping options are used varies depending on the situation For more information see the other trapping topics For more information...

Page 328: ...s type values to specify the conditions under which trapping occurs Many variables affect the values you ll need to enter here For more information consult with your prepress service provider and see the other trapping topics To duplicate a trap style Do one of the following In the Trap Styles palette select a style and choose Duplicate Style in the palette menu Drag a style to the New Style butto...

Page 329: ...ant to apply the trap style 4 Click Assign and then click Done Note If you click Done without clicking Assign the dialog box closes without making any changes to the trap assignments Trap assignments previously made using the Assign button are preserved To set up trapping page ranges 1 In the Trap Styles palette choose Assign Trap Style in the palette menu 2 For Trap Style choose the style you wan...

Page 330: ...ically You can get the appropriate neutral density value for a given ink by asking your commercial printer The most accurate method of determining an ink s ND value is by measuring a swatch of the ink with a commercial densitometer Read the V or visual density of the ink do not use process filters If the value differs from the default setting type the new value in the ND text box Note Changing the...

Page 331: ...or metallic inks Choose OpaqueIgnore for heavy nontransparent inks to prevent trapping of under lying colors and to prevent trapping along the ink s edges Use this option for those inks such as metallics and varnishes that have undesirable interactions with other inks Specifying trapping sequence You can adjust the trapping sequence also called the trapping order The trapping sequence matches the ...

Page 332: ... 5 to 2 times the value of the default trap width The value you set for Black Color determines what InDesign will consider to be a solid black or a rich black a process color consisting of solid black with one or more compo nents of C M or Y inks For details see Trapping with blacks and rich blacks on page 335 Note If you choose Application Built In trapping and you specify a Default trap width or...

Page 333: ... Indicates the minimum amount of black ink required before the Black width setting is applied Type a value from 0 to 100 or use the default of 100 For best results use a value no lower than 70 See Trapping with blacks and rich blacks on page 335 Black Density Indicates the neutral density value at or above which InDesign considers an ink to be black For example if you want a dark spot ink to use t...

Page 334: ...y will always have their traps exactly straddle the centerline unless the Sliding Trap is set to 100 To set the percentage difference at which a trap slides 1 Open the Trap Style dialog box for a new or existing style See Using the Trap Styles palette on page 327 2 In the Trap Thresholds section for Sliding Trap enter a percentage from 0 to 100 or use the default of 70 At 0 all traps default to ce...

Page 335: ...reen adding percentages of one or more process inks to strengthen the black The Black Color setting is useful when you must compensate for extreme dot gain as when using low grade paper stock These situations cause black percentages lower than 100 to print as solid areas By screening back blacks or rich blacks using tints of solid black and decreasing the Black Color setting from its default of 10...

Page 336: ...er if you print multiple documents in a book and each document or page has a different trap style InDesign can resolve some trap style conflicts by synchro nizing styles among documents If documents in a book use different trap styles with the same name InDesign assigns the trap style used in the master document provided you ve selected the Trap Style option in the Synchronize Options dialog box S...

Page 337: ... example a variety of RGB spaces can exist among scanners and monitors and a variety of CMYK spaces can exist among printing presses and desktop printers Because of these varying color spaces colors can shift in appearance when you transfer documents between different devices Color variations can result from differences in image sources scanners and software produce art using different color space...

Page 338: ...a cross platform standard InDesign also supports Microsoft ICM Image Color Management profiles and system level CMS on Windows 98 Windows 2000 and Windows Me Rendering intents No single color translation method can manage color correctly for all types of graphics For example a color translation method that preserves correct relation ships among colors in a wildlife photograph may alter the colors ...

Page 339: ...ions in which your audience will see the final piece For example you might want to see how a housewares catalog looks under the incandescent light bulbs used in homes or view an office furniture catalog under the fluorescent lighting used in offices However always make final color judgments under the lighting conditions specified by the legal requirements for contract proofs in your country Turnin...

Page 340: ...for CMYK images For example in a CMYK workflow where you re printing to a CMYK device or exporting to a format such as EPS or PDF with CMYK as the selected output color space it s important not to change the actual CMYK values Those values are defined in terms of your final press values However so that the CMYK colors may be seen on screen the colors are converted to RGB for display purposes using...

Page 341: ...ialog box is updated to display the specific color management settings associated with the configuration Customizing color management settings Although the predefined settings can provide sufficient color management for some typical publishing workflows you should customize individual options to suit specific workflows For example you could change the CMYK working space to a profile that matches t...

Page 342: ...ed Mode at the top of the Color Settings dialog box To appear under a working space menu a color profile must be bidirectional that is it must contain specifications for translating both into and out of color spaces For information on installing color profiles see Adding device profiles to the color management system on page 352 For the RGB color model the following standard working space options ...

Page 343: ...tive plate uncoated white offset stock U S Web Coated SWOP v2 Uses specifications designed to produce high quality separations using U S inks under the following printing conditions 300 total area of ink coverage negative plate coated publication grade stock This profile was created using the TR001 characterization data U S Web Uncoated v2 Uses specifications designed to produce high quality separ...

Page 344: ... predefined color management workflows are set to display warning or option messages when a default color management policy is about to be implemented Although you can disable the repeated display of some of the messages it is highly recommended that you continue to display all policy messages to ensure the appropriate color management of documents on a case by case basis You should turn off messa...

Page 345: ... policy option see the table following this procedure 3 Select either both or neither of the following options It is strongly recommended that you keep both options selected Deselecting the options causes InDesign to implement default policy behavior without notification Ask When Opening to display a message whenever the embedded color profile in a newly opened document is missing or does not matc...

Page 346: ...00 Windows Millennium and Windows XP computers Preserve Embedded Profiles Working space profile is saved with new documents If opened document s profile does not match current working space profile is preserved and saved with document If opened document does not contain a profile working space is used for editing but not saved with document For color data imported within same color model between e...

Page 347: ...saturation instead of hue so that when translating to a smaller gamut hues may shift This rendering intent is suitable for business graphics where the exact relationship between colors is not as important as having vivid colors Absolute Colorimetric Leaves colors that fall inside the destination gamut unchanged This intent aims to maintain color accuracy at the expense of preserving relationships ...

Page 348: ...lor Settings dialog box If you choose a different option in the Settings menu you must reload the custom settings file before you can use it again Synchronizing color management between applications The Color Settings dialog box represents the common color management controls shared by several Adobe applications including InDesign 2 0 Photoshop 6 0 and Adobe Illus trator 9 0 and later If you modif...

Page 349: ...e Then follow the instructions outlined in the next procedure to set up the custom proof Document CMYK to soft proof colors using the document s CMYK color model as the proof profile space that you want to simulate Working CMYK to soft proof colors using your current working CMYK color space as the proof profile space 4 Choose View Proof Colors to toggle the soft proof display on and off When soft...

Page 350: ...r no profile or a profile different from the working space Assign Profile to embed a different profile in a color managed document Choose the desired profile in the menu InDesign embeds the new profile in the document without converting colors to the profile space 3 Choose a rendering intent for each type of graphic in your document For each graphic type you can choose one of the four standard int...

Page 351: ...InDesign document to PDF see Tagging colors with ICC profiles on page 372 For information on how InDesign handles placed PDF files in a color managed document see Preparing PDF files on page 358 Note You can change or discard an embedded profile before saving a document but you cannot change the default behavior to embed or not to embed profiles as you save a document See Changing the color profil...

Page 352: ...rs To add profiles to your system Do one of the following In Windows NT 4 0 copy profiles into the WinNT System32 Color folder In Windows 2000 copy profiles into the WinNT System32 spool drivers color folder In Windows 98 copy profiles into the Windows System Color folder In Mac OS 9 copy profiles into the ColorSync Profiles folder in the System Folder ColorSync 2 5 or later or System Folder Prefe...

Page 353: ...ystem level profile in Windows NT 4 0 Its ability to calibrate settings in Windows 98 Windows 2000 Windows Me and Windows XP depends on the video card and video driver software In such cases some calibration options documented here may not be available Calibrating versus characterizing a monitor Such profiling software as Adobe Gamma can both characterize and calibrate your monitor When you charac...

Page 354: ...e information refer to the manual for your operating system If your monitor has digital controls for choosing the white point from a range of preset values set those controls before starting the calibration tool Later in the calibration utility you ll set the white point to match your monitor s current setting Be sure to set the digital controls before you start the calibration utility If you set ...

Page 355: ...ide range of possibly uncal ibrated monitors and video display systems your control over color consistency is signifi cantly limited When you color manage a document for both print and online viewing simply build your color management workflow around the requirements of the print version the limitations of online color viewing are probably not surmountable until color management becomes common in ...

Page 356: ...produce a spot color on a monitor or proofing device because many spot color inks exist outside the gamuts of many of those devices Changing color values or CMS settings never affects the final spot color because spot color inks are premixed InDesign can color manage only the density of tints made from a spot color Preparing imported graphics for color management Use the following general guidelin...

Page 357: ...n document When you print the CMYK values will be preserved and the on screen preview will be consistent from program to program With proper monitor profiling the on screen colors will closely resemble those in the final printed document Preparing Adobe Photoshop 6 0 and later images Use the following guidelines to prepare Photoshop 6 0 and later for exporting color managed images In Photoshop cho...

Page 358: ...u cannot use InDesign to change the profiles embedded in PDF files When a PDF file does not contain embedded profiles InDesign can display and print the file as it appeared in the program that created it if that program supports color management and you use the same profiles and CMS settings in both InDesign and the other program However this method cannot account for individual images contained w...

Page 359: ... Settings dialog box as you place the graphic or at any time directly on the layout Color managing scanned images When you receive a CMYK scan a scanner operator has converted the image from RGB to CMYK using a color lookup table Use the following guidelines as you prepare scanned images If the image has an embedded profile use it for soft proofing and controlling color in the document If the imag...

Page 360: ...r management settings 1 Do one of the following If the graphic is on the layout select it and then choose Object Image Color Settings If you re about to import the graphic choose File Place select Show Import Options locate and select the file and click Place Then click Color Settings on the left side of the Image Import Options dialog box that appears 2 Select Enable Color Management to apply col...

Page 361: ...e into another application such as Adobe Illustrator To export an open document to Adobe PDF 1 Choose File Export 2 For Save as Type Windows or Formats Mac OS choose Adobe PDF Type a filename choose a location for the file and click Save 3 To view or change existing settings click the panel names on the left side of the Export PDF page 4 Click Export To export a book to Adobe PDF Depending on whet...

Page 362: ...obe Web site at www adobe com often for the latest developments Currently Adobe addresses publishing workflow needs by providing an integrated system of several technologies Adobe Acrobat 5 0 software with its support for Adobe PDF version 1 4 Adobe PostScript 3 printing technology for device independent support Adobe In RIP Trapping in RIP color separations and smooth blends Adobe Extreme which c...

Page 363: ...tion images in your document For best results use only CMYK images in a four color process job Alternatively you can convert RGB images except those in placed Adobe PDF files to CMYK in the Advanced panel of the Export PDF dialog box Proofing and correcting a high resolution composite Adobe PDF file PostScript color printers can generate good preliminary color proofs Composites from a desktop colo...

Page 364: ...sswords and other security options Use a filename of no more than eight characters followed by an extension of up to three characters Many networks and e mail programs shorten long filenames Make sure that the filename has a pdf extension if users will view the file on a Windows computer or on the Web To apply default Adobe PDF export settings for on screen viewing choose Screen in the Style menu ...

Page 365: ...file except the Base 14 fonts maintains compatibility with Acrobat 4 0 and later and optimizes files for byte serving Print Creates Adobe PDF files that are intended for desktop printers digital copiers and CD ROM publishing you can also send them to clients as publishing proofs In this set of options file size is still important but it is not the only objective This set of options uses compressio...

Page 366: ...ialog box select one or more styles in the list to save 2 Click Save Specify a name and location and then click Save To load existing Adobe PDF styles 1 In the PDF Styles dialog box click Load 2 Locate and double click the PDF file you want to load or select the file and click Open Setting general Adobe PDF options The General options allow you to specify an Acrobat version for file compatibility ...

Page 367: ...links Creates Adobe PDF hyperlink annotations for InDesign hyperlinks table of contents entries and index entries Include Bookmarks Creates bookmarks for InDesign table of contents entries preserving the TOC levels Export Nonprinting Objects Exports objects to which you have applied the Nonprinting option in the Attributes palette Export Visible Guides and Baseline Grids Exports margin guides rule...

Page 368: ...nDesign can downsample or subsample a bitmap image to reduce the amount of data in the image to no more than what an output device requires You should resample bitmap images when they contain more data than the output device can use or when the exported Adobe PDF file will be used on the Web For a table showing different output resolutions see Compressing and resampling images on page 369 If your ...

Page 369: ...grade image quality However it doesn t affect the quality of text and line art You may want to experiment with these options to find an appropriate balance between file size and image quality Note Before setting compression options check with your service provider for recom mended settings To resample color or grayscale images 1 Click Compression on the left side of the Export PDF dialog box 2 For...

Page 370: ...1500 dpi increases the file size but does not improve image quality Note Resampling monochrome images can have unexpected viewing results such as no image display If this happens use downsampling or choose No Sampling Change and then export the file again This problem is more likely to occur with subsampling than with downsampling To compress monochrome images 1 Choose Compression in the menu at t...

Page 371: ...gnated color space InDesign uses the destination profile to describe the gamut of your final RGB or CMYK output device such as your monitor or a SWOP standard Using this profile InDesign converts the document s color information defined by the source profile in the Working Spaces section of the Color Settings dialog box to the color space of the target output device For more information see Using ...

Page 372: ...ting To simulate overprinting in Acrobat 4 0 documents 1 In the General panel of the Export PDF dialog box choose Acrobat 4 0 for Acrobat Compatibility 2 In the Advanced panel of the Export PDF dialog box select the Simulate Overprint option About font embedding and substitution InDesign embeds a font only if it contains a setting by the font vendor that permits it to be embedded Embedding prevent...

Page 373: ...ers To change font embedding status In the Advanced panel of the Export PDF dialog box type a new percentage for the Subset Fonts Below option Omitting graphics The OPI options in the Advanced panel let you selectively omit different imported graphics types when sending image data to a printer or file leaving only the OPI links comments for later handling by an OPI server For details see Setting c...

Page 374: ...fy any password protection you want Select Password Required to Open Document and in the User Password text box enter the password users must enter before they can open the file Select Password Required to Change Permissions and Passwords and in the Master Password text box enter the password users must enter before they can set or change any security options Note You cannot use the same password ...

Page 375: ... transparency whereas AICB breaks selections into many smaller opaque objects that give an overall look of transparency InDesign turns AICB objects into native InDesign objects To specify copying preferences 1 Choose Edit Preferences General 2 Select Copy PDF to Clipboard and click OK Note Copying selections as Adobe PDF requires time and memory To specify pasting preferences 1 Choose Edit Prefere...

Page 376: ...tnotes from text Printing artifacts such as crop marks registration marks and page information printed outside of the crop marks In addition to this content tagged Adobe PDF documents contain a logical structure tree that references the author s content in a natural reading order Comments and artifacts aren t referenced by the logical structure tree because they re not considered useful when repur...

Page 377: ...you can save tagged Adobe PDF files to other formats such as RTF and XML with the best results including the recognition of paragraphs basic text formatting lists and tables You can reflow tagged Adobe PDF files so that they re readable in different sized devices Tagged Adobe PDF files have been optimized for accessibility so that they can be reliably accessed with a screen reader for Windows Exte...

Page 378: ...it to HTML InDesign can add navigational links based on hyperlinks Although you can create compelling Web pages using InDesign the Export HTML feature is intended to simplify repurposing print material for the Web it does not replace the versatility of Web authoring products such as Adobe GoLive Getting consistent color online InDesign includes a color swatch library called Web which consists of t...

Page 379: ... document to HTML Some attributes don t have equivalents in HTML language Other attributes may be recognized correctly by HTML but ignored by specific browsers Consider the following issues when you design a document that will be published on the World Wide Web Type Exporting to HTML preserves some character and paragraph attributes but not others You can preserve the appearance but not the editab...

Page 380: ...o export an InDesign document to HTML 1 Choose File Export 2 For Save as Type Windows or Formats Mac OS choose HTML 3 Type a filename and choose a location for the file 4 Click Save to open the Export HTML dialog boxes The options are explained in the following topics 5 Adjust settings as desired Then choose another dialog box in the menu at the top of the current dialog box or click Previous or N...

Page 381: ...op of the Export HTML dialog box to set general formatting options If you choose a color using the system color picker InDesign shifts the selected color to the closest Web safe color Override Color Changes the color of all text in the HTML file to the selected color You can either choose a Web safe color in the menu or double click the color box and choose a color from the color picker Remember t...

Page 382: ...ion This maintains any GIF animation or transparency in the linked images and also maintains the quality of JPEG images by not adding additional lossy compression On the other hand all embedded images even those saved as GIF JPEG or PNG are converted to the format you choose Use Images Subfolder Creates a folder called Images within the folder where your HTML documents are saved InDesign stores im...

Page 383: ... opened Choose Progressive to make the JPEG images display gradually and in increasing detail as they are downloaded to a Web browser Files created with this option are slightly larger and they require more RAM for viewing Choose Baseline to make each JPEG file display only after it has been completely downloaded a placeholder appears in its place until the file displays Setting encoding options C...

Page 384: ...e of a continuous tone image Halftoning To create the illusion of continuous tone images are broken down into a series of dots This process is called halftoning Varying the sizes and densities of the dots in a halftone screen creates the optical illusion of variations of gray or continuous color in the printed image Color separation Artwork that will be commercially reproduced and that contains mo...

Page 385: ...nter drivers see Choosing the right method for creating a PostScript file on page 410 Resolving overlapping InDesign printer driver features Some InDesign printing features appear in both the printer driver dialog boxes and the InDesign Print dialog box If settings overlap InDesign tries to synchronize the settings or to ignore the driver s settings Some printer driver features for example N up pr...

Page 386: ... when printing a document For example InDesign assumes that the fonts listed in your PPD file reside in the printer so they are not downloaded when you print unless you explicitly include them Note Certain PPD features commonly found in imagesetter PPDs won t be accessible from the InDesign Print dialog box To set those printer specific features click Setup Windows Printer Mac OS or Page Setup Mac...

Page 387: ... tint of yellow is lighter than a 20 tint of black since yellow is visually lighter than black When you print a book with chapters containing conflicting spot inks or trap styles you can instruct InDesign to synchronize settings with the master document See Synchronizing documents in a book file on page 169 If you re using color management with the Book feature make sure that each document in the ...

Page 388: ...h option in a panel For help with individual options see the Index Settings you specify in these panels are saved with the document 9 Click Print InDesign prints all visible layers and all or selected documents in a book About printing to non PostScript language printers You can print a document on a GDI Windows and QuickDraw Mac OS non PostScript language printer However because PostScript is the...

Page 389: ...djust print settings and click Save Style Choose File Printer Styles Define select a style in the list and then click Edit In the Print dialog box that appears adjust print settings and click OK To change default printer style settings 1 Choose File Printer Styles Default 2 Adjust print settings and click Save Style 3 Select the Style option and choose Default in the menu Click OK To print using a...

Page 390: ...ment pages Selecting this option makes the Ranges option unavailable Spreads Prints pages together as if they were bound or printed on the same sheet You can print only one spread per sheet If the new page is larger than the currently selected paper size InDesign prints as much as it can but won t automatically scale the page to fit the imageable area unless you select ScaleTo Fit in the Setup pan...

Page 391: ...ny printer s marks or the bleed area The list of paper sizes available to InDesign comes from the PPD PostScript printers or from the printer driver non PostScript printers If the printer and PPD you ve chosen for PostScript printing support custom paper sizes you ll see a Custom option in the Paper Size menu Most imagesetters can accommodate regular paper sizes such as letter and tabloid as well ...

Page 392: ... 394 Note Paper sizes for non PostScript printing won t be accessible from the InDesign Print dialog box To choose those paper sizes click Setup Windows Printer Mac OS or Page Setup Mac OS in the InDesign Print dialog box To specify a paper size In the Setup panel of the Print dialog box choose an option in the Paper Size menu Specifying the page orientation In most cases the page orientation spec...

Page 393: ...p panel of the Print dialog box choose Custom in the Paper Size menu 3 To specify width and height do one of the following To let InDesign determine the smallest paper size needed for your document s contents printer s marks and bleeds select Auto for Width and Height Auto the default option is also useful if you have different sized pages in a book and you re printing on continuous media such as ...

Page 394: ...ocument s pages fit on the chosen paper size before you print to a PostScript printer A preview in the lower left area of the Print dialog box shows whether your paper and orientation settings will work for your page size When you select different options in the Print dialog box panels the preview updates dynamically with the combined effects of your print settings The preview has three views Stan...

Page 395: ...edia size In both the custom page and cut sheet views the preview also indicates the output mode using an icon Separations Composite Grayscale Composite CMYK or Composite RGB Custom page view left A Direction of media travel B Transverse deselected C Paper size D Media Cut sheet view right E Imageable area F Media To switch between each type of preview Click the preview image in the lower left are...

Page 396: ...the document s page and the bottom sides of the bottommost tiles are aligned at the bottom edge of the document s page Manual to print a single tile Before you choose this option first specify the upper left corner of this tile by dragging the zero point of the rulers Then choose File Print and select Manual for the Tile option 3 For Overlap type the minimum amount of duplicated information you wa...

Page 397: ...ly To scale a document automatically 1 In the Setup panel of the Print dialog box make sure that Tile is unselected If Tile is selected the Scale to Fit option is unavailable 2 Select Scale to Fit The scaling percentage which is determined by the imageable area defined by the selected PPD appears next to the Scale to Fit option Changing page position When you print a document to a cut sheet media ...

Page 398: ...ite Note The options available for non PostScript printing depend on the color model the printer uses which is usually RGB Choose from the following options Composite Gray Sends grayscale versions of specified pages to the printer when for example you are printing to a monochrome printer without making separations When this option is selected the trapping option is disabled Composite RGB Sends a f...

Page 399: ...Sends just enough image data to print the graphic at the best possible resolution for the output device A high resolution printer will use more data than a low resolution desktop model Select this option when you re working with high resolution images but printing proofs to a desktop printer Note For separations you can control how much image data is sent by changing the Frequency value in the Out...

Page 400: ...th the interpreters in PostScript output devices Data Format Specifies how InDesign sends the image data from your computer to a printer Omitting graphics The OPI options in the Advanced panel let you selectively omit different imported graphics types when sending image data to a printer or file leaving only the OPI links comments for later handling by an OPI server For details see Setting common ...

Page 401: ...our changes For details see Changing the color profile of a document on page 350 3 In the Color Management panel of the Print dialog box under Print Space choose an option for Profile To print using the document s current color profile choose Document CMYK No conversions will be performed on the colors when the document is printed To print using a different destination profile choose that profile ...

Page 402: ...age of change in the gradient See Working with gradients on page 313 Decrease the screen frequency for the document PostScript output devices only See Specifying the halftone screen frequency on page 423 If banding occurs in an imported graphic such as an Adobe Illustrator file you may need to adjust the original graphic Print to a PostScript 3 output device which is capable of producing smoother ...

Page 403: ... of printer dots Ensuring that your resolution line screen produces 256 grays In printing your file you may find that the resolution of your printer when combined with the chosen line screen allows fewer than 256 levels of gray A higher screen frequency decreases the levels of gray available to the output device For example if you are printing at a resolution of 2400 dpi using a line screen higher...

Page 404: ...een and resolution that produce 256 levels of gray To determine the maximum gradient length based on the color change 1 Select the line tool and drag from the beginning point and the endpoint of the gradient 2 On a piece of paper note the distance displayed in the Transform palette This distance represents the length of the gradient 3 Calculate the number of steps in the gradient by dividing the n...

Page 405: ...s Note The number of steps a printer supports depends on the resolution and imaging capabilities of the printer This table presents recommendations for PostScript Level 2 PostScript 3 output devices have improved imaging capabilities Number of Steps InDesign Recommends Maximum Gradient Length Points Inches Cms 10 21 6 3 762 20 43 2 6 1 524 30 64 8 9 2 286 40 86 4 1 2 3 048 50 108 0 1 5 3 810 60 12...

Page 406: ...mit certain graphics for OPI replacement by the service provider To view a summary of output settings In the Print dialog box click Summary To save the summary as a text file 1 In the Summary panel of the Print dialog box click Save Summary 2 Accept the default filename or type another name for the text file and click Save Performing a preflight check Before printing or handing off the document to...

Page 407: ...xt editor Viewing fonts The Fonts panel of the Preflight dialog box lists all fonts used in the document including fonts embedded in EPS files native Adobe Illustrator files and placed PDF pages and determines whether the font is installed on your computer Selecting Show Problems Only lists only problem fonts Make sure that the fonts you used in the document are licensed installed and activated if...

Page 408: ... don t need to perform a final preflight check before packaging InDesign performs an up to date preflight check If problem areas are detected a dialog box appears To package files 1 Do one of the following to open the Package dialog box Choose File Package In the Preflight dialog box click Package In the Book palette menu choose Package Book or Package Selected Documents depending on whether all s...

Page 409: ... workgroup such as when you take the document to a service provider To allow the external user dictionary on the computer on which the file is opened to merge with the document s hyphenation exceptions list and to allow the document to compose using the exceptions lists stored in both the external user dictionary and inside the current document leave Use Document Hyphenation Exceptions Only unsele...

Page 410: ...lected printer is shown here Creating a device independent PostScript file This type of PostScript file is created when PostScript File is selected in the Printer menu and Device Independent is selected in the PPD menu A device independent PostScript file has the following characteristics It is 100 DSC compliant making it ideal for such post processing tasks as trapping and imposition Printer sele...

Page 411: ...evice Independent 3 View or change existing print settings InDesign uses the current page range when creating the PostScript file 4 Click Save 5 Specify a name and location and click Save Creating a device dependent PostScript file This type of PostScript file is created with a PPD selected and has the following character istics It is 100 DSC compliant making it ideal for such post processing task...

Page 412: ...ommended printer drivers see Choosing the right method for creating a PostScript file on page 410 It is device dependent This means that it contains code for enabling and controlling specific device features making it less compatible with devices other than the target device It can be composite or separated all of the color output methods that InDesign supports are available It can be trapped by I...

Page 413: ... dialog box choose File in the Destination menu and then click Save 3 Specify a name and location and click Save 4 In the InDesign Print dialog box click Print To save your document or book as a PostScript file using a PostScript printer driver Mac OS 10 1 1 In the InDesign Print dialog box click the Printer button at the bottom of the dialog box 2 In the printer driver s dialog box choose Output ...

Page 414: ...n page 362 Host based separations In the traditional host based preseparated workflow InDesign creates PostScript information for each of the separations required for the document and sends that information to the output device In RIP separations In the newer RIP based workflow a new generation of PostScript RIPs performs color separations trapping and even color management at the RIP leaving the ...

Page 415: ...ample instead of using the four process colors to reproduce artwork consisting of black text and bluish green line drawings you could use two spot colors one of black and one representing the exact shade of green In addition you can use spot color inks to produce colors not reproducible by CMYK inks such as fluorescent and metallic colors You can use the Color palette to display the CMYK equivalen...

Page 416: ...ment for color separations 1 Correct any color problems in your artwork See Checking colors in your document on page 417 2 Set overprint options See Selecting overprint options for overlapping colors on page 418 3 Specify the appropriate printer s marks and bleed options See Specifying printer s marks on page 420 and Specifying the bleed area on page 422 4 Create trapping instructions to compensat...

Page 417: ...possibility of misregistration You can prevent misregistration by making sure that abutting process colors have common inks For example if you specify a dark purple stroke with a vivid red fill they will both contain a significant percentage of magenta The stroke s and fill s common magenta will print as a single area so that if misregistration occurs in the other process inks the magenta printing...

Page 418: ...nting process color mixes or custom colors that don t share common ink colors the overprint color is added to the background color For example if you print a fill of 100 magenta over a fill of 100 cyan the overlapping fills appear violet not magenta Don t overprint when using a stroke to trap two process colors Instead you specify a CMYK stroke color that uses the higher value from the correspondi...

Page 419: ...ers select a stroke weight that is twice the required trap width This is because the stroke is applied to the center of its path so you are overprinting only half of the stroke width beyond the object s boundary When using a stroke to trap two spot colors or a spot and a process color you usually apply the lighter color to the stroke and overprint the stroke To overprint a stroke or fill 1 Select ...

Page 420: ...olors will overprint and blend Choose View Overprint Preview Simulating overprinting of spot inks Overprint simulation is useful for simulating the effects of overprinting spot inks with different neutral density values for example red and blue When you print to a composite output device using overprint simulation you can see if the resulting color is one that you want to overprint or knock out Fo...

Page 421: ...s Adds fine hairline horizontal and vertical rules that define where the page should be trimmed Crop marks can also help register align one color separation to another Color Bars Adds small squares of color representing the CMYK inks and tints of gray in 10 increments Your service provider uses these marks to adjust ink density on the printing press Registration Marks Adds small targets outside th...

Page 422: ...le Print 2 Click Marks Bleeds on the left side of the Print dialog box 3 Enter values from 0 to 6 inches or equivalent for the Top Bottom Left and Right text boxes for single sided documents or Top Bottom Inside and Outside for double sided documents with facing pages These values specify the placement of the Bleed marks Note Bleed marks appear only if you select the Bleed Marks option in the Mark...

Page 423: ...osely together to create a finely rendered image on the press a low line screen ruling 60 lpi to 85 lpi spaces the dots farther apart to create a coarser image The size of the dots is also determined by the line screen A high line screen ruling uses small dots a low screen ruling uses large dots The most important factor in choosing a line screen ruling is the type of printing press your job will ...

Page 424: ...mportant The emulsion and image exposure settings in the InDesign Print dialog box will override any conflicting settings in the printer driver Always specify print settings using the InDesign Print dialog box To specify emulsion 1 In the Output panel of the Print dialog box for Color choose Composite Gray or a separation option 2 For Flip select one of the following options None the default to ma...

Page 425: ...e to Acrobat PDF using Acrobat Distiller and then viewing the PDF document in Acrobat By viewing the PDF document in Acrobat you can inspect high quality PostScript output on screen at a high level of detail Printing and saving separations Depending on the prepress software available a service provider may be able to perform such prepress activities as trapping imposition separating and OPI replac...

Page 426: ...PostScript select the PostScript level of the output device Level 2 or Level 3 6 Click Advanced and do any of the following To replace low resolution graphics embedded in placed EPS files with their high resolution versions at output time make sure that Read Embedded OPI Links was selected when the EPS file was placed in the InDesign document and then select OPI Image Replacement in the Advanced p...

Page 427: ...rom a selection of multiple objects or click to deselect with click center point Duplicates selection when appears drag Duplicates and offsets selection or Duplicates and offsets selection by 10 times or Moves selection or Moves selection by 10 times or Selects master page item from document page or click Selects next object behind or in front click or click Selects next object under pointer or in...

Page 428: ...ete column Delete Resize rows or columns without changing the size of the table drag interior row or column border Resize rows or columns proportionally drag right or bottom table border Move to next cell Tab Move to previous cell Tab Move to first cell in column Page Up Move to last cell in column Page Down Move to first cell in row Home Move to last cell in row End Move to first row in frame Pag...

Page 429: ...Cell Options dialog box B Result Action Duplicates and transforms selection or drag Displays Transform palette Double click or in toolbox Resizes selection proportionately Increases size by one percent Decreases size by one percent Resizes graphics frame and content drag Constrains proportion or drag Result Action Inserts selected text into Find What box F1 Inserts selected text into Find What box...

Page 430: ...ter L R or C Justifies all lines F all lines or J all but last line Increases or decreases point size or Increases or decreases point size by 5 times or Increases or decreases leading or Increases or decreases leading by 5 times or Selects or deselects preferences setting for typographer s marks Autoleading A Aligns to grid on off G Auto hyphenates on off H Increases or decreases kerning and track...

Page 431: ...tories Inserts current page number N Inserts section marker text or place holder N Result Action Moves to right or left one character or Moves up or down one line or Moves to right or left one word or Moves to start or end of line Home or End key Moves to previous or next paragraph or Moves to start or end of the story Home or End key Selects one word Double click word Selects one word right or le...

Page 432: ...us zoom levels 2 Scrolls up or down one screen Page Up or Page Down Goes back or forward to last viewed page Page Up or Page Down Goes to previous or next spread Page Up or Page Down Cycles through units of measurement U Snaps guide to ruler increments drag guide Selects first or last frame Page Up or Pag Down Selects previous or next frame Page Up or Page Down Selects page number in page box J Go...

Page 433: ...ro point Control click zero point and choose option Uses current magnification for view threshold of new guide drag guide Selects buttons in alert dialog boxes Press first letter of button name if underlined Information on installed plug ins and InDesign components Apple menu About InDesign Result Action Index palette F8 Create index entry without dialog box U Create proper name index entry last n...

Page 434: ...cts from a selection of multiple objects or click to deselect with click center point Duplicates selection when appears Alt drag Duplicates and offsets selection Alt or Duplicates and offsets selection by 10 times Alt or Moves selection or Moves selection by 10 times or Selects master page item from document page or Ctrl click Selects next object behind or in front Ctrl click or Alt Ctrl click Sel...

Page 435: ...ete row Ctrl Backspace Delete column Backspace Resize rows or columns without changing the size of the table drag interior row or column border Resize rows or columns proportionally drag right or bottom table border Move to next cell Tab Move to previous cell Tab Move to first cell in column Alt Page Up Move to last cell in column Alt Page Down Move to first cell in row Alt Home Move to last cell ...

Page 436: ...ons dialog box Alt Ctrl B Result Action Duplicates and transforms selection or Alt drag Displays Transform palette Double click or in toolbox Resizes selection proportionately Increases size by one percent Ctrl Decreases size by one percent Ctrl Resizes graphics frame and content Ctrl drag Constrains proportion or drag Result Action Inserts selected text into Find What box Ctrl F1 Inserts selected...

Page 437: ...tifies all lines Ctrl F all lines or J all but last line Increases or decreases point size Ctrl or Increases or decreases point size by five times Ctrl Alt or Increases or decreases leading Alt or Increases or decreases leading by five times Alt Ctrl or Autoleading Alt Ctrl A Selects or deselects preferences setting for typographer s marks Alt Ctrl Aligns to grid on off Alt Ctrl G Auto hyphenates ...

Page 438: ...Inserts current page number Alt Ctrl N Inserts section marker text or placeholder Alt Ctrl N Result Action Moves to right or left one character or Moves up or down one line or Moves to right or left one word Ctrl or Moves to start or end of line Home or End key Moves to previous or next paragraph Ctrl or Moves to start or end of the story Ctrl Home or End key Selects one word Double click word Sel...

Page 439: ...vious zoom levels Alt Ctrl 2 Switches to next or previous document window Ctrl F6 or Ctrl F6 Scrolls up or down one screen Page Up or Page Down Goes back or forward to last viewed page Ctrl Page Up or Page Down Goes to previous or next spread Alt Page Up or Page Down Selects first or last frame Alt Ctrl Page Up or Page Down Selects previous or next frame Alt Ctrl Page Up or Page Down Selects page ...

Page 440: ...l H Selects all guides Alt Ctrl G Locks or unlocks zero point Right click zero point and choose option Uses current magnification for view threshold of new guide Alt drag guide Selects buttons in alert dialog boxes Press first letter of button name if underlined Information on installed plug ins and InDesign components Ctrl Help About Design Result Action Index palette F8 Create index entry withou...

Page 441: ...Proximity Technology Inc THE PROXIMITY WILLIAM COLLINS SONS CO LTD DATABASE Copyright 1990 William Collins Sons Co Ltd Copyright 1997 All Rights Reserved Proximity Technology Inc THE PROXIMITY WILLIAM COLLINS SONS CO LTD DATABASE Copyright 1984 William Collins Sons Co Ltd Copyright 1988 All Rights Reserved Proximity Technology Inc THE PROXIMITY DR LLUIS DE YZAGUIRRE I MAURA DATABASE Copyright 1991...

Page 442: ...licable Consistent with 48 C F R 12 212 or 48 C F R 227 7202 1 through 227 7202 4 as applicable the commercial computer software and commercial computer software documentation are being licensed to U S government end users A only as commercial items and B with only those rights as are granted to all other end users pursuant to the terms and conditions set forth in the Adobe standard commercial agr...

Page 443: ...or adding colors from 320 alternate import methods 235 color managing 357 color managing PDF 358 editing InDesign pages in 253 import options 225 importing colors from 320 patterns 320 trapping 324 when to use 223 Adobe InDesign converting 1 0 documents 14 Adobe In RIP Trapping 323 326 Adobe PageMaker color managing 358 converting publications 11 templates 12 Adobe Paragraph Composer command 141 A...

Page 444: ... 206 215 appearance 20 changing type of point 205 corner smooth and center 193 described 193 drawing and 198 selection states and 21 195 working with multiple 207 anchors hypertext 172 Angle option gradient 314 halftone screen 423 anti aliasing 19 Append style sheets See Character Styles palette Application Built In option 326 application preferences See defaults Apply Default Spreadsheet Style op...

Page 445: ...or 219 black color definition 304 in composite proofs 387 overprinting 418 trapping next to 335 Black Color option definition of black 336 dot gain and 335 rich blacks and 332 trapping thresholds and 333 Black Density option 333 336 Black option 333 Trap Width 332 335 Bleed Marks option 421 Bleed option 231 254 371 bleeds clipping in PDF format 231 described 44 422 overriding by prepress software ...

Page 446: ...ting 142 capitalizing index entries 189 Cascade command 19 Cascading Style Sheets 1 379 380 case changing 122 cataloging objects 250 CCITT compression in PDF 368 Cell Alignment option Excel 111 Cell Range option Excel 111 cells table cutting copying and pasting 157 described 151 inserting tabs in 161 inset spacing 160 merging and splitting 161 overset 152 overset cells 162 selecting 154 Center ima...

Page 447: ...ft proofing 348 turning on off 339 viewing environment 339 working spaces 342 color management system See color management color managing Adobe Illustrator files 357 bitmap graphics 225 EPS files 358 file formats 223 HTML output 355 imported graphics 356 JPEG files 357 multiple media and 356 online viewing of output 355 PageMaker objects 358 PDF files 355 358 Photoshop 6 images 357 Web browser out...

Page 448: ...ting strokes or fills 419 redefining spot as process 317 321 423 representing in exported files 251 sampling from imported graphics 320 soft proofing 348 specifying process colors 301 spot described 300 swatches See swatches trapping to compensate for ink misregistration 322 colors base 290 column and margin guides 31 column break 89 columns creating unequal widths 32 exporting to HTML 380 guide c...

Page 449: ...copying See also duplicating content to Clipboard 375 drag and drop 233 fill and stroke attributes 319 layers 71 objects 70 285 pages and spreads 49 and pasting 233 path segments 278 type attributes 139 copyright symbols 89 corner effects 213 214 Corner Effects command 213 214 corner points 193 206 213 corner shapes 214 correcting mistakes 24 CRD 401 Create Guides command 40 Create Outlines comman...

Page 450: ...OLOR 308 dictionaries adding a word 98 customizing 96 125 deleting a word 98 preferences 97 Proximity language 124 Dictionary command 97 Difference mode 291 digital master 362 direction lines adjusting 202 204 206 defined 199 described 192 end shapes and 212 moving 199 200 direction points 199 direct selection tool activating temporarily 21 206 adjusting compound paths with 215 adjusting paths wit...

Page 451: ...gles and squares 194 smooth tool 196 straight lines 194 drop caps 130 Drop Shadow command 293 DSC output 385 Duplicate Master Spread command 60 Duplicate Page command 49 Duplicate Spread command 49 Duplicate Swatch command 306 duplicating direct selection tool and 278 fill and stroke attributes 319 into rows and columns 285 layers 71 objects 70 285 pages and spreads 49 reflecting objects and 285 s...

Page 452: ...DF option 361 Export command 361 EPS 253 HTML 380 PDF 361 Transparency Flattener option 253 export files 251 Export Selected Documents to PDF option 361 exported files converting color spaces 251 embedding fonts in 251 exporting HTML 380 382 options 251 PDF 361 374 text 112 to EPS format 253 to PostScript 253 to SVG format 254 extensions filename 309 Extra Carriage Returns option 111 Extra Spaces ...

Page 453: ...zone See Justification command FOCOLTONE Color System 308 Following Topic option 189 font characters 87 font family 113 Font menu command 114 font subsetting 251 372 400 fonts copying attributes 319 downloading 399 embedding in PDF files 372 embedding in PostScript files 251 finding and changing 91 94 handling missing 125 installing 114 missing 94 407 multiple master 116 372 OpenType 87 216 optica...

Page 454: ... Gradient button 302 Gradient Fill box 314 gradient fill See gradients Gradient palette 314 Gradient Resolution option 295 gradient tool 314 315 316 gradients adding colors to 315 adding intermediate colors to 315 applying across multiple objects 315 applying to text 316 applying while editing text 124 banding 401 changing angle 314 creating compound paths and 215 defining 313 described 313 endpoi...

Page 455: ...384 hand tool 17 handing off files 406 408 handles frame 20 hanging indent 134 hanging punctuation 133 Hard light mode 290 Height H option 280 Height page size option 30 Hexidecimal color codes 378 hidden layers 72 409 hidden tools 4 Hide Frame Edges command 64 Hide Master Items command 61 Hide Others command 72 hiding layers 72 411 nonprinting elements 44 High Quality resolution option 221 high f...

Page 456: ...replacement 400 by an OPI server 253 Image Trap Placement option 335 imageable area 391 397 images checking links 407 colorizing 302 in online publishing 220 including in PDF files 252 resampling during PDF export 369 370 Images option PDF export 252 import options color settings 225 EPS 226 Microsoft Word 109 PNG files 229 imported graphics color management and 356 display performance 221 finding...

Page 457: ...tels 330 problems with 408 trapping metallic 330 inline frames 100 inline graphics See inline frames in RIP separations 425 In RIP Separations option 426 Insert Glyphs command 88 Insert option 48 Insert Page Number command 52 Insert Section Name command 51 54 Insert Table command 151 Insert White Space command 89 insertion point 85 inset 83 Inset Clipping Path option 265 Inset Frame option 265 Ins...

Page 458: ...osing color 71 copying between documents 70 defined 67 deleting 73 duplicating 71 final output and 72 409 locking 72 merging or flattening 73 moving objects to other layers 70 object libraries and 247 options for 69 Photoshop files and 226 ruler guides and 39 41 selecting objects on 70 showing and hiding 72 targeting 69 working with 67 Layers command 68 Layers palette colored dot 70 described 67 e...

Page 459: ...14 Lock Guides command 41 Lock Guides option 41 68 Lock Layer option 68 Lock Others command 73 Lock Position command 269 271 locking layers 72 locking objects 271 logical structure tree defined 376 long documents numbering 52 lossless compression 227 367 lossy compression 228 382 lowercase letters 122 Luminosity mode 291 M Mac OS system colors 309 Macintosh PICT See PICT magnifying 14 15 See scali...

Page 460: ...Minimum option justified text 143 144 misregistration 322 missing fonts 94 Missing Fonts command 125 Missing link icon 236 missing link icon 239 mistakes undoing 24 miter join 211 Miter Limit option 211 Modified link icon 236 modified link icon 238 modifying gradients 314 modules plug in 19 monitor profiles 353 monitors calibrating 353 characterizing 353 monochrome images in PDF 370 Move command 2...

Page 461: ...utton 17 Next Page command 17 Next Page Number command 56 Next Style option 147 No Adding or Changing Notes and Form Fields option 374 No Break command 143 No Changing the Document option 374 No Content Copying or Extraction Disable Accessibility option 374 No Printing option 374 nonbreaking hyphens 143 nonbreaking spaces 89 143 None button 302 303 None option 251 399 400 None swatch 303 non globa...

Page 462: ... for 400 links 252 Omit for OPI option 373 400 trapping images 324 opening book files 168 opening documents and templates 11 opening QuarkXPress and Adobe PageMaker files 12 OpenType fonts 87 115 116 216 OPI comments See OPI links OPI Image Replacement option 253 399 400 OPI links 238 optical kerning 118 optical margin alignment 133 Optical Margin Alignment option 133 optical size axis 116 Optimiz...

Page 463: ...index 182 184 page size 30 391 Page size option 30 PageMaker converting layers 13 67 page number marker 51 pages See also Pages palette duplicating 49 exporting 251 facing 30 maximum number of 30 numbering See numbering pages page breaks 89 pasteboard 44 selecting 46 shuffling 50 turning 17 Pages command 45 Pages palette 44 45 adding pages 48 arranging 49 deleting pages 50 masters See masters sect...

Page 464: ...hapes 212 adjusting segments with pen tool 204 anchor points 193 and frames 63 64 basic shapes 194 changing direction 212 changing with pen tool 204 combining into compound 214 connecting 205 connecting or merging 196 converting text to 216 corner effects 213 creating closed 199 202 creating compound 214 216 creating curved segments 200 creating holes in 214 creating with pen tool 198 creating wit...

Page 465: ...mage display quality and 221 Photoshop Path option 102 265 picas 35 PICT files 228 324 pixels described 219 Place command 239 compared to other importing methods 233 import options for 110 223 inline frames and 100 object libraries 248 PDF files 231 replacing imported files 239 text 80 placeholder text 82 placeholders 12 63 64 placing text and graphics 233 master page 79 placing See also names of ...

Page 466: ... prepress service provider handing off files 408 prepress workflows creating PostScript files for 409 DSC compliant output 385 410 Preserve Halftone Screens option 232 Preserve Local Formatting option 165 preset 25 Press PDF style 365 Preview Mode 44 Preview option 350 Preview options 252 previewing color conversions 351 documents 44 page fit 394 Previous Page command 17 Previous Page Number comma...

Page 467: ...on 4 o version 2 351 ICC converting from version 4 to version 2 371 ICC embedding in PDF files 372 obtaining 351 reassigning 350 resolving conflicts 359 storage location 352 updating 352 projecting cap option for strokes 211 Proof Colors command 349 Proof Setup commands 349 401 proofing separations on PostScript printers 425 proper names index 183 Proportional Lining option 116 Proportional Oldsty...

Page 468: ...ll option 407 Repeat Count option 286 Repeat Tab command 137 Replace Existing Table of Contents option 177 replacing text 91 Report option 407 repurposing Adobe PDF documents 375 377 resampling images color or grayscale 369 monochrome 370 sampling threshold 369 table of resolutions 370 resizing objects See scaling objects resizing tables 158 resolution comparing screen and device in PDF 232 descri...

Page 469: ...34 setting horizontal origin 36 using 33 zero point 35 rules above or below paragraph 130 Run Length compression in PDF 368 Run in option table of contents 178 S Saturation mode 291 Saturation rendering intent 347 Save a Copy command 23 Save As command 23 Save as Type menu 12 Save as Type option 253 Save command 23 Save Images As option 382 Save Style button 389 saving Adobe PDF documents to RTF 3...

Page 470: ...t Unused Masters command 60 selecting activating selection tool 206 all objects 23 bounding box 22 defined 20 frames 75 layer color for 70 71 multiple points 207 objects on layers 70 pages 46 ruler guides 41 segments of paths 207 spreads 46 text 86 tools for 20 selection bounding box See bounding box selection marquee 21 selection tool activating temporarily 21 moving and resizing objects with 75 ...

Page 471: ... 253 simulating overprinting 387 Single Quotes option 89 single line composer 141 Size menu command 114 Size option 123 214 skew See shear skewing See shearing slanting type 121 Sliding Trap option 333 334 sliding traps 334 slugs in text 151 Small Caps option 122 small caps OpenType fonts 116 Small Palette Rows command 7 smooth points 193 206 213 smooth tool 198 smoothing paths or strokes 196 Snap...

Page 472: ...95 Start At option sections 53 Start menu for strokes 212 Start option grids 37 Start Paragraph option 132 Start Section option 53 55 start shapes 212 starting new documents 30 Start of section marker 53 startup file 308 Stationery option 12 Step and Repeat command 285 Step Limit option 334 Step option 333 Stop Color option 313 stop gradient 313 story 75 Story command 133 story jumps 55 straight l...

Page 473: ...iting 314 libraries 308 loading from color systems 308 modifying 305 size of 307 working with 301 Swatches palette 303 320 SWOP standards 330 symbols typing 89 113 symmetrical points See smooth points synchronizing book documents 167 169 system color options 309 T tab leaders 138 table of contents advanced formatting options 178 and books 179 contents between entry and number 178 creating 176 crea...

Page 474: ...ption 12 templates 11 12 text adding to tables 152 aligning 126 aligning and justifying vertically 128 applying color to 302 autoflow 81 changing case 122 combining with graphics 99 compressing in PDF 370 converting into table 153 converting to paths 216 deselecting 86 drag and drop 79 editing 85 editing in original application 90 exporting 112 finding and changing 91 flowing 80 gradients applying...

Page 475: ...import options 230 when to use 223 Tile command 19 tiling automatically 396 defined 396 manually 396 repositioning the zero point 396 Tint slider 310 tints 311 title bar 24 Titling Alternatives option 115 Tolerance option 264 toolbox 4 5 302 tools See individual tool names Top path type alignment command 106 topics index 189 TOYO Color Finder 1050 309 tracking 117 118 trademarks symbols 89 tradema...

Page 476: ...ines to images 335 making trapping unnecessary 419 maximizing performance 325 metallic inks 330 order 331 page ranges 329 pastel inks 330 sliding traps 334 solutions 322 specialty inks 331 spreads and 336 Step option 334 Trap Thresholds options 333 Trap Width options 332 varnishes 331 trapping page ranges 329 trapping styles 336 Trapping Thresholds options 333 Trash button Layers palette 73 object...

Page 477: ...ing up 173 Use Black Point Compensation option 347 Use Color Settings Intent option 350 Use Defaults option 222 Use Document Hyphenation Exceptions Only option 409 Use High Resolution Image option 265 Use Images Sub Folder option 382 Use Transparency Information option 229 230 Use Typographer s Quotes option 89 User Defined Page Breaks to option 110 user passwords 374 V values calculating 7 varnis...

Page 478: ...d breaks 143 word spacing generally 143 in tagged PDF documents 376 Word importing 110 Words Longer than _ letters option 142 words finding and changing 91 work area 4 workflow management adding files to 244 checking files in and out 242 downloading managed files 241 uploading changes 244 workflows high resolution composite PDF 362 host based preseparated 414 in RIP separations 414 PostScript prin...

Reviews: