


6-84
TI71M01D06-01EN 3rd Edition: 2012.12.01
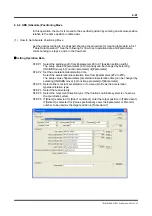
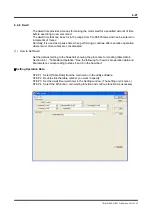
(3) How to Perform Homing Operation (Utility Software)
STEP 1 Select [Operation] from [Control] in the utility software.
STEP 2 Select the Homing Operation tab from the Operation window.
STEP 3 Move the motor to the position at which the homing should be started.
STEP 4 Click the [Servo-ON] button.
STEP 5 Click the [Drive] button to start the homing operation.
STEP 6 If the home dog position error (error code: 49.1) occurs, the relationship between
the home sensor position and dog position is not appropriate. Adjust the dog
position so that the homing measurement value is within the target value range,
reset the error, and perform the homing operation again.
*
Table data No. 63 is executed from the Homing window. The M function, continue
function, and coin waiting function cannot be set.
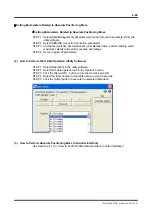
(4) How to Perform Homing Operation (via Command from the Controller Interface)
See Section 6.4.1 (3), "How to Perform Table Data Operation (Control Interface)."
With an incremental motor, the OUT_ORG_FINISH signal is OFF after the power. When a
homing operation is complete, the OUT_ORG_FINISH signal is turned ON. Afterward, it is not
turned OFF until the power is turned OFF regardless of servo ON/OFF.
However, if a homing operation is performed, it is turned OFF when starting a homing
operation, and then turned ON when the homing operation is complete.
TIP
5 Perform the homing
operation.
2 Select the Homing
operation tab.
4 Turn the servo on.
#392 [Final home location from
sensor edge] is displayed after the
completion of homing.
If the homing measurement value is not in the target value
range at the completion of the homing operation, a home
dog position error (ERR49.1) occurs. (See (5), "Adjusting
Dog Installation Position.")