Inspection and Maintenance — GEK 107048
Hot Gas Path Inspection — Reassembly Procedures
HGP-R-2
However, if the nozzle was replaced or adjusted, the following procedure is to be used:
1. Cut the old retaining strap from the top of the eccentric pin heads and grind both surfaces smooth.
2. Install the eccentric pin into the casing to its full depth carefully as not to disturb the lateral center-
ing of the nozzles.
3. Coat top portion of the pin with Dykem Blue.
4. Coat the top and sides of the retaining strap with Dykem Blue.
5. Place the strap, coated side up, on top of the eccentric pin and bolt up with two bolting strap bolts.
Note:
Apply a light coat of anti-seize compound to the bolt threads. Do not use
colloidal copper type anti-seize.
6. Scribe a mark on the heads of the pin, along both sides of the retaining strap.
7. Scribe two transverse marks across the tops and down the sides of the retaining strap and continu-
ing across the head of the pin.
8. Remove the retaining strap bolts, strap, and eccentric pin.
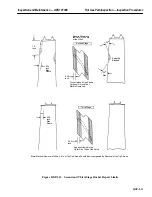
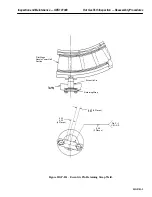
9. Hold the pin in a vise, reposition the strap on the pin head, aligning the scribe marks and weld
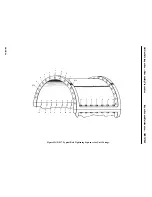
the strap to the pin head as shown in Figure HGP-R.1.
10. Lightly coat the eccentric pin with anti-seize compound and reinstall it in the shell.
11. Install and properly tighten the retaining strap bolts.
Operation 1 — How to Install Lower Half First Stage Nozzle and Eccentric Pin
(With Tangential Support Pin)
Note:
The following reassembly operation is for reinstalling the same first-
stage nozzle that was removed from the unit. If a new or remanufac-
tured nozzle is to be installed it is recommended that you obtain assis-
tance from your General Electric Company Apparatus and
Engineering Services Operation Field Service Representative to install
and properly align the first-stage nozzle.
1. Remove the eighteen 500-13 wire lock inserts (Helicoils) located in the retainer plate bolt hole
in the support ring upper and lower halves and install new wire inserts.
2. Thread a shouldered eyebolt into the center bolt hole in each of the nozzle horizontal joint flanges
(one eyebolt for each end of the nozzle). These will be needed after the nozzle half is partially
installed.
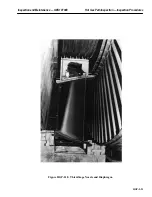
3. Using cable slings and chainfalls attached to the lifting bars on the back of the nozzle assembly,
rig to lift the nozzle half inverted (ends pointed down), over the turbine casing. The lower half
of the first stage nozzle weighs approximately 380 pounds.
Summary of Contents for MS6001B
Page 2: ...Gas Turbine Inspection and Maintenance GEK 107048 I 2 THIS PAGE INTENTIONALLY LEFT BLANK ...
Page 4: ...Inspection and Maintenance Note THIS PAGE INTENTIONALLY LEFT BLANK ...
Page 13: ...INSERT TAB INTRODUCTION ...
Page 14: ......
Page 25: ...INSERT TAB STANDARD PRACTICES ...
Page 26: ......
Page 87: ...INSERT TAB AUXILIARY CONTROLS SYSTEMS MAINTENANCE ...
Page 88: ......
Page 133: ...INSERT TAB SCHEDULED TURBINE MAINTENACE ...
Page 134: ......
Page 157: ...INSERT TAB COMBUSTION INSPECTION ...
Page 158: ......
Page 239: ...INSERT TAB HOT GAS PATH INSPECTION ...
Page 240: ......
Page 313: ...INSERT TAB MAJOR INSPECTION ...
Page 314: ......
Page 316: ...Inspection and Maintenance GEK 107048 Major Inspection 2 THIS PAGE INTENTIONALLY LEFT BLANK ...
Page 363: ...INSERT TAB MAINTENANCE FORMS ...
Page 364: ......


