User Manual
Hybrid Inverter
Version 1.0, Release Date: 07,2023
Applicable models
H3PH-1J5K-EUH3PH-1J6K-EUH3PH-1J8K-EUH3PH-1J10K-EU
Applicable System
Three phase system
Page 1: ...User Manual Hybrid Inverter Version 1 0 Release Date 07 2023 Applicable models H3PH 1J5K EU H3PH 1J6K EU H3PH 1J8K EU H3PH 1J10K EU Applicable System Three phase system...
Page 2: ...4 2 Mounting the Inverter 4 4 PV Input Cable Installation 4 6 AC Cable Installation 4 7 Communication Cable Installation 04 2 3 Notice for Use 06 15 4 5 Battery Power Cable Installation 26 4 8 Meter...
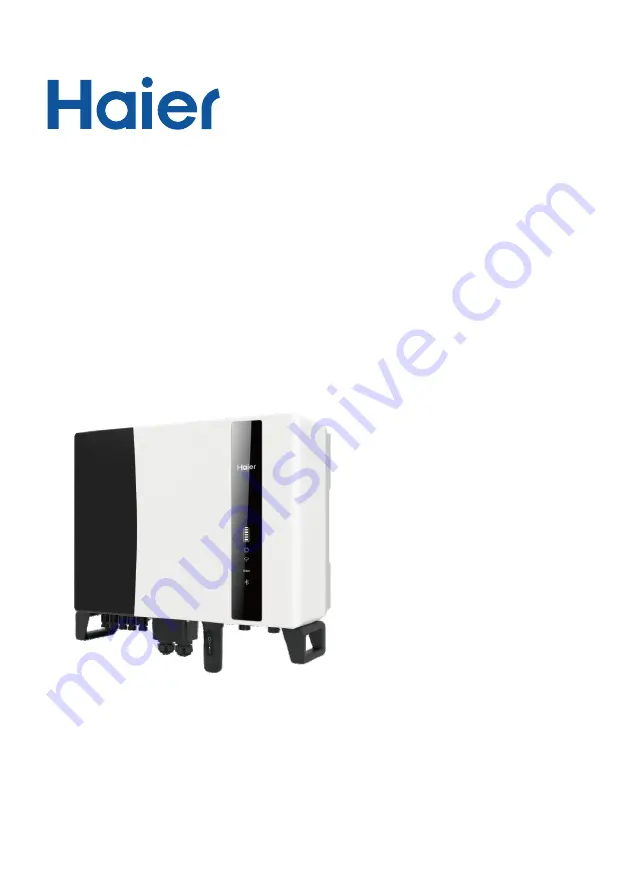
Page 3: ...n operate in both off and on grid modes This manual covers the Haier H3PH Series inverter model listed below H3PH 1J5K EU H3PH 1J6K EU H3PH 1J8K EU H3PH 1J10K EU Figure 1 1 Front side view Figure 1 2...
Page 4: ...with your machine If anything is missing please contact your local distributor Inverter x1 Back Plate x1 AC Backup x1 Fixing Screws M4 12 x4 Dust Cover x1 CT x3 Eastron Meter x1 Meter cable x1 User M...
Page 5: ...ation of your product 2 2 General Safety Instructions WARNING Electrical installations must be done in accordance with the local and national electrical safety standards WARNING Please don t connect P...
Page 6: ...hotovoltaic source and output circuit conductors shall have that comply with isolators the NEC Article 690 Part II CAUTION Risk of electric shock do not remove cover There is no user serviceable parts...
Page 7: ...l the applicable regulations and standards 3 The inverter must be installed according to the instructions stated in this manual 4 The inverter must be installed according to the correct technical spec...
Page 8: ...er 1 minute The Power indicator will remain on with lower brightness Short press the Power indicator can wake up all indicators Battery Power WiFi Bluetooth RS485 Light Status Description Blue Flashin...
Page 9: ...id installing the inverter in direct sunlight It is recommended that the inverter is installed in a cooler ambient which doesn t exceed 104 40 WARNING Risk of fire Despite careful construction electri...
Page 10: ...between the bottom of the machine and the ground Adequate ventilation must be provided NOTE Nothing should be stored on or placed against the inverter Install vertically with a maximum incline of 5 de...
Page 11: ...RNING The inverter must be mounted vertically Once a suitable location has be found accordingly to 4 1 using figure 4 3 mount the wall bracket to the wall Dimensions of mounting bracket Figure 4 3 Inv...
Page 12: ...of inverter Prepare OT terminals M4 Use proper tooling to crimp the lug to the terminal Connect the OT terminal with ground cable to the right side of inverter The torque is 2N m 4 3 PE Cable Install...
Page 13: ...V array matches the DC and DC symbols Please use approved DC cable for PV system 4 0 6 0 4 0 12AWG 12 10AWG Cable type Cross section mm Range Industry generic PV cable Recommended value 1 Select a sui...
Page 14: ...terminal and crimp it with a special DC terminal crimping tool Negative terminal Positive terminal Squeeze 5 Insert the crimped DC cable into the DC terminal firmly then insert the waterproof rubber r...
Page 15: ...even lead to a fire disaster The correct actions are Use a clip on ammeter to measure the DC string current If it is above 0 5A please wait for the solar irradiance reduces until the current decrease...
Page 16: ...ery module positive and negative terminals 2 Measure DC voltage of DC input with multimeter verify DC input cable polarity Figure 4 14 3 Connect the inverter end to the battery input port of the inver...
Page 17: ...load circuit 4 6 AC Cable Installation AC BACKUP terminal AC GRID terminal AC GRID AC BACKUP ANTENNA COM Figure 4 16 NOTE AC Backup Connector is longer while the AC Grid Connector is shorter 4 6 1 AC...
Page 18: ...rid Connector and set the parts on the cable Figure 4 18 Figure 4 19 4 Push Housing into Body until you hear a click sound Figure 4 20 AC Grid Click Housing 5 Insert Seal Body and Claw into the Body a...
Page 19: ...the AC Grid Port on the inverter and rotate the rotatory ring on the AC Grid connector to the direction as marked LOCK on the connector Hold the Body while rotating the ring Click 4 6 2 AC Backup Por...
Page 20: ...kup Connector and set the parts on the cable Figure 4 25 4 Push Housing into Body until you hear a click sound Figure 4 26 Click Housing 5 Insert Seal Body and Claw into the Body and then tighten the...
Page 21: ...Backup Port on the inverter and rotate the rotatory ring on the AC Backup connector to the direction as marked LOCK on the connector Hold the Body while rotating the ring Click 4 6 3 Disassembly Conne...
Page 22: ...ber of the cables and keep the unused holes with watertight cap Step 4 Lead the cables into the holes in the cable gland Hole Diameter 6mm Step 5 Crimp the RJ45 connectors onto the cables according to...
Page 23: ...tween inverter and Lithium battery BMS Used for RS485 communication between inverter and the smart meter It is necessary to realize the normal hybrid control logics Optional To realize Demand Response...
Page 24: ...CAN L CAN H 4 7 4 Meter Port Connection Take out the pre made Meter cable from the package and connect RJ45 end to inverter Meter port and then connect another end with loose RS485 A B pins to the met...
Page 25: ...interface Switch_input1 Switch_input2 Figure 4 35 Strip the insulation layer and connect to RJ45 plug Signal Short Pin5 and Pin6 Inverter Generates Inverter Shutdown in 5s Open Pin5 and Pin6 Function...
Page 26: ...ignment for inverters capable of both charging and discharging Pin DRED means demand response enable device The AS NZS 4777 2 required 2020 inverter need to support demand response mode DRM This funct...
Page 27: ...ption mode export power control monitoring etc Eastron 3ph meter With CT SDM630MCT Provided by default Eastron 3ph meter Direct Insert SDM630 Optional Customer prepare if needed NOTE Please note that...
Page 28: ...J5 6 8 10K EU Power cable Note If the CT is installed in the wrong direction the Hybrid Inverter can t work normally CT direction towards to grid G r id s id e K L User Manual 4 Installation 27 9 1011...
Page 29: ...Power cable Figure 4 38 Eastron SDM630 User Manual 4 Installation 28 H3PH 1J5 6 8 10K EU...
Page 30: ...user manuals of data loggers The data loggers are optional and can be purchased separately Dust cover is provided the inverter package in case the port is not used WARNING The USB type COM port is on...
Page 31: ...d labels are suitably affixed and durable Bluetooth Antenna has been connected to the Antenna port of the inverter An Android or IOS mobile phone with Bluetooth function is available Measure DC voltag...
Page 32: ...emember Forgot Password Language More Tools Data Migration Log in Hello Welcome to Nahui Energy Register Username Email Password I have agreed Privacy Policy Remember Forgot Password Log in Local Oper...
Page 33: ...oid alarms It is suggested to install the meter at the system grid connection point and select Meter in Grid Step 4 4 Set the grid code setting Please select the grid code based on the local grid netw...
Page 34: ...harge Current Set Charge Time Slot 1 Discharge Time Slot 1 Charge Time Slot 2 Discharge Time Slot 2 Charge Time Slot 3 Discharge Time Slot 3 Allow Grid Charging 10 0A 10 0A 22 00 08 00 08 00 22 00 00...
Page 35: ...Time Slot 3 Discharge Time Slot 3 Allow Grid Charging 20 0A 50 0A 08 00 18 00 19 00 08 00 00 00 00 00 00 00 00 00 00 00 00 00 00 00 00 00 Work mode3 Backup Mode This mode can coexist with Self use or...
Page 36: ...the operating data alarm message or other advanced settings Step 6 Change Password If the Owner forgot the password please contact the installer Installer log in and go to Setting More Change Passwor...
Page 37: ...the inverter and let it cool down before you do any maintenance or cleaning of inverter Haier H3PH Series inverter does not require any regular maintenance However cleaning the heatsink will help inve...
Page 38: ...process Main menu Advanced Settings Password 0010 STD mode settings Working Mode Working mode NULL Save and exit 1 Due to the requirements of local safety regulations when the grid voltage is high th...
Page 39: ...grid surge 1 Grid side fault restart the device If it is still not eliminated please contact the manufacturer s customer service 1 Confirm whether the power grid is abnormal 2 Confirm that the AC cabl...
Page 40: ...Restart the system and check if the fault persists If it is still not eliminated please contact the manufacturer s customer service 1 Check if the internal fan is working correctly or jammed 1 Check i...
Page 41: ...02 60mA Leakage current failure 03 150mA Leakage current failure 04 Leakage current sensor failure Power grid disturbance 02 Battery overvoltage hardware failure VBUS 1 Restart the system confirm that...
Page 42: ...ault message and description Message Name Information Description Troubleshooting Suggestion NOTE If the inverter displays any alarm message as listed in Table 7 1 please turn off the inverter and wai...
Page 43: ...ng grid frequency Power factor THDi Recommended max PV power Maximum Charge discharge current Communication 8000W 160V 200 850V 3 3 16A 16A 16A 5kW 25A CAN RS485 5kW 3 N PE 380V 400V 320 460V 45 55 Hz...
Page 44: ...Resistor detection AFCI Residual current monitoring unit Output over current protection Output short protection Output over voltage protection DC switch DC reverse polarity protection PV overvoltage p...
Page 45: ...206006 UNE 206007 1 CEI 0 21 C10 11 NRS 097 2 1 TOR EIFS 2018 2 IEC 62116 IEC 61727 IEC 60068 IEC 61683 EN 50530 MEA PEA Safty EMC standard IEC 62109 1 2 EN 61000 6 1 3 4000m Max operation altitude MC...
Page 46: ...ncy Power factor THDi Recommended max PV power Maximum Charge discharge current Communication 12800W 160V 200 850V 4 4 16A 16A 16A 16A 8kW 50A CAN RS485 8kW 3 N PE 380V 400V 320 460V 45 55 Hz 55 65Hz...
Page 47: ...esistor detection AFCI Residual current monitoring unit Output over current protection Output short protection Output over voltage protection DC switch DC reverse polarity protection PV overvoltage pr...
Page 48: ...206006 UNE 206007 1 CEI 0 21 C10 11 NRS 097 2 1 TOR EIFS 2018 2 IEC 62116 IEC 61727 IEC 60068 IEC 61683 EN 50530 MEA PEA Safty EMC standard IEC 62109 1 2 EN 61000 6 1 3 4000m Max operation altitude M...
Page 49: ...dhere to the actual products in case of any discrepancies in this user manual Qingdao Nahui Energy Technology Co LTD Address Room303 Entrance1 No 4Building Lan Gu Entrepreneurship Center Phase 1 No 7...