Guide to the Printer
15
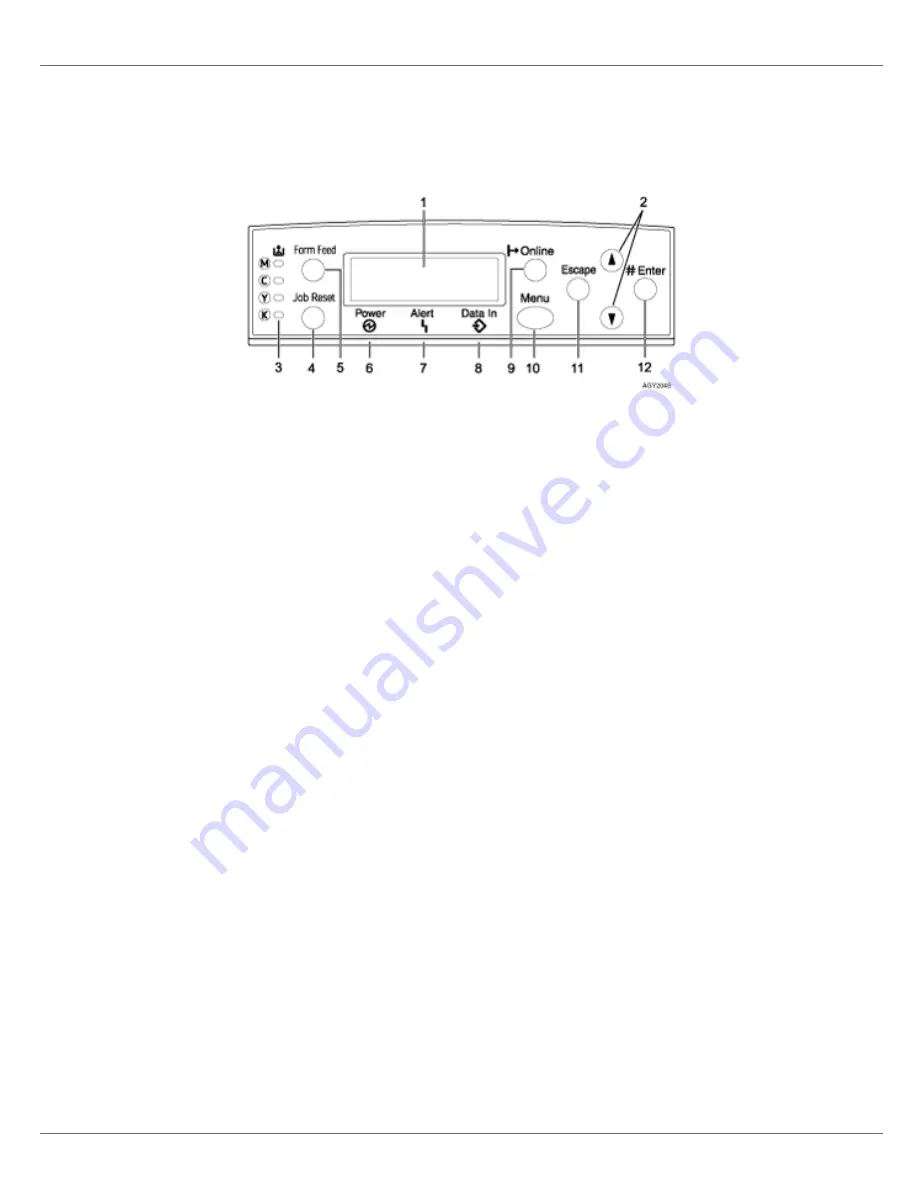
Control Panel
1.
Display
Displays current printer status and error messages.
For details about error messages, see Maintenance Guide.
2.
{U}
{T}
keys
Use these keys to increase or decrease values on the display when making settings.
Keep the key pressed to quicken scrolling, and increase or decrease values on the dis-
play in units of 10.
3.
Toner End LED
The color of the lit LED indicates toner status for each color.
A yellow light indicates the toner amount is approaching exhaustion. A red light indicates
the toner cartridge needs to be replaced.
4.
{
Job Reset
}
key
When the printer is online, press this key to cancel an ongoing print job.
5.
{
Form Feed
}
key
When the printer is offline, press this to print all data left in the printer's input buffer.
You can use this to force the printer to print data received in the online status when the
paper size or type does not match the actually set size or type.
6.
Power indicator
This indicator remains lit while the power is on. It is unlit when the power is off or while
the printer is in Energy Saver mode.
7.
Alert indicator
Lights up whenever a printer error occurs. A red light indicates an error has occurred that
makes printing impossible; the yellow light indicates a potential error during printing.
If the red light is on, follow the instructions that appear on the display.
8.
Data In indicator
Blinks when the printer is receiving data from a computer. The Data In indicator is lit if
there is data to be printed.
Summary of Contents for LP222cn
Page 66: ...Installing Options 54 For details about printing the configuration page see p 40 Test Printing...
Page 112: ...Configuration 100 For details about printing the configuration page see p 40 Test Printing...
Page 229: ...Other Print Operations 110 The initial screen appears...
Page 285: ...Monitoring and Configuring the Printer 166 E Click Apply...
Page 518: ...Removing Misfed Paper 98 F Close the front cover carefully...
Page 525: ...Removing Misfed Paper 105 C Remove any misfed paper D Close the front cover carefully...


