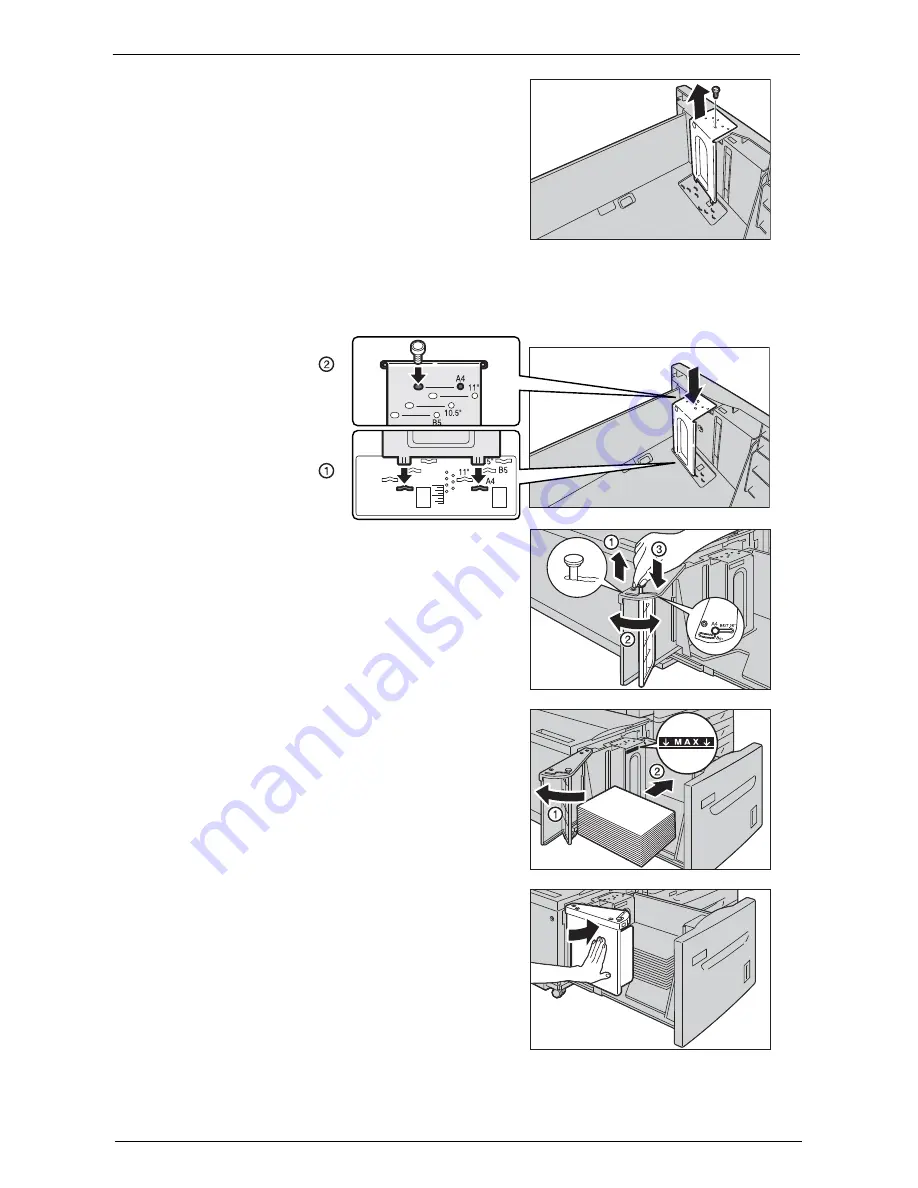
Changing the Paper Size
243
5
Unscrew the screw of the front guide and
remove the guide from the tray.
6
Insert the small protrusions at the bottom of the guide into the holes corresponding to the
paper size (1). Insert the protrusion on the tray into a hole corresponding to the paper size
on the top of the guide, and tighten up the screw (2).
7
Pull up the lever of the end guide (1). Move the
lever along the slot, and set it at the position
corresponding to the paper size (2). And then
press the lever down (3).
Note
•
Adjust the end guide correctly to the size of
the paper. If the end guide is not adjusted
correctly, the machine cannot feed the paper
properly, resulting in paper jams.
•
The slot to the left of 8.5" is not used.
8
Open the end guide (1), and load and align the
edge of the paper against the right edge of the
tray with the side to be copied or printed on
facing down (2).
Note
•
Do not load paper above the maximum fill line
("MAX" in the right figure). It may cause paper
jams or machine malfunction.
9
Close the end guide securely.
10
Push the tray in gently until it stops.
Summary of Contents for C7765DN
Page 1: ...Dell C7765dn Color Multifunction Printer User s Guide Regulatory Model C7765dn ...
Page 32: ...1 Before Using the Machine 32 ...
Page 144: ...3 Copy 144 ...
Page 156: ...4 Fax 156 ...
Page 168: ...5 Scan 168 ...
Page 272: ...13 Maintenance 272 ...
Page 294: ...14 Machine Status 294 ...
Page 468: ...16 Dell Printer Configuration Web Tool Settings 468 ...
Page 510: ...19 Scanner Environment Settings 510 ...
Page 564: ...22 Authentication and Accounting Features 564 ...
Page 764: ...28 Using Shortcut Menu 764 ...
Page 796: ...29 Using Access Google Drive 796 2 Check the content status 3 Select Close ...
Page 802: ...29 Using Access Google Drive 802 ...
Page 816: ...30 Google Cloud Print 816 ...


