


Appendix K: Integration
868
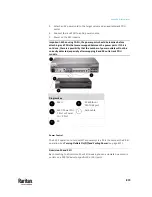
Connecting a PX PDU
Raritan PX series rack PDUs (power strips) are connected to the Dominion
device using the D2CIM-PWR CIM.
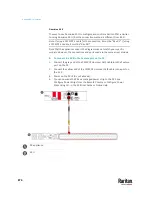
To connect the rack PDU:
1.
Connect the male RJ-45 of the D2CIM-PWR to the following female RJ-45
connector of the rack PDU.
▪
PX1 series: RJ-45 "SERIAL" port
▪
PX2, PX3 or PX3TS series: RJ-45 "FEATURE" port
2.
Connect the female RJ-45 connector of the D2CIM-PWR to any of the
available female system port connectors on the KX III using a straight
through Cat5 cable.
3.
Attach an AC power cord to the target server and an available rack PDU
outlet.
4.
Connect the rack PDU to an AC power source.
5.
Power on the device.
Diagram key
PX rack PDU
D2CIM-PWR
KX III
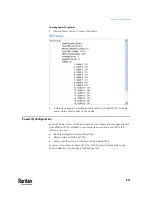
Summary of Contents for Raritan PX3TS
Page 4: ......
Page 6: ......
Page 20: ......
Page 80: ...Chapter 4 Connecting External Equipment Optional 60...
Page 109: ...Chapter 5 PDU Linking 89...
Page 117: ...Chapter 5 PDU Linking 97...
Page 441: ...Chapter 7 Using the Web Interface 421...
Page 464: ...Chapter 7 Using the Web Interface 444...
Page 465: ...Chapter 7 Using the Web Interface 445 Continued...
Page 746: ...Appendix A Specifications 726...
Page 823: ...Appendix I RADIUS Configuration Illustration 803 Note If your PX3TS uses PAP then select PAP...
Page 828: ...Appendix I RADIUS Configuration Illustration 808 14 The new attribute is added Click OK...
Page 829: ...Appendix I RADIUS Configuration Illustration 809 15 Click Next to continue...
Page 860: ...Appendix J Additional PX3TS Information 840...
Page 890: ...Appendix K Integration 870 3 Click OK...
Page 900: ......


