


Chapter 6: Using the PX3TS
124
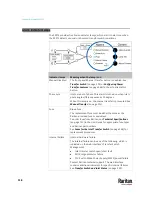
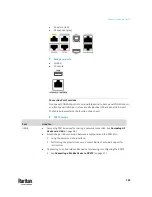
Port
Used for...
USB-A
This is a "host" port, which is powered, per USB 2.0 specifications.
•
Connecting to an iOS mobile device for viewing or configuring the PX3TS. See
Connecting a Mobile Device to PX3TS
(on page 17).
•
Connecting a USB device, such as a Logitech
®
webcam or wireless LAN
adapter.
•
Cascading PX3TS devices for sharing a network connection.
FEATURE
Connection to one of the following devices:
▪
A Raritan access product, such as Dominion KX III KVM switch, with the
use of a power CIM.
▪
A Schroff
®
LHX-20, SHX-30 or LHX-40 device, using an RJ-45 to RS-232
cable provided by Schroff.
▪
An external beeper with the RJ-45 socket.
▪
A Raritan asset management strip, which allows you to track the locations
of IT devices on the rack.
See
Connecting External Equipment (Optional)
(on page 41).
Warning: This is not an RS-232 port so do NOT plug in an RS-232 device, or
damages can be caused to the device.
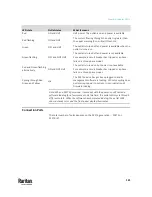
CONSOLE/
MODEM
(DB9)
Establishing a serial connection between the PX3TS and a computer or modem.
This is a standard DTE RS-232 port. You can use a null-modem cable with two DB9
connectors on both ends to connect the PX3TS to the computer.
SENSOR
(RJ-45)
Connection to one of the following devices:
▪
Raritan's environmental sensor package(s).
▪
Raritan's sensor hub, which expands the number of a sensor port to four
ports.
ETHERNET
Connecting the PX3TS to your company's network via a standard network patch
cable (Cat5e/6). This connection is necessary to administer or access the PX3TS
remotely.
There are two small LEDs adjacent to the port:
▪
Green indicates a physical link and activity.
▪
Yellow indicates communications at 10/100 BaseT speeds.
Note: Network connection to this port is not required if wireless connection is
preferred, or if the PX3TS is a slave device in the cascading configuration.
PX3TS-iX7 models:
Summary of Contents for Raritan PX3TS
Page 4: ......
Page 6: ......
Page 20: ......
Page 80: ...Chapter 4 Connecting External Equipment Optional 60...
Page 109: ...Chapter 5 PDU Linking 89...
Page 117: ...Chapter 5 PDU Linking 97...
Page 441: ...Chapter 7 Using the Web Interface 421...
Page 464: ...Chapter 7 Using the Web Interface 444...
Page 465: ...Chapter 7 Using the Web Interface 445 Continued...
Page 746: ...Appendix A Specifications 726...
Page 823: ...Appendix I RADIUS Configuration Illustration 803 Note If your PX3TS uses PAP then select PAP...
Page 828: ...Appendix I RADIUS Configuration Illustration 808 14 The new attribute is added Click OK...
Page 829: ...Appendix I RADIUS Configuration Illustration 809 15 Click Next to continue...
Page 860: ...Appendix J Additional PX3TS Information 840...
Page 890: ...Appendix K Integration 870 3 Click OK...
Page 900: ......


