


Chapter 7: Using the Web Interface
439
▪
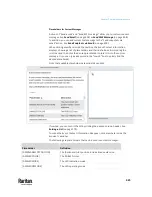
Asset management tag log:
Transmit the log of all asset strips, which is
generated when there are changes made to asset tags and asset strips,
including asset tag connection or disconnection events.
▪
Sensor log:
Transmit the record of all logged sensors, including their
sensor readings and/or status. Logged sensors refer to all internal
and/or environmental sensors/actuators that you have selected on
the Data Logging page. See
Setting Data Logging
(on page 437).
7.
If 'Asset management tag list' is selected in the above step, specify the
asset strip(s) whose information to send. For PX3TS with only one FEATURE
port, only one asset strip is available.
▪
To specify the asset strip(s), select them one by one from the Available
AMS Ports list. Or click Select All to add all.
▪
To remove the asset strip(s), click that asset strip's
in the Selected
AMS Ports field. Or click Deselect All to remove all.
8.
Click Create.
9.
Repeat the same steps for additional destinations. Up to 64 destinations
are supported.
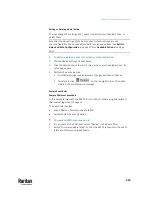
To immediately push out the data:
1.
On the Data Push page, choose the one whose data you want to push out.
2.
Click its
.
To modify or delete data push settings:
1.
On the Data Push page, click the one you want in the list.
2.
Perform either action below.
▪
To modify settings, make necessary changes and then click Save.
▪
To delete it, click
, and then confirm it on the
confirmation message.
Data Push Format
Each push message contains exactly one JSON object. The data format is
formally defined in IDL files, sharing several definitions from the JSON-RPC data
model.
IDL files are available by launching
JSON-RPC online help
https://help.raritan.com/json-rpc/pdu/v3.6.0/namespacedatapush.html
).
To have an overview of the data format, see the following topic.
•
Sensor Log
(on page 440)
•
Asset Management Tag List
(on page 443)
•
Asset Management Tag Log
(on page 446)
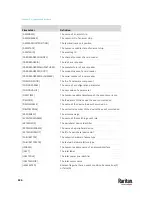
Summary of Contents for Raritan PX3TS
Page 4: ......
Page 6: ......
Page 20: ......
Page 80: ...Chapter 4 Connecting External Equipment Optional 60...
Page 109: ...Chapter 5 PDU Linking 89...
Page 117: ...Chapter 5 PDU Linking 97...
Page 441: ...Chapter 7 Using the Web Interface 421...
Page 464: ...Chapter 7 Using the Web Interface 444...
Page 465: ...Chapter 7 Using the Web Interface 445 Continued...
Page 746: ...Appendix A Specifications 726...
Page 823: ...Appendix I RADIUS Configuration Illustration 803 Note If your PX3TS uses PAP then select PAP...
Page 828: ...Appendix I RADIUS Configuration Illustration 808 14 The new attribute is added Click OK...
Page 829: ...Appendix I RADIUS Configuration Illustration 809 15 Click Next to continue...
Page 860: ...Appendix J Additional PX3TS Information 840...
Page 890: ...Appendix K Integration 870 3 Click OK...
Page 900: ......


