


Chapter 7: Using the Web Interface
331
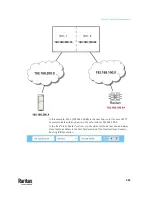
In this mode, the DHCP server communicates with every cascaded device
respectively and assigns four
different
IP addresses. Each device has its
own IP address.
The way to remotely access each cascaded device is completely the same
as accessing a standalone device in the network.
•
"Port Forwarding" mode:
In this mode, the DHCP server communicates with the master device alone
and assigns one IP address to the master device. All slave devices share the
same IP address as the master device.
You must specify a 5XXXX port number (where X is a number) when
remotely accessing any slave device with the shared IP address. See
Port
Number Syntax
(on page 332).
Comparison between cascading modes:
•
The Bridging mode supports the wired network only, while the Port
Forwarding mode supports both wired and wireless networks.
•
Both cascading modes support a maximum of 16 devices in a chain.
•
Both cascading modes support both DHCP and static IP addressing.
•
In the Bridging mode, each cascaded device has a unique IP address.
In the Port Forwarding mode, all cascaded devices share the same IP
address(es) as the master device.
•
In the Bridging mode, each cascaded device has only one IP address.
In the Port Forwarding mode, each cascaded device can have multiple IP
addresses as long as the master device has multiple network interfaces
enabled/configured properly.
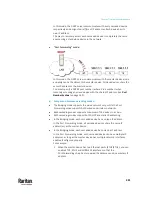
For example:
▪
When the master device has two Ethernet ports (ETH1/ETH2), you can
enable ETH1, ETH2 and WIRELESS interfaces so that the
Port-Forwarding chain has two wired IP addresses and one wireless IP
address.
Summary of Contents for Raritan PX3TS
Page 4: ......
Page 6: ......
Page 20: ......
Page 80: ...Chapter 4 Connecting External Equipment Optional 60...
Page 109: ...Chapter 5 PDU Linking 89...
Page 117: ...Chapter 5 PDU Linking 97...
Page 441: ...Chapter 7 Using the Web Interface 421...
Page 464: ...Chapter 7 Using the Web Interface 444...
Page 465: ...Chapter 7 Using the Web Interface 445 Continued...
Page 746: ...Appendix A Specifications 726...
Page 823: ...Appendix I RADIUS Configuration Illustration 803 Note If your PX3TS uses PAP then select PAP...
Page 828: ...Appendix I RADIUS Configuration Illustration 808 14 The new attribute is added Click OK...
Page 829: ...Appendix I RADIUS Configuration Illustration 809 15 Click Next to continue...
Page 860: ...Appendix J Additional PX3TS Information 840...
Page 890: ...Appendix K Integration 870 3 Click OK...
Page 900: ......


