


Chapter 7: Using the Web Interface
350
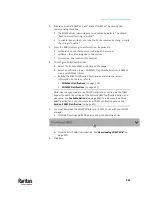
ADD a rule to the end of the list
▪
Click Append.
▪
Type an IP address and subnet mask in the IP/Mask field.
▪
Select an option in the Policy field.
▪
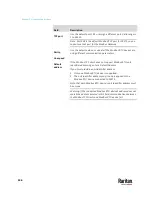
Accept:
Accepts traffic from/to the specified IP address(es).
▪
Drop:
Discards traffic from/to the specified IP address(es), without sending any failure
notification to the source or destination host.
▪
Reject:
Discards traffic from/to the specified IP address(es), and an ICMP message is sent
to the source or destination host for failure notification.
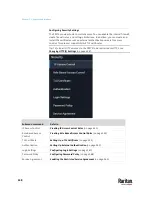
INSERT a rule between two rules
▪
Select the rule above which you want to insert a new rule. For example, to insert a rule
between rules #3 and #4, select #4.
▪
Click
Insert Above
.
▪
Type an IP address and subnet mask in the IP/Mask field.
▪
Select
Accept
,
Drop
or
Reject
in the Policy field. Refer to the above table for details.
The system automatically numbers the rule.
6.
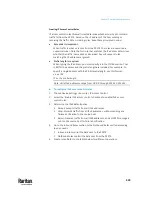
When finished, the rules are listed.
Summary of Contents for Raritan PX3TS
Page 4: ......
Page 6: ......
Page 20: ......
Page 80: ...Chapter 4 Connecting External Equipment Optional 60...
Page 109: ...Chapter 5 PDU Linking 89...
Page 117: ...Chapter 5 PDU Linking 97...
Page 441: ...Chapter 7 Using the Web Interface 421...
Page 464: ...Chapter 7 Using the Web Interface 444...
Page 465: ...Chapter 7 Using the Web Interface 445 Continued...
Page 746: ...Appendix A Specifications 726...
Page 823: ...Appendix I RADIUS Configuration Illustration 803 Note If your PX3TS uses PAP then select PAP...
Page 828: ...Appendix I RADIUS Configuration Illustration 808 14 The new attribute is added Click OK...
Page 829: ...Appendix I RADIUS Configuration Illustration 809 15 Click Next to continue...
Page 860: ...Appendix J Additional PX3TS Information 840...
Page 890: ...Appendix K Integration 870 3 Click OK...
Page 900: ......


