


Chapter 7: Using the Web Interface
298
2.
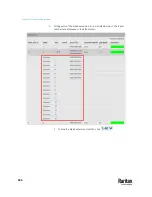
Copy and paste all content in the text editor into the SSH Public Key field.
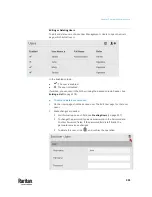
SNMPv3:
The SNMPv3 access permission is disabled by default.
Field/setting
Description
Enable SNMPv3
Select this checkbox when intending to permit the
SNMPv3 access by this user.
Note: The SNMPv3 protocol must be enabled for
SNMPv3 access. See
Configuring SNMP Settings
(on
Security level
Click the field to select a preferred security level from
the list:
▪
None: No authentication and no privacy. This is the
default.
▪
Authentication: Authentication and no privacy.
▪
Authentication & Privacy: Authentication and
privacy.
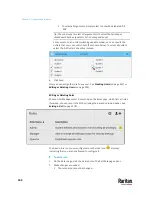
•
Authentication Password
: This section is configurable only when
'Authentication' or 'Authentication & Privacy' is selected.
Field/setting
Description
Same as user
password
Select this checkbox if the authentication password is
identical to the user's password.
To specify a different authentication password, disable
the checkbox.
Password,
Confirm password
Type the authentication password if the 'Same as User
Password' checkbox is deselected.
The password must consist of 8 to 32 ASCII printable
characters.
•
Privacy Password
: This section is configurable only when 'Authentication &
Privacy' is selected.
Field/setting
Description
Same as
authentication
password
Select this checkbox if the privacy password is
identical to the authentication password.
To specify a different privacy password, disable the
checkbox.
Summary of Contents for Raritan PX3TS
Page 4: ......
Page 6: ......
Page 20: ......
Page 80: ...Chapter 4 Connecting External Equipment Optional 60...
Page 109: ...Chapter 5 PDU Linking 89...
Page 117: ...Chapter 5 PDU Linking 97...
Page 441: ...Chapter 7 Using the Web Interface 421...
Page 464: ...Chapter 7 Using the Web Interface 444...
Page 465: ...Chapter 7 Using the Web Interface 445 Continued...
Page 746: ...Appendix A Specifications 726...
Page 823: ...Appendix I RADIUS Configuration Illustration 803 Note If your PX3TS uses PAP then select PAP...
Page 828: ...Appendix I RADIUS Configuration Illustration 808 14 The new attribute is added Click OK...
Page 829: ...Appendix I RADIUS Configuration Illustration 809 15 Click Next to continue...
Page 860: ...Appendix J Additional PX3TS Information 840...
Page 890: ...Appendix K Integration 870 3 Click OK...
Page 900: ......