


Chapter 7: Using the Web Interface
353
Creating Role Based Access Control Rules
Role-based access control rules are similar to IP access control rules, except
that they are applied to members of a specific role. This enables you to grant
system permissions to a specific role, based on their IP addresses.
Same as IP access control rules, the order of role-based access control rules is
important, since the rules are executed in numerical order.
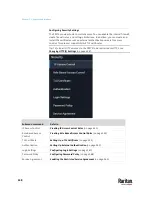
To create IPv4 role-based access control rules:
1.
Choose Device Settings > Security > Role Based Access Control.
2.
Select the 'Enable role based access control for IPv4' checkbox to enable
IPv4 access control rules.
3.
Determine the IPv4 default policy.
▪
Accept:
Accepts traffic when no matching rules are present.
▪
Deny:
Rejects any user's login attempt when no matching rules are
present.
4.
Create rules. Refer to the tables below for different operations.
ADD a rule to the end of the list
▪
Click Append.
▪
Type a starting IP address in the Start IP field.
▪
Type an ending IP address in the End IP field.
▪
Select a role in the Role field. This rule applies to members of this role only.
▪
Select an option in the Policy field.
▪
Accept:
Accepts traffic from the specified IP address range when the user is a member of
the specified role.
▪
Deny:
Rejects the login attempt of a user from the specified IP address range when that
user is a member of the specified role.
INSERT a rule between two rules
▪
Select the rule above which you want to insert a new rule. For example, to insert a rule
between rules #3 and #4, select #4.
▪
Click Insert Above.
▪
Type a starting IP address in the Start IP field.
▪
Type an ending IP address in the End IP field.
▪
Select a role in the Role field. This rule applies to members of this role only.
▪
Select
Accept
or
Deny
in the Policy field. Refer to the above table for details.
The system automatically numbers the rule.
5.
When finished, the rules are listed on this page.
Summary of Contents for Raritan PX3TS
Page 4: ......
Page 6: ......
Page 20: ......
Page 80: ...Chapter 4 Connecting External Equipment Optional 60...
Page 109: ...Chapter 5 PDU Linking 89...
Page 117: ...Chapter 5 PDU Linking 97...
Page 441: ...Chapter 7 Using the Web Interface 421...
Page 464: ...Chapter 7 Using the Web Interface 444...
Page 465: ...Chapter 7 Using the Web Interface 445 Continued...
Page 746: ...Appendix A Specifications 726...
Page 823: ...Appendix I RADIUS Configuration Illustration 803 Note If your PX3TS uses PAP then select PAP...
Page 828: ...Appendix I RADIUS Configuration Illustration 808 14 The new attribute is added Click OK...
Page 829: ...Appendix I RADIUS Configuration Illustration 809 15 Click Next to continue...
Page 860: ...Appendix J Additional PX3TS Information 840...
Page 890: ...Appendix K Integration 870 3 Click OK...
Page 900: ......


