


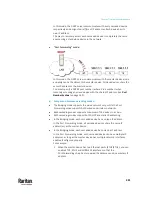


Chapter 7: Using the Web Interface
342
Configuring SMTP Settings
The PX3TS can be configured to send alerts or event messages to a specific
administrator by email. See
Event Rules and Actions
(on page 375).
To send emails, you have to configure the SMTP settings and enter an IP
address for your SMTP server and a sender's email address.
If any email messages fail to be sent successfully, the failure event and reason
are available in the event log. See
Viewing or Clearing the Local Event Log
(on
page 473).
To set SMTP server settings:
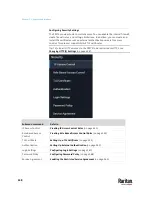
1.
Choose Device Settings > Network Services > SMTP Server.
2.
Enter the information needed.
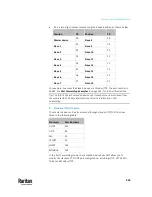
Field
Description
IP address/host
name
Type the name or IP address of the mail server.
Port
Type the port number.
▪
Default is 25
Sender email address Type an email address for the sender.
Number of sending
retries
Type the number of email retries.
▪
Default is 2 retries
Time between
sending retries
Type the interval between email retries in minutes.
▪
Default is 2 minutes.
Server requires
authentication
Select this checkbox if your SMTP server requires
password authentication.
User name,
Password
Type a user name and password for authentication
after selecting the above checkbox.
▪
The length of user name and password ranges
between 4 and 64. Case sensitive.
▪
Spaces are not allowed for the user name, but
allowed for the password.
Enable SMTP over
TLS (StartTLS)
If your SMTP server supports the Transport Layer
Security (TLS), select this checkbox.
▪
Settings for the CA Certificate:
If the required certificate file is a chain of certificates, and you are not sure
about the requirements of a certificate chain, see
TLS Certificate Chain
(on
page 859).
Summary of Contents for Raritan PX3TS
Page 4: ......
Page 6: ......
Page 20: ......
Page 80: ...Chapter 4 Connecting External Equipment Optional 60...
Page 109: ...Chapter 5 PDU Linking 89...
Page 117: ...Chapter 5 PDU Linking 97...
Page 441: ...Chapter 7 Using the Web Interface 421...
Page 464: ...Chapter 7 Using the Web Interface 444...
Page 465: ...Chapter 7 Using the Web Interface 445 Continued...
Page 746: ...Appendix A Specifications 726...
Page 823: ...Appendix I RADIUS Configuration Illustration 803 Note If your PX3TS uses PAP then select PAP...
Page 828: ...Appendix I RADIUS Configuration Illustration 808 14 The new attribute is added Click OK...
Page 829: ...Appendix I RADIUS Configuration Illustration 809 15 Click Next to continue...
Page 860: ...Appendix J Additional PX3TS Information 840...
Page 890: ...Appendix K Integration 870 3 Click OK...
Page 900: ......


