


Chapter 6: Using the PX3TS
129
Outlet Information
The outlet mode is NOT available for PX3TS-1000 series.
The Outlet mode is displayed as "OUTLET" on the LCD display. By default the
PX3TS displays the current reading of OUTLET 1.
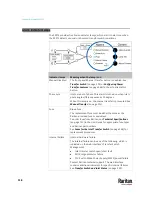
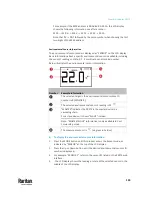
Below illustrates the outlet information shown on the LCD display.
Section
Example information
The selected target is OUTLET 3.
This outlet's current reading is 2 amps.
"MASTER" indicates the PX3TS is the master device in a
cascading chain.
For a slave device, it shows "SLAVE" instead.
Note: "MASTER/SLAVE" information is only available in Port
Forwarding mode.
The measurement unit is A (Amp), indicating that the reading
is the RMS current.
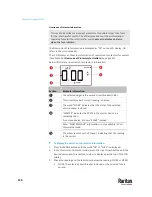
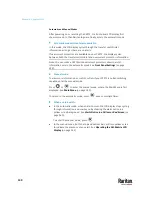
To display a single-phase outlet's information:
1.
By default this product enters the Outlet mode. If not, press the MODE
button until the word "OUTLET" is displayed.
2.
In the Outlet mode, press the Up or Down button until the desired outlet's
number is displayed at the top of the LCD display.
3.
Press the FUNC button to switch between voltage, active power and
current readings of the selected target.
▪
A is displayed for the current reading. A means Amp.
▪
V is displayed for the voltage reading. V means Volt.
▪
W is displayed for the power reading. W means Watt.
If the word "ALARM" appears below the reading, it means the currently
displayed reading already reaches or crosses the upper or lower
thresholds.
Summary of Contents for Raritan PX3TS
Page 4: ......
Page 6: ......
Page 20: ......
Page 80: ...Chapter 4 Connecting External Equipment Optional 60...
Page 109: ...Chapter 5 PDU Linking 89...
Page 117: ...Chapter 5 PDU Linking 97...
Page 441: ...Chapter 7 Using the Web Interface 421...
Page 464: ...Chapter 7 Using the Web Interface 444...
Page 465: ...Chapter 7 Using the Web Interface 445 Continued...
Page 746: ...Appendix A Specifications 726...
Page 823: ...Appendix I RADIUS Configuration Illustration 803 Note If your PX3TS uses PAP then select PAP...
Page 828: ...Appendix I RADIUS Configuration Illustration 808 14 The new attribute is added Click OK...
Page 829: ...Appendix I RADIUS Configuration Illustration 809 15 Click Next to continue...
Page 860: ...Appendix J Additional PX3TS Information 840...
Page 890: ...Appendix K Integration 870 3 Click OK...
Page 900: ......


