
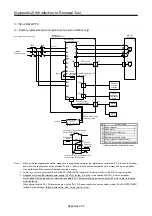

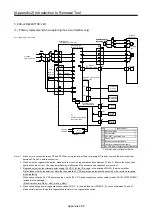


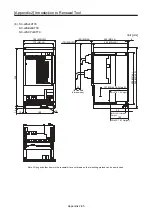
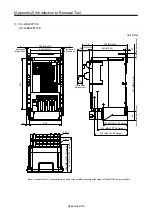
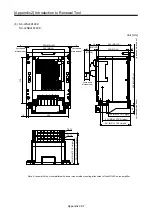
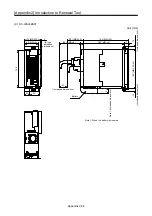
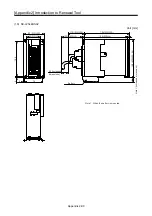

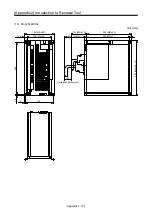
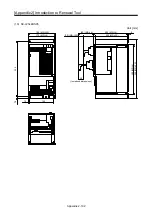

[Appendix 2] Introduction to Renewal Tool
Appendix 2-87
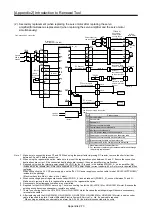
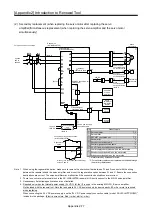
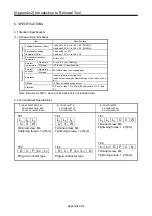
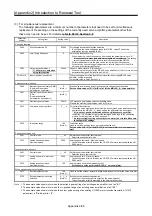
7.2 List of SSCNET Interface Setting Requisite Parameters
POINT
When the MR-J4-_B-RJ020 servo amplifier is combined with the MR-J4-T20
SSCNET conversion unit, the servo amplifier is recognized as MR-J2S by the
controller. For parameters, changes to the program or the parameters are
required as necessary.
(For details, refer to "[Appendix 1] Summary of MR-J4_B_-RJ020 + MR-J4-T20"
in this document.)
For details on how to set parameters, refer to
Chapter 5 of the "MR-J4-_B_-
RJ020 Servo Amplifier Instruction Manual (SH(NA)030124)"
.
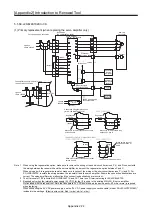
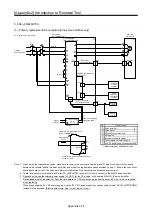
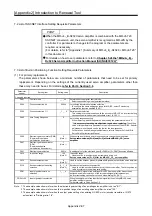
7.3 List of Built-in Positioning Function Setting Requisite Parameters
(1) For primary replacement
The parameters shown below are a minimum number of parameters that need to be set for primary
replacement. Depending on the settings of the currently used servo amplifier, parameters other than
these may need to be set. For details,
refer to Part 4 Section 3.6
.
Parameter
number
Setting item
Setting value
Description
Changing required.
PA01
Control mode
_ _ _ 6h
Select the servo amplifier control mode.
Select the positioning mode (point table method).
PA04
Function selection A-1
0000h
Forced stop deceleration function selection
To configure the same settings as those for MR-J2S, select "Forced stop
deceleration function disabled (EM1)".
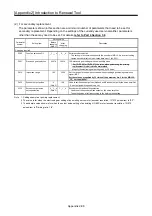
PC22
Function selection C-1
_ 1 _ _ h
Serial encoder selection.
This setting is for communication with the encoder of MR-J2S. An incorrect setting
causes encoder initial communication data error 1 (AL.20.1).
PA09 Auto
Tuning
Response
8 Auto tuning response setting
When replacing, switch the power on after setting the parameter value to "8".
*
It is necessary to make gain adjustment again when replacing.
The setting
value of this parameter is equivalent to the slow response of the MR-J2S. Perform
adjustment since tha gain can be too low for the slow response.
For details on how to make gain adjustments, refer to Chapter 6 of the MR-J4
Servo Amplifier Instruction Manual.
PA06
Electronic gear numerator (CMX)
(Command input pulse
multiplication numerator)
8
(Note 1)
When using an electronic gear, it is necessary to change the setting value.
Set the same value as [Pr. 4] and [Pr. 5] of for the MR-J2S-_CP_ servo
amplifier.
PA07 Electronic
gear
denominator
(CDV)
(Commanded pulse
multiplication denominator)
1
(Note 1)
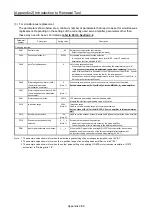
PA21
Electronic gear selection
0001h
A setting value for the electronic gear [Pr. PA06] or [Pr. PA07] becomes effective.
PA10
In-position range
100
(Note 2)
In-position range
Used to set an in-position range per command pulse unit.
Set the same value as [Pr. 6] of for the MR-J2S-_CP_ servo amplifier.
PA15
Encoder output pulses
4
(Note 3)
Used to set the encoder pulses (A-phase and B-phase) output by the servo amplifier.
PC19
Encoder output pulse setting
selection
0 _ 1 _ h
(Note 3)
Encoder output pulse setting selection
Used to set the encoder pulses output by the servo amplifier. The setting value at
left is according to the dividing ratio setting.
PD01
Input signal automatic on
selection
1_ _ _h
When the EMG signal of the existing MR-J2S-CP servo amplifier has not been
assigned, enable automatic on of the forced stop signal after replacement.
An incorrect setting causes Servo forced stop warning (AL. E6.1).
PD04 to 28
Input signal device selection
-
When the assignment of the Input/output signal for the existing MR-J2S servo
amplifier, setting is required.
For details, refer to Part 4 Section 3.6.
Note 1. The example value shown is for when the electronic gear setting of an existing servo amplifier is set as "8/1".
2. The example value shown is for when the in-position range of an existing servo amplifier is set as "100".
3. The example value shown is for when the output pulse setting of an existing HC-KFS motor (encoder resolution: 131072
pulses/rev) is "Dividing ratio: 1/4".
Содержание MELSERVO-J2-Super Series
Страница 18: ...Part 1 Summary of MR J2S MR J2M Replacement 1 1 Part 1 Summary of MR J2S MR J2M Replacement ...
Страница 31: ...Part 1 Summary of MR J2S MR J2M Replacement 1 14 MEMO ...
Страница 109: ...Part 3 Review on Replacement of MR J2S _B_ with MR J4 _B_ 3 32 MEMO ...
Страница 161: ...Part 4 Review on Replacement of MR J2S _CP_ CL_ with MR J4 _A_ RJ 4 52 MEMO ...
Страница 219: ...Part 5 Review on Replacement of MR J2S 30 kW or Higher Capacity Models with MR J4 DU_ 5 58 MEMO ...
Страница 220: ...Part 6 Review on Replacement of MR J2M with MR J4 6 1 Part 6 Review on Replacement of MR J2M with MR J4 ...
Страница 239: ...Part 6 Review on Replacement of MR J2M with MR J4 6 20 MEMO ...
Страница 240: ...Part 7 Common Reference Material 7 1 Part 7 Common Reference Material ...
Страница 284: ...Part 7 Common Reference Material 7 45 Click Update Project ...
Страница 342: ...Part 8 Review on Replacement of Motor 8 1 Part 8 Review on Replacement of Motor ...
Страница 409: ...Part 8 Review on Replacement of Motor 8 68 MEMO ...
Страница 461: ...Part 9 Review on Replacement of Optional Peripheral Equipment 9 52 MEMO ...
Страница 462: ...Part 10 Startup Procedure Manual 10 1 Part 10 Startup Procedure Manual ...
Страница 464: ... Appendix 1 Summary of MR J4_B_ RJ020 MR J4 T20 Appendix 1 1 Appendix 1 Summary of MR J4_B_ RJ020 MR J4 T20 ...