Part 5: Review on Replacement of MR-J2S-30 kW or Higher Capacity Models with MR-J4-DU_
5 - 48
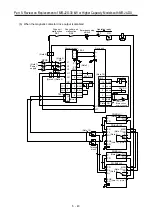
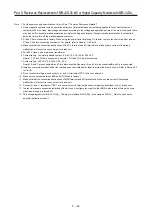
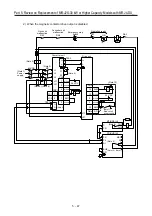
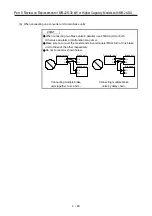
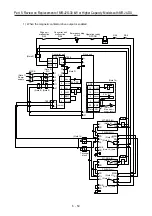
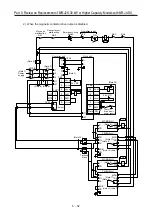
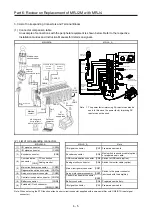
Note 1. For the power supply specifications, refer to Part 7 "Common Reference Material".
2. Use a magnetic contactor with an operation delay time (interval between current being applied to the coil until closure of
contacts) of 80 ms or less. Bus voltage decreases according to the voltage and operation pattern of the main circuit, and there
may be a shift in dynamic brake deceleration during forced stop deceleration. If dynamic brake deceleration is not desired,
delay the time to turn off the electromagnetic contactor.
3. P1 and P2 are connected in factory. When using the power factor improving DC reactor, remove the short-circuit bar across
P1 and P2 before connecting the reactor. For details, refer to Chapter 7 in Part 9.
4. Make sure that the connection destinations of the P/+ terminal and N/- terminal of a brake unit are correct. Otherwise a
malfunction will occur to a converter unit or brake unit.
5. For 400 V class, use a step-down transformer.
6. Contact rating: 1a normally open contact, 5 A at 110 V AC/3 A at 220 V AC
Normal: TH1 and TH2 are disconnected. Abnormal: TH1 and TH2 are connected.
7. Contact rating: 230 V AC_0.3 A/30 V DC_0.3 A
Normal: B and C are connected/A and C are disconnected. Abnormal: B and C are disconnected/A and C are connected.
8. Install an overcurrent protection device (molded-case circuit breaker or fuse) to protect the branch circuit. (Refer to Section 5.3
in Part 5.)
9. Do not connect multiple wires directly to L+ and L- terminals of TE2-1 of a converter unit.
10. Make sure to connect between BUE and SD. (Wired in factory.)
11. In order to prevent unexpected restarting of the drive unit, configure the circuit so that EM2 is also turned off when the main
circuit power supply is turned off.
12. This wiring diagram is for MR-J4-DU_B_. The way to interface MR-J4-DU_ is the same as MR-J4-_. Refer to each servo
amplifier instruction manual.
Содержание MELSERVO-J2-Super Series
Страница 18: ...Part 1 Summary of MR J2S MR J2M Replacement 1 1 Part 1 Summary of MR J2S MR J2M Replacement ...
Страница 31: ...Part 1 Summary of MR J2S MR J2M Replacement 1 14 MEMO ...
Страница 109: ...Part 3 Review on Replacement of MR J2S _B_ with MR J4 _B_ 3 32 MEMO ...
Страница 161: ...Part 4 Review on Replacement of MR J2S _CP_ CL_ with MR J4 _A_ RJ 4 52 MEMO ...
Страница 219: ...Part 5 Review on Replacement of MR J2S 30 kW or Higher Capacity Models with MR J4 DU_ 5 58 MEMO ...
Страница 220: ...Part 6 Review on Replacement of MR J2M with MR J4 6 1 Part 6 Review on Replacement of MR J2M with MR J4 ...
Страница 239: ...Part 6 Review on Replacement of MR J2M with MR J4 6 20 MEMO ...
Страница 240: ...Part 7 Common Reference Material 7 1 Part 7 Common Reference Material ...
Страница 284: ...Part 7 Common Reference Material 7 45 Click Update Project ...
Страница 342: ...Part 8 Review on Replacement of Motor 8 1 Part 8 Review on Replacement of Motor ...
Страница 409: ...Part 8 Review on Replacement of Motor 8 68 MEMO ...
Страница 461: ...Part 9 Review on Replacement of Optional Peripheral Equipment 9 52 MEMO ...
Страница 462: ...Part 10 Startup Procedure Manual 10 1 Part 10 Startup Procedure Manual ...
Страница 464: ... Appendix 1 Summary of MR J4_B_ RJ020 MR J4 T20 Appendix 1 1 Appendix 1 Summary of MR J4_B_ RJ020 MR J4 T20 ...


