


8-15
SRW-5000/5500
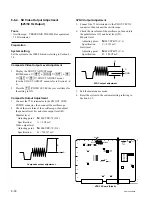
8-4-3. Recording Current Adjustment
When the recording current adjustment is required inde-
pendently of the standard RF system alignment, perform
this adjustment as described in this section.
(Refer to Section “8-4-2. Itemized Digital Format RF
System Adjustments” regarding the standard recording
current adjustment in the RF system adjustment.)
Tools
.
Cleaning tape:
BCT-HD12CL (Separately available)
.
Recording tape: BCT-SR series (Separately available)
BCT-HD series (Separately available)
(SRW-5500 only)
n
Use the blank tape erased using the tape eraser, etc. in
advance or a new blank tape.
Preparation
1. Clean with the cleaning tape.
Insert the cleaning tape (BCT-HD12CL).
.
The EJECT button blinks, and the PLAY button light.
Then the cleaning tape is played back for about 10
seconds, before it is automatically ejected.
2. Check the Settings of the Function Menu
Item
Customer
Setting at
setting
adjustment
HOME menu
[F2]
(REC INH) ____________
8
OFF
3. Warming Up
Before starting the adjustment, warm up the VTR through
the power for 20 minutes or more.
4. Check the Operation Mode
Check that the unit set into the 29.97 Hz mode.
If does not, change the system setting referring to Section
8-1-3.
Recording Current Adjustment
(1) HDCAM SR
1.
Activate the ALT MAINTENANCE menu, and
display the RF ADJUST menu.
(HOME menu
→
[SFT]
+
[DIAG]
→
[SFT]
+
[F8]
→
[ALT]
→
[F7]
→
RF ADJUST menu)
(For the RF ADJUST menu, refer to Section 3-4-5.)
2.
Press the
[F1]
(FMT SEL) key several times to select
the HDCAM SR.
3.
Press the
[F5]
(REC ADJ) key to display the REC
ADJUST menu.
4.
Insert the recording tape.
5.
To execute the automatic adjustment for the recording
current, press the
[F6]
(ALL CH ADJ) key then press
the
[SET]
key.
.
Message [Complete] will be displayed when this
adjustment is completed normally.
Saving the Data
n
Do not save the adjustment data if the automatic adjust-
ment was not completed properly.
6.
Press the
[F1]
(NVRAM CTL) key to display the NV-
RAM CONTROL menu.
7.
Select the “SAVE ALL DATA” by pressing the cursor
keys, then press the
[F10]
(EXIT) key to saving data.
.
The message “Save Complete” will be displayed
when this data save is completed normally.
8.
Eject the recording tape.
9.
Exit the maintenance mode.