


5-87
SRW-5000/5500
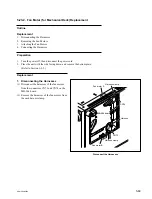
Side view
Hooks of the guide rail (L)
Hooks of the chassis
Square
hole
Square
hole
Square
hole
Hook
Hook
Hook
Claw
Claw
Guide rail (L)
Boss
Boss
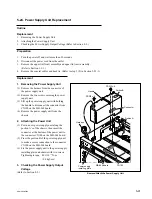
Fan motor
Fan motor
Fan harnesses
PS4
x
20
CN72
CN71
PS4
x
20
MB-964 board
Labels
Remove/Attach the Fan Motor
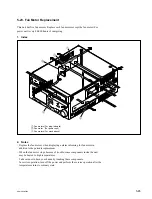
3. Removing the Guide Rail (L)
(1) Lift up the bottom part of the guide rail (L)
and remove the guide rail (L) from two hooks
of the chassis.
n
The guide rail (L) can be removed easier
from two hooks of the chassis if you hold it
with a thumb up and other fingers down then
lift up the bottom while pressing with a
thumb.
(2) Remove the two claws of guide rail (L) from
the bosses of the chassis.
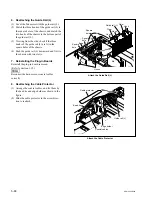
(3) Remove the three hooks from the square
holes of the chassis while lifting up the whole
guide rail (L).
(4) Remove the guide rail (L) in the arrow
direction.
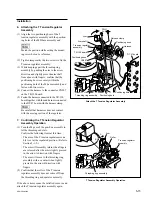
4. Removing the Fan Motor
(1) Disconnect the fan harness from the connec-
tor CN71 or CN72 on the MB-964 board.
(2) Remove the two screws to remove the fan
motor.
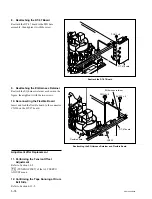
5. Attaching the Fan Motor
Attach a new fan motor in the direction as shown
in the figure, then tighten it with two screws.
Tightening torque:
140
x
10
_
2
N
.
m
{14.0 kgf
.
cm}
n
Pay attention not to mistake the direction of the
labeled side and the harness direction.
Remove the Guide Rail (L)