


5-32
SRW-5000/5500
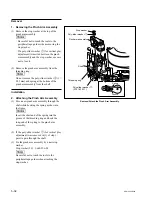
Stop washer
Poly-slider washer
1
Poly-slider washer
2
(3-701-439-11)
Threading ring
Shaft
Pinch arm assembly
Groove
Spring
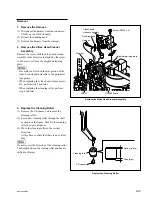
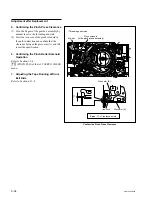
Remove/Attach the Pinch Arm Assembly
Removal
1. Removing the Pinch Arm Assembly
(1) Remove the stop washer at the top of the
pinch arm assembly.
m
.
Be careful not to touch the tools to the
peripheral tape guides when removing the
stop washer.
.
If a poly-slider washer
1
(for vertical play
adjustment) is inserted between the pinch
arm assembly and the stop washer, use care
not to lose it.
(2) Remove the pinch arm assembly from the
threading ring.
n
Do not remove the poly-slider washer
2
(t =
0.25 mm) and spring at the bottom of the
pinch arm assembly from the shaft.
Installation
2. Attaching the Pinch Arm Assembly
(1) Pass a new pinch arm assembly through the
shaft while hooking the spring as shown in
the figure.
m
Insert the short-end of the spring into the
groove of the threading ring and hook the
long-end of the spring to the pinch arm
assembly.
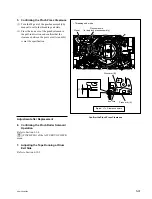
(2) If the poly-slider washer
1
(for vertical play
adjustment) was removed in (1) of step 1,
pass it again through the shaft.
(3) Fix the pinch arm assembly by a new stop
washer.
Stop washer (2.3): 3-660-596-00
n
Be careful not to touch the tools to the
peripheral tape guides when attaching the
stop washer.