


1-1
SRW-5000/5500
Knob
Knob
Removal
Installation
Upper lid (front) assembly
Fixing screw
Section 1
Service Overview
1-1. Notes on Power Supply Block
Warning on Primary Circuit Block and Electric
Shock
w
The primary circuit consists of the AC inlet, the POWER
switch, and the power supply unit.
Be careful not to receive an electric shock when perform-
ing the maintenance and service works with the power
turned on.
A primary voltage remains applied to the AC inlet, and
POWER switch even if the POWER switch is turned off.
For the work that requires no current conduction, therefore,
turn off the POWER switch and disconnect the power
cord.
1-2. Cleaning when the Heads are
Clogged
Clean using a cleaning cassette tape (specified product:
BCT-HD12CL) when the video heads are clogged.
For the cleaning, refer to “4-2-1. Cleaning using Cleaning
Tape”.
w
Clean the video heads in the prescribed procedure using a
specified cleaning cassette tape. If not, the video heads
may be abrasive or damaged.
If the head clogging is not solved using a cleaning cassette
tape, use cleaning cloth.
For the cleaning using a cleaning cloth, clean according to
the procedure of “4-2-3. Rotary Heads Cleaning” and “4-2-
4. Tape Running Surface of Upper Drum Cleaning”after
confirming the cautions and preparation in “4-2-2. General
Information for Cleaning using Cleaning Cloth”.
1-3. Removing/Reattaching Cabinet
n
Turn off the power and unplug the power cord before
removing/reattaching.
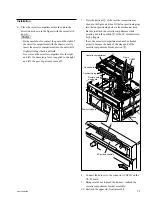
1-3-1. Removing/Reattaching the Upper Lid
n
When removing only the upper lid (from) assembly,
perform the steps 1 to 3.
Upper lid (front) assembly
1.
Fully loosen the fixing screw.
2.
Slide the knobs on upper lid (front) assembly each in
the inside. (Move the knobs to the outside to fix the
upper lid (front) assembly.
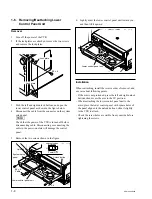
3.
Remove the upper lid (front) assembly in the arrow
direction.
When reattaching the upper lid (front) assembly, install in
the reverse order of removal.
n
Tighten the fixing screw as following torque.
Tightening torque: 120
x
10
_
2
N
.
m {12.0 kgf
.
cm}