båÖäáëÜ
59 38 399 D3352
D3352.076.01.13.02
07.2008
6 – 53
Tab 6
6.19 Replacing the light barriers
6.19
5.
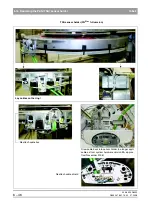
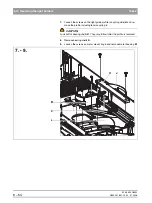
Loosen the screws from the bearing covers of the actuator spindles and
detach the spindles. Now you can remove the lower wing plate
(F)
.
z
Position the motor mount ring so that the tensioning roller is positioned
above a recess (so that the roller can be removed from below).
6.
Detach the retaining ring and the washer. Remove tensioning roller
G
incl.
eccentric bolt (downward).
5.
F
6.
G
Summary of Contents for ORTHOPHOS XG 3 DS
Page 4: ......
Page 9: ...ORTHOPHOS XG 1General information...
Page 12: ...59 38 399 D3352 1 4 D3352 076 01 13 02 07 2008 Tab1...
Page 59: ...ORTHOPHOS XG 2 Messages...
Page 124: ...59 38 399 D3352 2 66 D3352 076 01 13 02 07 2008 2 6 List of available service routines Tab 2...
Page 125: ...ORTHOPHOS XG 3 Troubleshooting...
Page 153: ...ORTHOPHOS XG 4 Adjustment...
Page 269: ...ORTHOPHOS XG 5 Service routines...
Page 433: ...ORTHOPHOS XG 6 Repair...
Page 436: ...59 38 399 D3352 6 4 D3352 076 01 13 02 07 2008 Tab6...
Page 530: ...59 38 399 D3352 6 98 D3352 076 01 13 02 07 2008 6 21 Replacing cables Tabs 6...
Page 531: ...ORTHOPHOS XG 7 Maintenance...
Page 577: ...b 59 38 399 D3352 D3352 076 01 13 02 07 2008...


