


båÖäáëÜ
59 38 399 D3352
D3352.076.01.13.02
07.2008
6 – 7
Tab 6
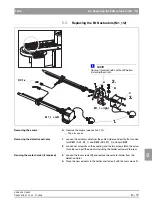
6.1 Replacing the height adjustment motor (M1_4)/spindle
6.1
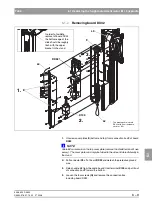
Securing the slide position
z
Make a mark at the position of the upper limit stop.
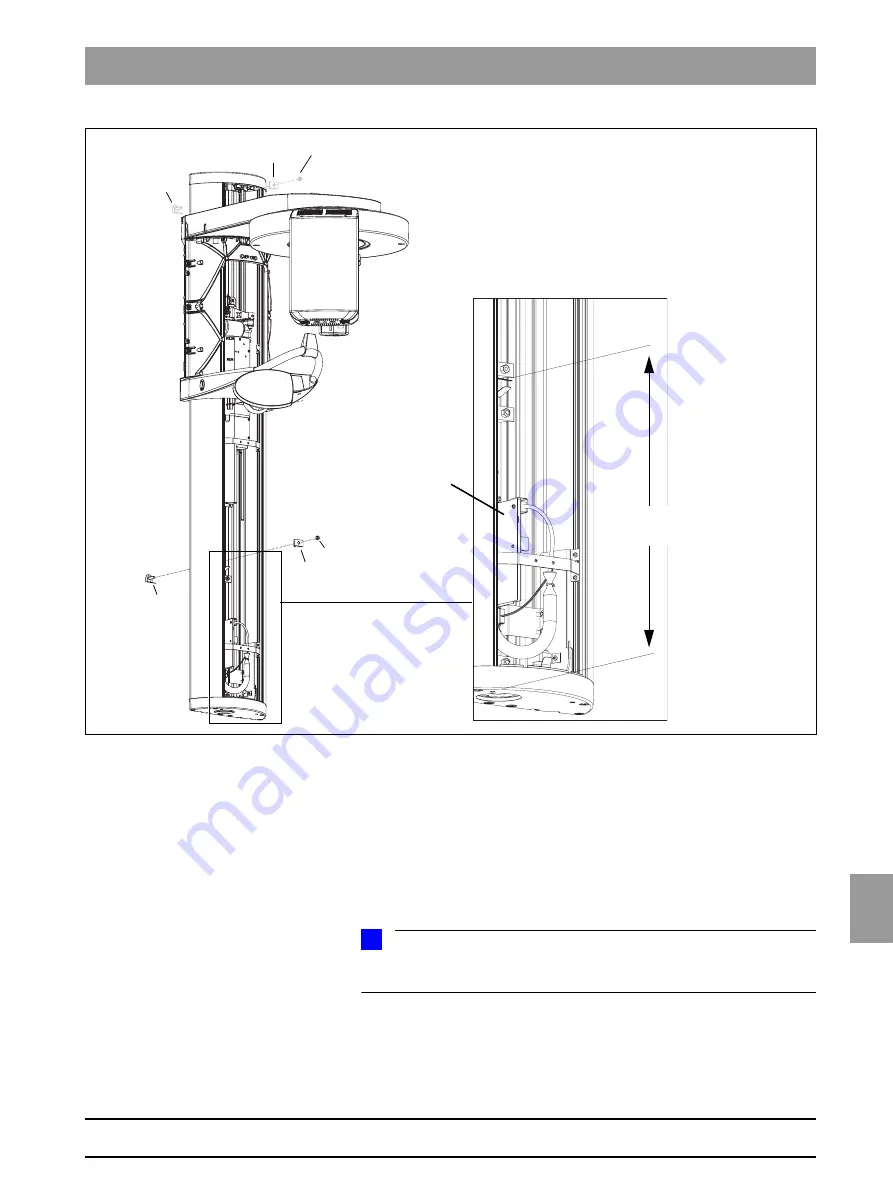
3.
Loosen nut
G
on upper profile clamp
H
and remove upper limit stop
J
from
the stand.
4.
Install limit stop
J
above the lower limit stop so that there is a distance of
approx.
560 mm ( 22’’)
between the lower edge of the unit and the lower
edge of the limit stop.
z
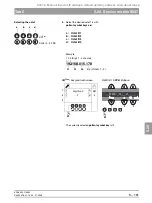
Use the UP/DOWN keys on the Easypad (XG
Plus
) or Multipad
(XG 5 / 3 / 3 PPE) to move the slide downward.
NOTE
i
If the height adjustment motor is inoperative, you can also move the slide man-
ually (see page 6-6).
z
Switch the unit
OFF
and
de-energize
it.
4.
G
H
J
J
G
H
3.
approx. 560 mm
DX41*
*
Board DX41 is omitted in unit
HW version BA and higher.
approx. 22’’
Summary of Contents for ORTHOPHOS XG 3 DS
Page 4: ......
Page 9: ...ORTHOPHOS XG 1General information...
Page 12: ...59 38 399 D3352 1 4 D3352 076 01 13 02 07 2008 Tab1...
Page 59: ...ORTHOPHOS XG 2 Messages...
Page 124: ...59 38 399 D3352 2 66 D3352 076 01 13 02 07 2008 2 6 List of available service routines Tab 2...
Page 125: ...ORTHOPHOS XG 3 Troubleshooting...
Page 153: ...ORTHOPHOS XG 4 Adjustment...
Page 269: ...ORTHOPHOS XG 5 Service routines...
Page 433: ...ORTHOPHOS XG 6 Repair...
Page 436: ...59 38 399 D3352 6 4 D3352 076 01 13 02 07 2008 Tab6...
Page 530: ...59 38 399 D3352 6 98 D3352 076 01 13 02 07 2008 6 21 Replacing cables Tabs 6...
Page 531: ...ORTHOPHOS XG 7 Maintenance...
Page 577: ...b 59 38 399 D3352 D3352 076 01 13 02 07 2008...