


59 38 399 D3352
6 – 22
D3352.076.01.13.02
07.2008
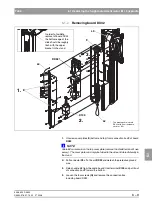
6.5 Replacing the Easypad (XG
Plus
) or the Multipad (XG 5 / 3 / 3 PPE)
Tabs 6
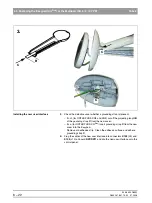
Installing the new user interface
3.
Check the defective cover whether a grounding strap ist present.
– If not, (for ORTHOPHOS XG3 and XG5) cut off the projekting length
B
of the gounding strap
C
from the new cover
.
– If so, (for ORTHOPHOS XG
Plus
) insert grounding strap
C
from the new
cover into the Easypad.
Remove old adhesive strip. Clean the adhesive surface and adhere
grounding strap
C
.
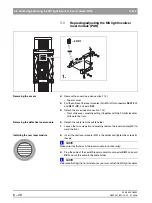
z
Plug the cables of the new user interface into connectors
X102
(L9) and
X103
(L10) on board
DX7/DX71
and clip the new user interface onto the
control panel.
C
B
C
3.
C
Summary of Contents for ORTHOPHOS XG 3 DS
Page 4: ......
Page 9: ...ORTHOPHOS XG 1General information...
Page 12: ...59 38 399 D3352 1 4 D3352 076 01 13 02 07 2008 Tab1...
Page 59: ...ORTHOPHOS XG 2 Messages...
Page 124: ...59 38 399 D3352 2 66 D3352 076 01 13 02 07 2008 2 6 List of available service routines Tab 2...
Page 125: ...ORTHOPHOS XG 3 Troubleshooting...
Page 153: ...ORTHOPHOS XG 4 Adjustment...
Page 269: ...ORTHOPHOS XG 5 Service routines...
Page 433: ...ORTHOPHOS XG 6 Repair...
Page 436: ...59 38 399 D3352 6 4 D3352 076 01 13 02 07 2008 Tab6...
Page 530: ...59 38 399 D3352 6 98 D3352 076 01 13 02 07 2008 6 21 Replacing cables Tabs 6...
Page 531: ...ORTHOPHOS XG 7 Maintenance...
Page 577: ...b 59 38 399 D3352 D3352 076 01 13 02 07 2008...