Using: Border Workshop
221
Adding a Photo Item
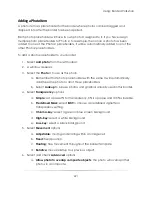
A photo item is a placeholder for the border where photos can be dragged and
dropped into after the border has been applied.
Each photo placeholder will have its own photo # assigned to it. If you have assign
multiple photo placeholders to Photo 2, for example, then once a photo has been
added to one of the Photo 2 placeholders, it will be automatically added to all of the
other Photo 2 placeholders.
To add a photo placeholder to your border:
1.
Select
add photo
from the left toolbar.
2.
A window appears.
3.
Select the
Photo
# to use as this photo.
a.
Remember that photo placeholders with the same # will automatically
add the same photo to all of those placeholders.
b.
Select
Lookup
to browse photos and graphics already used in this border.
4.
Select
Transparency
options:
a.
Simple
: set a preset % for transparency. 0% is opaque and 100% is invisible.
b.
Predefined Mask
: select
Edit
to choose a predefined vignette or
transparency setting.
c.
Chroma-key
: select a green or blue screen background
d.
High-Key:
select a white background
e.
Low-key:
select a black background
5.
Select
Movement
options:
a.
Adjustable:
moving and scaling within an image cell
b.
Fixed:
fixed position
c.
Floating:
free movement throughout the border template
d.
Relative:
moves relative to a previous object
6.
Select and check
Advanced
options:
a.
Allow photo to overlap composite objects
: the photo will overlap other
photos in a composite.
Summary of Contents for Studio Solution
Page 1: ...User Guide ...
Page 366: ...Index 366 Zoom 296 ...

