


16.1 Checking Servo motor and SERVOPACK
16-3
16.1.2 Checking SERVOPACK
The following table summarizes how to check the SERVOPACK. You need not conduct a daily
check; however, conduct a check once a year at least.
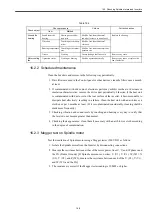
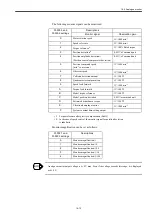
A guide line of parts replacement timing
The following parts become worn or degraded over years. Conduct a periodical check.
As to the SERVOPACKs that we made an overall repair, we are returning them to users with
resetting their user-defined constants to standard values. Be sure to check user-defined con-
stants before starting operation.
Operating conditions
• Ambient temperature: 30
℃
on average
• Load factor: 80% or less
• Availability: 20 hours or less per day
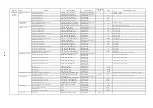
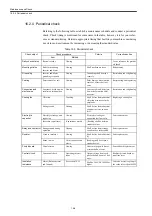
Table 16.2 SERVOPACK check
Check item
Check timing
Check method
Corrective action
Cleaning of main
unit and board
Once per year at
least
Shall be free from adherents
such as dirt, dust, and oil.
Clean with a cloth or air.
Loose screw
Once per year at
least
Fixing screws shall not be
loose on terminal blocks and
connectors etc.
Retighten the screws.
Failed parts on
main unit or
boards
Once per year at
least
Shall be free from discolora-
tion, breakage, wire-break
resulting from heat genera-
tion.
Contact us.
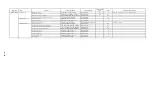
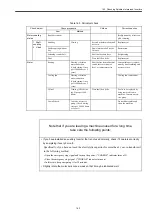
Table 16.3 Periodical parts check
Part name
Standard
replacement
timing
Replacement method etc.
Cooling fan
4-5 years
Replace with new one
Smoothing capacitor
7-8 years
Replace with new one (after a check.)
Relays
-
Determine after a check.
Fuse
10 years
Replace with new one
Aluminum electrolytic
capacitor on printed
board
5 years
Replace entire board with new one (after
a check.)
Summary of Contents for CNC Series
Page 1: ...Maintenance Manual Serviceman Handbook MANUAL No NCSIE SP02 19 Yaskawa Siemens CNC Series...
Page 26: ...Part 1 Hardware...
Page 38: ...System Configuration 1 2 3 Spindle motor designations 1 12...
Page 58: ...Installing the control panels 2 3 5 Installing lightning surge absorbers 2 20...
Page 62: ...Installing the motors 3 4...
Page 84: ...Connection method 4 3 2 Setting the rotary switches on the inverters and servo units 4 22...
Page 96: ...Part 2 Software...
Page 102: ...Software configuration 6 6...
Page 113: ...7 2 Network settings 7 11 8 Click on the radio button to the left of Specify an IP address...
Page 121: ...7 2 Network settings 7 19...
Page 122: ...Part 3 PLC...
Page 154: ...Part 4 Setting up and maintenance...
Page 160: ...Overview of System 10 1 2 Basic operation 10 6...
Page 204: ...How to use Digital Operation 12 2 9 Setting the password setting for write prohibit 12 32...
Page 327: ...Error and Troubleshooting 15 4...
Page 328: ...15 1 Errors without Alarm Display and Troubleshooting 15 5...
Page 329: ...Error and Troubleshooting 15 6...
Page 343: ...Maintenance and Check 16 3 3 Setting up Initializing Absolute encoder 16 14...


