


SIMATIC manager and hardware configuration
9.2.3 Opening the hardware configuration
9-6
9.2.3 Opening the hardware configuration
For hardware environment settings, such as PLC module configuration, CPU environment
setting, and module address setting, you will use the hardware configuration screen to open
the hardware configuration.
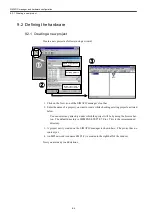
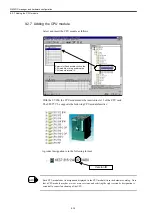
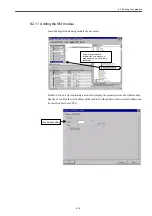
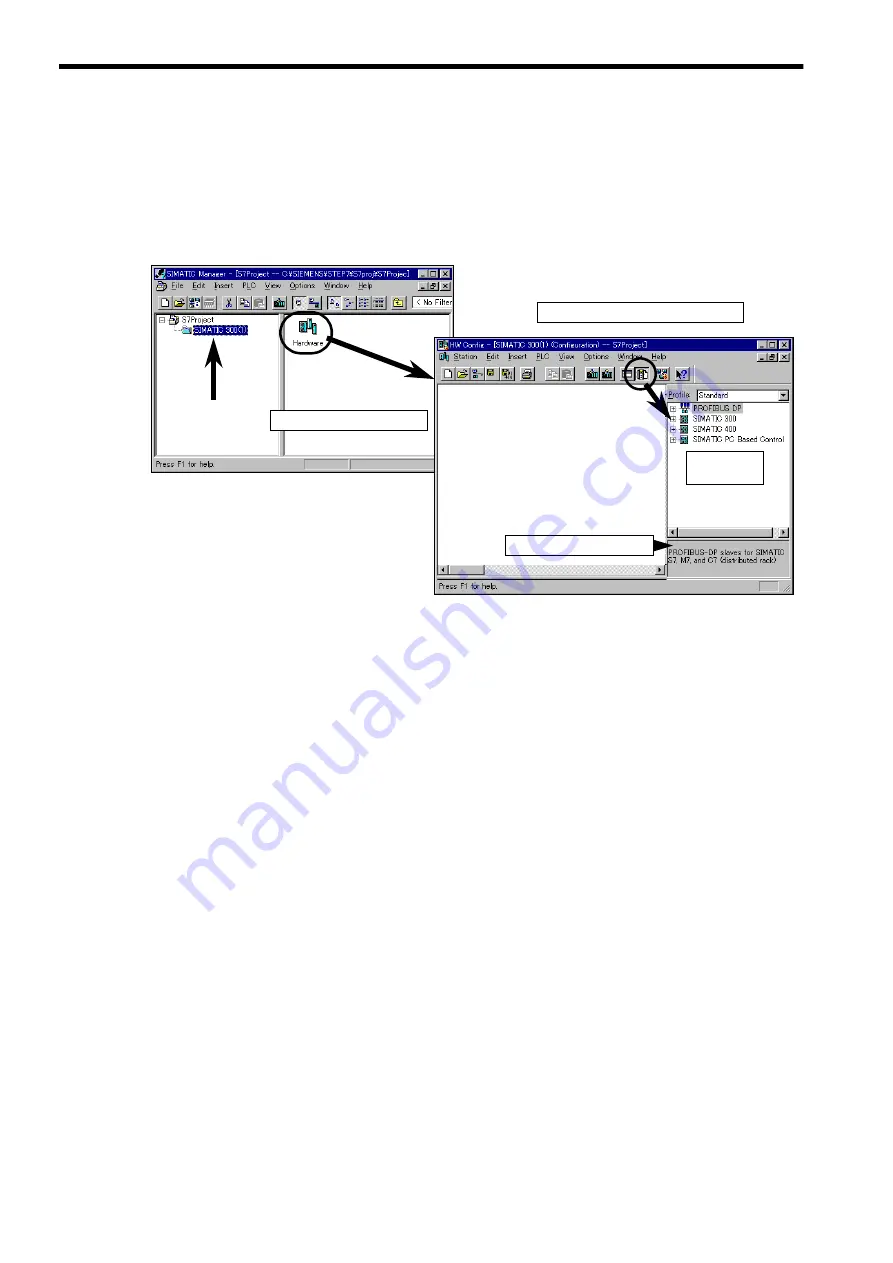
1. Click on a station (SIMATIC 300 Station (1) in this example) in the SIMATIC manager
screen.
2. Double-click on the Hardware icon in the right frame.
The hardware configuration function will start up.
If the selected station has its hardware already configured, that hardware configuration
is displayed. If not, a blank window results (see the figure above).
3. Click on the catalog icon of the hardware configuration screen’s tool bar.
A hardware catalog is displayed listing the modules and other products for the
SIMATIC300, SIMATIC400, and PROFIBUS-DP categories.
You can create a new hardware configuration in the hardware configuration window using
these products. For example, click on the plus sign (+) before the SIMATIC300 category in
the hardware catalog, and the following product groups will be displayed:
②
②
②
②
①
①
①
①
ハードウェアコンフィグレーション画面
Hardware configuration screen
ハードウェアをダブルクリック
Double-click on Hardware
ハードウェア
カタログ
Hardware
catalog
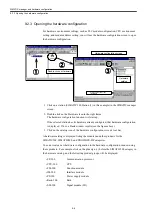
③
③
③
③
Order number and other
information
•
CP-300
Communication processor
•
CPU-300
CPU
•
FM-300
Function module
•
IM-300
Interface module
•
PS-300
Power supply module
•
Rack-300
Rack
•
SM-300
Signal module (I/O)
Summary of Contents for CNC Series
Page 1: ...Maintenance Manual Serviceman Handbook MANUAL No NCSIE SP02 19 Yaskawa Siemens CNC Series...
Page 26: ...Part 1 Hardware...
Page 38: ...System Configuration 1 2 3 Spindle motor designations 1 12...
Page 58: ...Installing the control panels 2 3 5 Installing lightning surge absorbers 2 20...
Page 62: ...Installing the motors 3 4...
Page 84: ...Connection method 4 3 2 Setting the rotary switches on the inverters and servo units 4 22...
Page 96: ...Part 2 Software...
Page 102: ...Software configuration 6 6...
Page 113: ...7 2 Network settings 7 11 8 Click on the radio button to the left of Specify an IP address...
Page 121: ...7 2 Network settings 7 19...
Page 122: ...Part 3 PLC...
Page 154: ...Part 4 Setting up and maintenance...
Page 160: ...Overview of System 10 1 2 Basic operation 10 6...
Page 204: ...How to use Digital Operation 12 2 9 Setting the password setting for write prohibit 12 32...
Page 327: ...Error and Troubleshooting 15 4...
Page 328: ...15 1 Errors without Alarm Display and Troubleshooting 15 5...
Page 329: ...Error and Troubleshooting 15 6...
Page 343: ...Maintenance and Check 16 3 3 Setting up Initializing Absolute encoder 16 14...


