


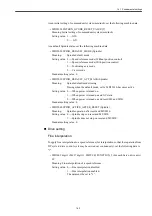


Drive system overview 1
13-2
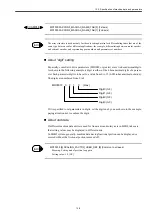
13.1 System configuration
The following figure shows 840DI drive system configuration overview.
Main features of the system are:
• Multi-axis drive system consisting of MRX-type converter unit (Converter), SGDK-type
drive unit (Servo drive), and MX-type spindle drive unit (Spindle drive).
• Each Converter can accommodate up to 7 units of Servo drives and Spindle drives. For
multi-axis configuration, more than 1 Converter can be connected.
• "PROFIBUS" network (PROFIBUS) is used as an interface with CNC. The Converter
performs network processing for all axes.
• In order to reduce wiring to CNC, absolute encoder battery is embedded; and emergency
stop signal input/output, brake signal output, and latch signal input are input/output to
Drive system.
• Digital operator, connected to a Converter, can be used for both a Servo drive and a
Spindle drive in common.
Hardware
timer
Converter
Drive #2
Battery
Data bus
Battery
Latch signal
(2 ch)
Data bus
Latch signal
Battery
Drive #1
PROFIBUS
Drive #n(Up to seven axis)
Data bus
Latch signal
Battery
Converter or i/O
Converter or i/O
Emergency
stop
Contactor
200 VAC
Motor
power
Encoder
Brake
Motor
power
Encoder
Brake
Motor
power
Encoder
Brake
ON/OFF
Motor#1
Motor#2
Motor#n
DC power
Digital
operator
Analogue
monitor
(2 ch)
Analogue
monitor
(2 ch)
Analogue
monitor
(2 ch)
PROFIBUS
i/F
(MMC board)
PROFIBUS
i/F
PLC (MMC board)
・
PLC application
NCK (PCU)
・
NCK application
・
CNC program analysis
・
Interpolation, acceleration/
deceleration
・
Position control
(Processing at CNC)
・
Backlash and pitch error
correction
HMI (PCU)
・
HMI application
840DI
Via
PROFIBUS
I/O
(OP)
(OP)
Summary of Contents for CNC Series
Page 1: ...Maintenance Manual Serviceman Handbook MANUAL No NCSIE SP02 19 Yaskawa Siemens CNC Series...
Page 26: ...Part 1 Hardware...
Page 38: ...System Configuration 1 2 3 Spindle motor designations 1 12...
Page 58: ...Installing the control panels 2 3 5 Installing lightning surge absorbers 2 20...
Page 62: ...Installing the motors 3 4...
Page 84: ...Connection method 4 3 2 Setting the rotary switches on the inverters and servo units 4 22...
Page 96: ...Part 2 Software...
Page 102: ...Software configuration 6 6...
Page 113: ...7 2 Network settings 7 11 8 Click on the radio button to the left of Specify an IP address...
Page 121: ...7 2 Network settings 7 19...
Page 122: ...Part 3 PLC...
Page 154: ...Part 4 Setting up and maintenance...
Page 160: ...Overview of System 10 1 2 Basic operation 10 6...
Page 204: ...How to use Digital Operation 12 2 9 Setting the password setting for write prohibit 12 32...
Page 327: ...Error and Troubleshooting 15 4...
Page 328: ...15 1 Errors without Alarm Display and Troubleshooting 15 5...
Page 329: ...Error and Troubleshooting 15 6...
Page 343: ...Maintenance and Check 16 3 3 Setting up Initializing Absolute encoder 16 14...


