May 2013
6-19
Xerox® WorkCentre® 5790 Family
GP 4
General Procedures/Information
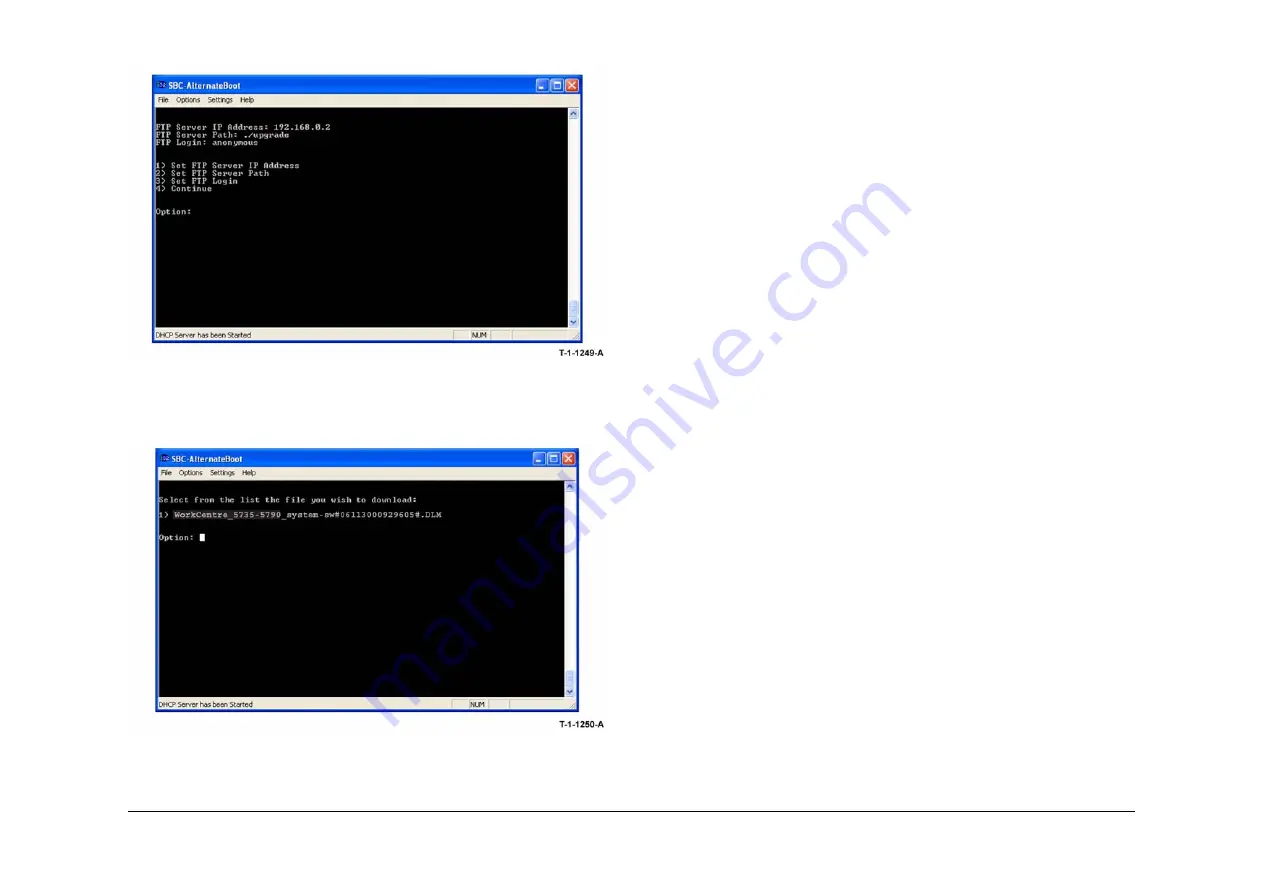
16. From the next menu,
Figure 19
, select option 4, Continue.
Figure 19 Option menu
17. From the next menu,
Figure 20
, select the correct DLM file to download to the machine. A
transfer progress window will then open.
Figure 20 DLM list
18. After the DLM file has been downloaded to the machine, the Software Upgrade start
screen will display on the UI,
Figure 21
.
NOTE: If the Upgrade Failed screen,
Figure 24
displays at this time, it is an indication of
hard disk failure. Refer to the
03C
Hard Disk Failure RAP.
19. After approximately 1 minute the upgrade will begin and the progress screen will open,
Figure 22
.
NOTE: If the upgrade process screen is not displayed after 2 minutes, restart the pro-
cess.
20. The Forced AltBoot process should complete after approximately 25 minutes and the Alt-
Boot complete screen will open,
Figure 23
. Ignore the instruction to remove the USB flash
drive, only press 0 to continue.
21. If the Forced AltBoot process fails, the AltBoot failed screen will open,
Figure 24
. Follow
the on screen instructions. Restart the procedure and refer to
Troubleshooting
as neces-
sary.
22. The UI displays the Data Encryption/Decryption in progress screen,
Figure 25
.
NOTE: Do not switch off the machine until directed to on the UI. During the reboot, the
hard disk drive is encrypted. Switching off the machine can cause only partial encryption
of the hard disks partitions. The Forced AltBoot process may need to be re-run if power is
removed at this step.
23. The machine will reboot several times before returning to a ready state. If a power on fail-
ure screen appears, switch off, then switch on the machine,
GP 14
.
24. Disconnect the null modem serial cable from the PWS serial port and the machine.
25. Disconnect the special crossover ethernet cable from the PWS network and the machine.
26. Connect the ethernet cable to the machine.
27. Check that the software set has been installed. Refer to the printed software upgrade
report or by pressing the machine status button.
28. If the NVM was saved at the beginning of this procedure, perform a NVM restore, refer to
GP 5
.
Summary of Contents for WorkCentre 5790 Series
Page 1: ...Xerox WorkCentre 5790 Family Service Manual 708P90298 May 2013 ...
Page 4: ...May 2013 ii Xerox WorkCentre 5790 Family Introduction ...
Page 20: ...May 2013 xviii Xerox WorkCentre 5790 Family Translation of Warnings Introduction ...
Page 22: ...May 2013 1 2 Xerox WorkCentre 5790 Family Service Call Procedures ...
Page 32: ...May 2013 1 12 Xerox WorkCentre 5790 Family SCP 7 Service Call Procedures ...
Page 53: ...May 2013 2 21 Xerox WorkCentre 5790 Family 01B Status Indicator RAPs Figure 1 3 3V Return ...
Page 54: ...May 2013 2 22 Xerox WorkCentre 5790 Family 01B Status Indicator RAPs Figure 2 3 3V Return ...
Page 56: ...May 2013 2 24 Xerox WorkCentre 5790 Family 01B Status Indicator RAPs Figure 3 5V Return ...
Page 57: ...May 2013 2 25 Xerox WorkCentre 5790 Family 01B Status Indicator RAPs Figure 4 5V Return ...
Page 59: ...May 2013 2 27 Xerox WorkCentre 5790 Family 01B Status Indicator RAPs Figure 5 12V Return ...
Page 61: ...May 2013 2 29 Xerox WorkCentre 5790 Family 01B Status Indicator RAPs Figure 6 24V Return ...
Page 62: ...May 2013 2 30 Xerox WorkCentre 5790 Family 01B Status Indicator RAPs Figure 7 24V Return ...
Page 63: ...May 2013 2 31 Xerox WorkCentre 5790 Family 01B Status Indicator RAPs Figure 8 24V Return ...
Page 95: ...May 2013 2 63 Xerox WorkCentre 5790 Family 01K Status Indicator RAPs Figure 2 Circuit diagram ...
Page 96: ...May 2013 2 64 Xerox WorkCentre 5790 Family 01K Status Indicator RAPs ...
Page 178: ...May 2013 2 146 Xerox WorkCentre 5790 Family 06 350 Status Indicator RAPs ...
Page 592: ...May 2013 2 560 Xerox WorkCentre 5790 Family 16B 16C Status Indicator RAPs ...
Page 596: ...May 2013 2 564 Xerox WorkCentre 5790 Family 19 409 Status Indicator RAPs ...
Page 698: ...May 2013 3 2 Xerox WorkCentre 5790 Family Image Quality ...
Page 736: ...May 2013 3 40 Xerox WorkCentre 5790 Family IQS 8 Image Quality ...
Page 742: ...May 2013 4 6 Xerox WorkCentre 5790 Family Repairs Adjustments ...
Page 772: ...May 2013 4 34 Xerox WorkCentre 5790 Family REP 3 4 Repairs Adjustments ...
Page 938: ...May 2013 4 200 Xerox WorkCentre 5790 Family REP 9 10 Repairs Adjustments ...
Page 994: ...May 2013 4 256 Xerox WorkCentre 5790 Family REP 11 17 110 Repairs Adjustments ...
Page 1014: ...May 2013 4 276 Xerox WorkCentre 5790 Family REP 11 15 120 Repairs Adjustments ...
Page 1166: ...May 2013 4 428 Xerox WorkCentre 5790 Family REP 14 20 Repairs Adjustments ...
Page 1168: ...May 2013 4 430 Xerox WorkCentre 5790 Family ADJ 3 1 ADJ 3 2 Repairs Adjustments ...
Page 1174: ...May 2013 4 436 Xerox WorkCentre 5790 Family ADJ 4 1 Repairs Adjustments ...
Page 1242: ...May 2013 4 504 Xerox WorkCentre 5790 Family ADJ 14 1 ADJ 14 2 Repairs Adjustments ...
Page 1386: ...May 2013 6 2 Xerox WorkCentre 5790 Family General Procedures Information ...
Page 1524: ...May 2013 6 140 Xerox WorkCentre 5790 Family Fax Tags General Procedures Information ...
Page 1526: ...May 2013 7 2 Xerox WorkCentre 5790 Family Wiring Data ...
Page 1554: ...May 2013 7 30 Xerox WorkCentre 5790 Family PJ Locations Wiring Data ...
Page 1604: ...May 2013 8 2 Xerox WorkCentre 5790 Family Accessories ...
Page 1606: ...May 2013 8 4 Xerox WorkCentre 5790 Family ACC 1 Accessories ...
Page 1610: ...XEROX EUROPE ...


