5-92
4
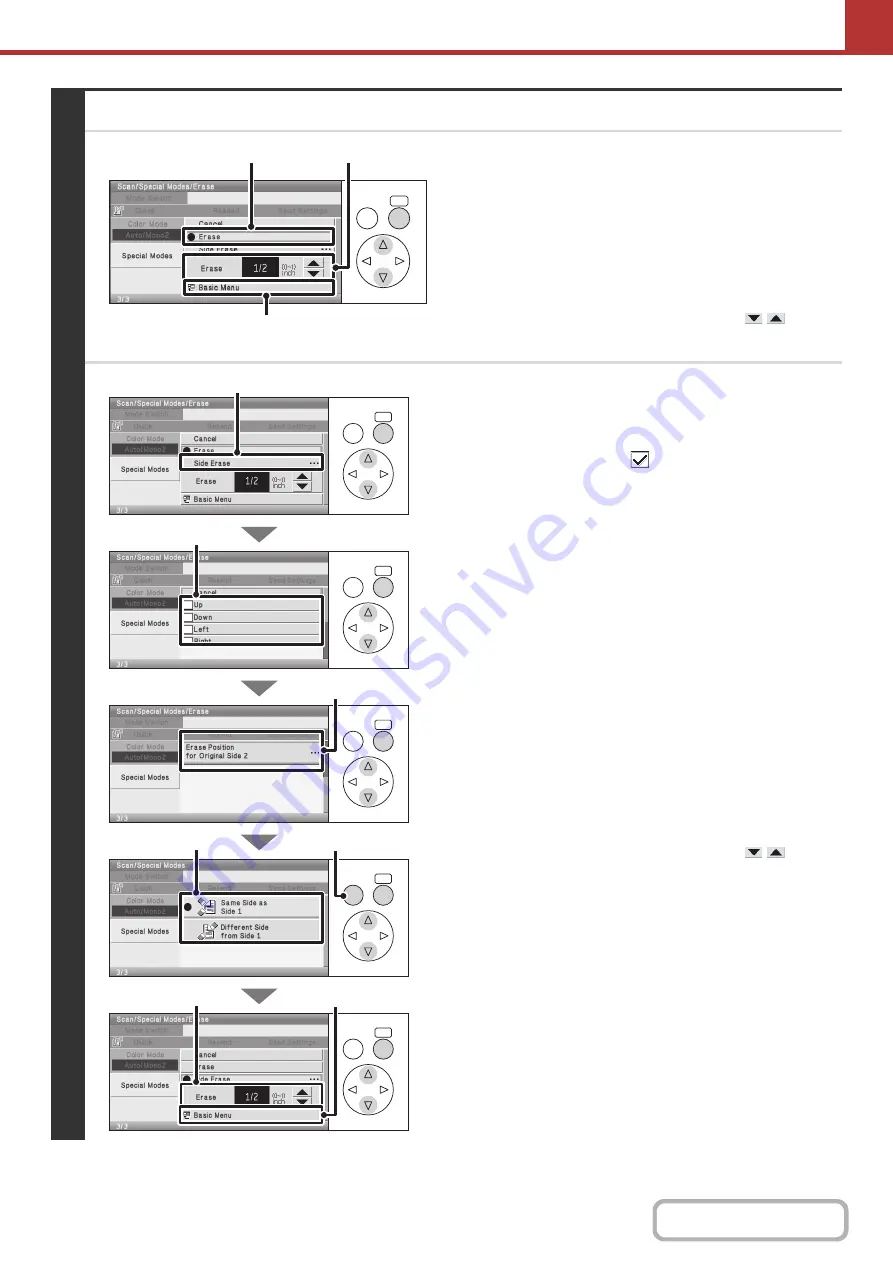
Select the erase settings.
●
When [Erase] is selected
(1) Select the [Erase] key.
(2) Set the erasure width.
Select the number display and press the [OK] key. A
number entry screen will appear. Enter the desired
number with the numeric keys and select the [OK] key in
the number entry screen.
0" to 1" (0 mm to 20 mm) can be entered.
You can also change the number with the
keys.
(3) Select the [Basic Menu] key.
●
When [Side Erase] is selected
(1) Select the [Side Erase] key.
(2) Set the sides to be erased.
Select the checkboxes
of the sides that you wish to
erase.
(3) Select the [Erase Position for Original Side 2]
key.
(4) Set the erase edge on the reverse side.
When performing two-sided scanning, set the erase edge
on the reverse side.
• If you select the [Same Side as Side 1] key, the edge in
the same position as on the front side will be erased.
• If you select the [Different Side from Side 1], the edge in
the position opposite to the erased edge on the front
side will be erased.
(5) Press the [BACK] key.
(6) Set the erasure width.
Select the number display and press the [OK] key. A
number entry screen will appear. Enter the desired
number with the numeric keys and select the [OK] key in
the number entry screen.
0" to 1" (0 mm to 20 mm) can be entered.
You can also change the number with the
keys.
(7) Select the [Basic Menu] key.
OK
BACK
(2)
(1)
(3)
OK
BACK
OK
BACK
OK
BACK
OK
BACK
OK
BACK
(1)
(2)
(4)
(6)
(7)
(5)
(3)
Summary of Contents for DX-C310 Operation
Page 5: ...Make a copy on this type of paper Envelopes and other special media Transparency film ...
Page 10: ...Conserve Print on both sides of the paper Print multiple pages on one side of the paper ...
Page 33: ...Search for a file abc Search for a file using a keyword ...
Page 34: ...Organize my files Delete a file Periodically delete files ...
Page 226: ...3 18 PRINTER Contents 4 Click the Print button Printing begins ...


