


5-13
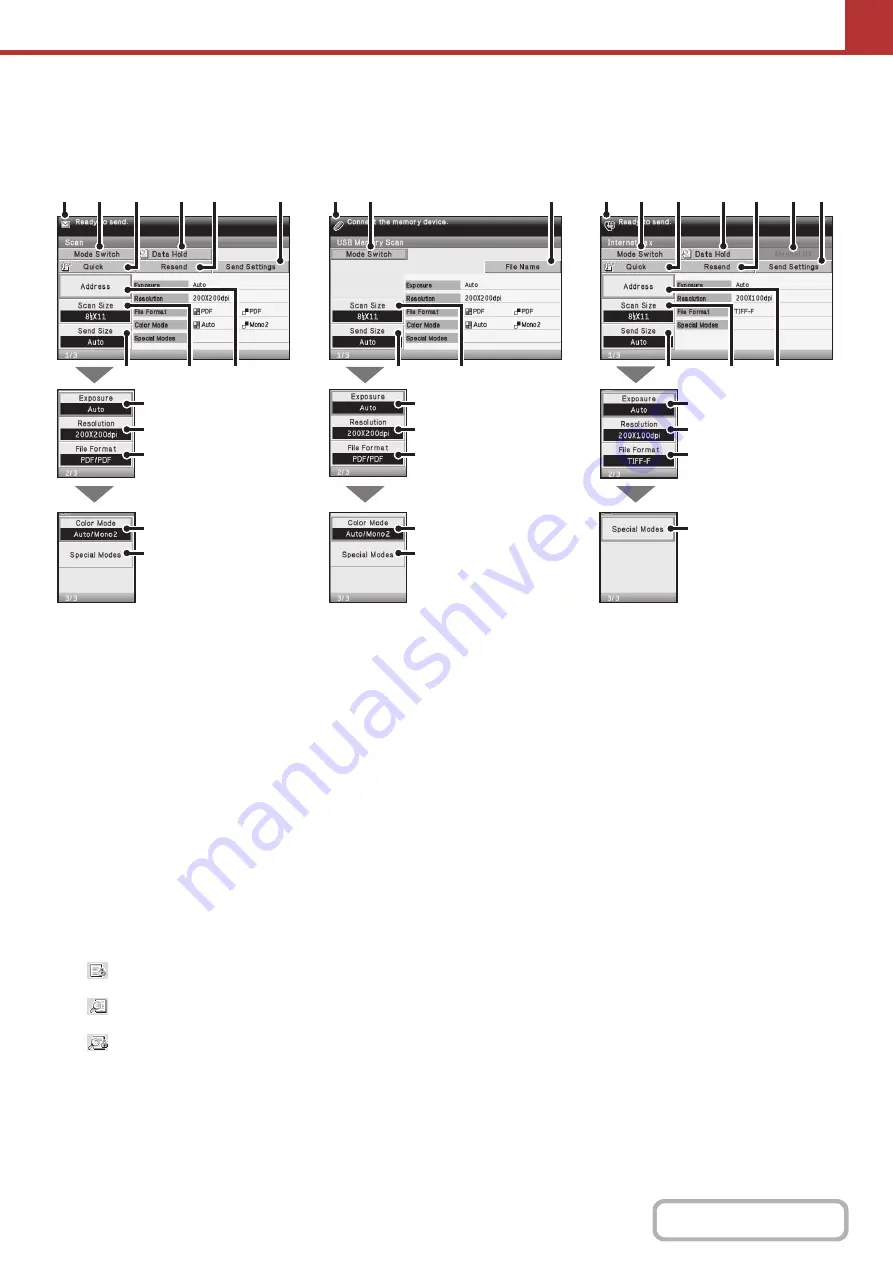
BASE SCREENS
Settings are selected in the base screen of each mode.
(1)
Various messages are displayed here.
The icon of the selected mode appears on the left.
(2)
[Mode Switch] key
Select one of these tabs to change the image send mode.
Modes that cannot be used because the corresponding
options are not installed do not appear.
☞
(page 5-12)
(3)
[Quick] key
Select this key to specify a destination using a search number.
*
* 3-digit number assigned to a destination when it is stored.
☞
USING A SEARCH NUMBER TO RETRIEVE A
DESTINATION
(page 5-26)
(4)
[Data Hold] key
When "Hold Setting for Received Data Print" or
"Received Data Image Check Setting" is enabled in the
system settings (administrator), this will appear when an
Internet fax is received.
: Only "Hold Setting for Received Data Print" is
enabled
: Only "Received Data Image Check Setting" is
enabled
: Both settings are enabled
☞
PRINTING A PASSWORD-PROTECTED FAX
(Hold Setting For Received Data Print)
(page 5-111)
☞
CHECKING THE IMAGE BEFORE PRINTING
(page 5-112)
(5)
[Resend] key/[Next Address] key
The destinations of the most recent 8 transmissions by
Scan to E-mail, fax and/or Internet fax are stored. Select
this key to select one of these destinations. After a
destination is selected, this key changes to the [Next
Address] key.
☞
☞
(6)
[Send Settings] key
Select this key to select or enter the subject, file name,
sender name, or body text, which has been previously
stored in the Web page.
Scan modes:
☞
CHANGING THE SUBJECT, FILE NAME,
REPLY-TO, AND BODY TEXT
Internet fax mode:
☞
CHANGING THE SUBJECT, FILE NAME, AND
BODY TEXT
(7)
[Address] key
Select this key to use a one-touch key or a group key.
☞
RETRIEVING A DESTINATION FROM THE
ADDRESS BOOK
(page 5-22)
(8)
[Scan Size] key
Select this key to select the image settings (original size,
duplex setup, image orientation) can be selected.
☞
(7)
(8)
(9)
(8)
(9)
(1)
(4)
(2)
(5)
(3)
(6)
(1)
(2)
(15)
(10)
(11)
(12)
(13)
(14)
(7)
(8)
(9)
(1)
(4)
(2)
(5)
(3)
(6)
(16)
(10)
(11)
(12)
(13)
(14)
(10)
(11)
(12)
(14)
Base screen of scan mode
Base screen of USB memory mode
Base screen of Internet fax mode
Summary of Contents for DX-C310 Operation
Page 5: ...Make a copy on this type of paper Envelopes and other special media Transparency film ...
Page 10: ...Conserve Print on both sides of the paper Print multiple pages on one side of the paper ...
Page 33: ...Search for a file abc Search for a file using a keyword ...
Page 34: ...Organize my files Delete a file Periodically delete files ...
Page 226: ...3 18 PRINTER Contents 4 Click the Print button Printing begins ...